
©Sassy n Simple Tutorials
GRAVEYARD BANSHEE
GRAVEYARD BANSHEE
Date Written: Sept 29, 2010
THINGS YOU NEED
Paintshop or Corel Program
You will need a good working knowledge of the program.t is your responsibility to have or find the programs needed if no link is available.
TUBE: Keith Garvey PTU you must buy it he is now at PTE
KIT: Angels Designz Tagger Kit FTU HERE
FONT: Of choice I used Dafonts FTU LunacyMore
MASK: SnSMask O1 HERE
PLUGINS: Eye Candy 5 Nature Smoke DEMO
ANIMATION SHOP
READ BELOW BEFORE STARTING
Settings may differ slightly depending on your version.
Close original after you copy it unless I state otherwise.
Sharpen all re-sized items 1 time.
RE-SIZE Only one Layer unless I state otherwise
Refer to my image for placement of items.
Left click and right click refers to mouse buttons.
Now Lets Start
Open your tube and mask before starting.
1. Open a new transparent Image 500x450
Selections/Select all
Select paper 9 from the Kit Edit/copy
Edit/paste into selection
Keep Selected
2. Layers palette/right click raster 1/add a new raster layer
Select paper 11 from the kit Edit/copy
Edit/paste into selection
Selections/modify/contract 8
Edit/cut (or hit delete on keyboard)
Selections/select none
3. Effects/3D/Drop shadow (settings below)
Go back and apply drop shadow again but
Change Horizontal and Vertical to -2
4. Layers palette/right click raster 2/add new raster layer
Selections/Select all
Edit/paste Paper 11 into selection
(you should still have it on clipboard)
Selections/select none
5. Under Layers on your tool bar select new mask layer/from image.
Select snsMask01 in the window.
source Luminance is checked and invert mask data is checked
Click OK
6. Layers palette/right click black/white mask
Delete
Would you like this mask merged into layer below YES
Layers palette/right click top mask/ merge/merge group
Re-size mask 90% smart size one layer
7. Effects/ 3D/drop shadow same settings
But change Horizontal and vertical back to 2

8. Select the MoonWCrow from the kit Edit/copy
Edit/paste as new layer into image
Re-size it 30%
Apply same drop shadow
Move to right top corner of image
Re-size 50%
Apply same drop shadow
Place center of image at bottom barely away from border
Make sure not to save changes when you close original image
9. Select the tomstones from the kit Edit/copy
Edit/paste as new layer into image
Re-size 65%
Apply same drop shadow
Move up to the top of your image some (refer to my image)
Layers palette/right click any layer/merge/merge visible
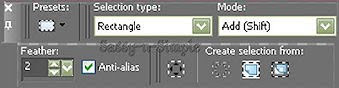
10. Select the Path from Kit
Make ruler viewable by clicking view check ruler
With your selection tool (settings below)
Starting at 300 on side of image draw out rectangle
See Image
Go to step 11
 11. Edit/copy that Selection
Edit/paste as new layer into your image
Re-size 50%
Apply same drop shadow
Move to center of tombstones at the bottom of them
12. Select the Fence from the kit Edit/copy
Edit/paste as new layer into image
Re-size 35%
Apply drop shadow
Move to right side of image bottom just below tombstones bottom edge
13. Still on fence
Layers palette/right click fence layer/duplicate 1 time
Image/mirror
Adjust fence so that there is a slight gap in the center of them
14. Select the crow from the kit Edit/copy
Edit/paste as new layer into image
Re-size 25%
Apply same drop shadow
Move to left side as if it were sitting on fence bar
15. Select the rat from the Kit Edit/copy
Edit/paste as new layer into image
Re-size 30%
Apply same drop shadow
Move to right side of image at bottom of fence
16. Select Tree 2 from the kit Edit/copy
Edit/paste as new layer into image
Re-size 75%
Apply came drop shadow
Move to left side of image so that bottom is at bottom of mask
17. Select your tube Edit/copy
Edit/paste as new layer into image
Re-size as needed I re-sized 75%
Apply same drop shadow
Center in path
18. Add your text at this time The text I used was
LunacyMore FTU from Dafonts
19. Add new layers and apply your copyrights and watermarks
20. Layers palette close of bottom merged layer
Right click any open layer/merge/merge visible
You can save as jpeg or continue to animation part
ANIMATION
1. Layers palette/right click bottom raster 1 layer/add new raster layer
Effects/plugins/eye candy 5 nature/ smoke
(Settings below)
Layers palette take opacity down to 40%
Layers palette click the eye to close layer
Edit/paste as new layer into image
Re-size it 30%
Apply same drop shadow
Move to right top corner of image
Re-size 50%
Apply same drop shadow
Place center of image at bottom barely away from border
Make sure not to save changes when you close original image
9. Select the tomstones from the kit Edit/copy
Edit/paste as new layer into image
Re-size 65%
Apply same drop shadow
Move up to the top of your image some (refer to my image)
Layers palette/right click any layer/merge/merge visible
10. Select the Path from Kit
Make ruler viewable by clicking view check ruler
With your selection tool (settings below)
Starting at 300 on side of image draw out rectangle
See Image
Go to step 11
 11. Edit/copy that Selection
Edit/paste as new layer into your image
Re-size 50%
Apply same drop shadow
Move to center of tombstones at the bottom of them
12. Select the Fence from the kit Edit/copy
Edit/paste as new layer into image
Re-size 35%
Apply drop shadow
Move to right side of image bottom just below tombstones bottom edge
13. Still on fence
Layers palette/right click fence layer/duplicate 1 time
Image/mirror
Adjust fence so that there is a slight gap in the center of them
14. Select the crow from the kit Edit/copy
Edit/paste as new layer into image
Re-size 25%
Apply same drop shadow
Move to left side as if it were sitting on fence bar
15. Select the rat from the Kit Edit/copy
Edit/paste as new layer into image
Re-size 30%
Apply same drop shadow
Move to right side of image at bottom of fence
16. Select Tree 2 from the kit Edit/copy
Edit/paste as new layer into image
Re-size 75%
Apply came drop shadow
Move to left side of image so that bottom is at bottom of mask
17. Select your tube Edit/copy
Edit/paste as new layer into image
Re-size as needed I re-sized 75%
Apply same drop shadow
Center in path
18. Add your text at this time The text I used was
LunacyMore FTU from Dafonts
19. Add new layers and apply your copyrights and watermarks
20. Layers palette close of bottom merged layer
Right click any open layer/merge/merge visible
You can save as jpeg or continue to animation part
ANIMATION
1. Layers palette/right click bottom raster 1 layer/add new raster layer
Effects/plugins/eye candy 5 nature/ smoke
(Settings below)
Layers palette take opacity down to 40%
Layers palette click the eye to close layer

2. Layers palette/right click smoke layer raster2/add a new raster layer
Effects/plugins/eye candy 5 nature/ smoke
(Settings below)
Layers palette take opacity down to 40%
Layers palette click the eye to close layer
 3. Layers palette/right click smoke layer raster3/add a new raster layer
Effects/plugins/eye candy 5 nature/ smoke
Layers palette take opacity down to 40%
(Settings below)

Lets Take it to Animation shop Now
Open your animation shop
1. In PSP Edit/copy Merged
Take it to animation shop right click in workspace paste as new antimation
2. Back in PSP close of top raster 4 smoke layer
Open middle raster 3 layer
Edit/copy/copy merged
Take it to animation shop right click first frame
Paste/paste after current frame
3. Back in PSP close of middle raster 3 smoke layer
Open bottom raster 2 layer
Edit/copy/copy merged
Take it to animation shop right click first frame
Paste/paste after current frame
4. Now save your animation
If you use this tutorial to make a stat you must provide a credit in your footer
