
CHAOTIC CHRISTMAS

©SassynSimple Tutorials
Date Written: Dec 16, 2010
PROGRAMS NEEDED
Paintshop or Corel Program
ITEMS YOU NEED
TUBE: Of your Choice,
I used Keith Garvey PTU I bought it at MPT
I have a license for this tube
KIT: Fantasy Moments Tagger FTU Magical Christmas HERE
FONT: Of your Choice
MASK: of your Choice or Mine HERE
READ BELOW BEFORE STARTING
Settings may differ slightly depending on your version.
Close original after you copy it unless I state otherwise.
Sharpen all re-sized items 1 time.
RE-SIZE only one layer unless other wise stated.
Refer to my image for placement of items.
Left click and right click refers to mouse buttons.
Now Lets Start
1. Select your Tube minimize and the mask from my supplies
Minimize them for now
2. Open a new transparent image 600x500
Selections/Select All
Select paper 10 from the Kit
Edit/copy
Edit/paste into selection on your image
Keep Selected
3. Layers palette/right click raster 1 add new raster layer
Select Paper 14 from kit Edit/copy
Edit/paste into selection on your image
Selections/select none
4. Layers/new mask layer/from Image
(settings Below)
Select BBD_2010 Mask 02 in window
Or Mask you decided to use
Click OK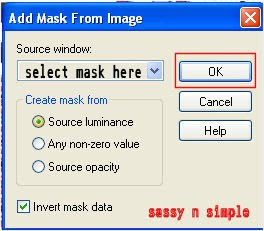
5. Layers palette/right click black/white mask
Delete
Would you like this mask merged into layer below YES
Layers palette/right click top mask/ merge/merge group
6. Select Element 25 wreath Edit/copy
Edit/paste as new layer into your image
Re-size it 55%
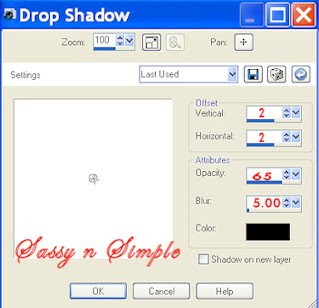
7. Effects/3D/Drop Shadow
(settings below)
8. Select Element 4 floral Edit/copy above wreath layer
Edit/paste as new layer into your image
Re-size it 45%
Apply same drop shadow
Move to top right side of wreath
9. Layers palette/right click floral duplicate 1 time
Image/mirror
10. Select Element 11 flower Edit/copy
Edit/paste as new layer into your image
Re-size it 35%
Apply same drop shadow
Move to left bottom of wreath
11. Select Element 9 flower Edit/copy
Edit/paste as new layer into your image
Re-size it 35%
Apply same drop shadow
Move to left side above other flower
12. Select your tube Edit/copy
Edit/paste as new layer into your image
Re-size as needed. I re-sized 65%
Apply same drop shadow
Center it in the wreath
13. Select Element 47 ball Edit/copy
Edit/paste as new layer into your image
Re-size it 35%
Apply same drop shadow
Place center right side of wreath
14. Select Element 66 gingerbread/ball Edit/copy
Edit/paste as new layer into your image
Re-size it 35%
Apply same drop shadow
Place on right side below other ball
15. Select Element 19 candle floral Edit/copy
Edit/paste as new layer into your image
Re-size it 35%
Apply same drop shadow
Center at bottom of wreath and tube
16. Add Your Text Now and Name now
17. Select your crop tool crop in close around image
Cutting off access paper
If you want to re-size image do so now
I re-sized mine so width was 475
18. Image/add borders symmetric checked
Size 3
Use dropper choose Light color
Repeat add border use dropper
choose dark color from image
Repeat add border use same light color
19. Apply your copyrights and watermark
20. Save your image in jpeg
Thanks for trying my tutorial I hope you enjoyed it.
If You use my tutorials in Stationary Please apply Credit
I would like to thank my testers at SassynSimple Group
For testing the tutorial and helping make it mistake free.

Date Written: Dec 16, 2010
PROGRAMS NEEDED
Paintshop or Corel Program
ITEMS YOU NEED
TUBE: Of your Choice,
I used Keith Garvey PTU I bought it at MPT
I have a license for this tube
KIT: Fantasy Moments Tagger FTU Magical Christmas HERE
FONT: Of your Choice
MASK: of your Choice or Mine HERE
READ BELOW BEFORE STARTING
Settings may differ slightly depending on your version.
Close original after you copy it unless I state otherwise.
Sharpen all re-sized items 1 time.
RE-SIZE only one layer unless other wise stated.
Refer to my image for placement of items.
Left click and right click refers to mouse buttons.
Now Lets Start
1. Select your Tube minimize and the mask from my supplies
Minimize them for now
2. Open a new transparent image 600x500
Selections/Select All
Select paper 10 from the Kit
Edit/copy
Edit/paste into selection on your image
Keep Selected
3. Layers palette/right click raster 1 add new raster layer
Select Paper 14 from kit Edit/copy
Edit/paste into selection on your image
Selections/select none
4. Layers/new mask layer/from Image
(settings Below)
Select BBD_2010 Mask 02 in window
Or Mask you decided to use
Click OK

5. Layers palette/right click black/white mask
Delete
Would you like this mask merged into layer below YES
Layers palette/right click top mask/ merge/merge group
6. Select Element 25 wreath Edit/copy
Edit/paste as new layer into your image
Re-size it 55%
7. Effects/3D/Drop Shadow
(settings below)

8. Select Element 4 floral Edit/copy above wreath layer
Edit/paste as new layer into your image
Re-size it 45%
Apply same drop shadow
Move to top right side of wreath
9. Layers palette/right click floral duplicate 1 time
Image/mirror
10. Select Element 11 flower Edit/copy
Edit/paste as new layer into your image
Re-size it 35%
Apply same drop shadow
Move to left bottom of wreath
11. Select Element 9 flower Edit/copy
Edit/paste as new layer into your image
Re-size it 35%
Apply same drop shadow
Move to left side above other flower
12. Select your tube Edit/copy
Edit/paste as new layer into your image
Re-size as needed. I re-sized 65%
Apply same drop shadow
Center it in the wreath
13. Select Element 47 ball Edit/copy
Edit/paste as new layer into your image
Re-size it 35%
Apply same drop shadow
Place center right side of wreath
14. Select Element 66 gingerbread/ball Edit/copy
Edit/paste as new layer into your image
Re-size it 35%
Apply same drop shadow
Place on right side below other ball
15. Select Element 19 candle floral Edit/copy
Edit/paste as new layer into your image
Re-size it 35%
Apply same drop shadow
Center at bottom of wreath and tube
16. Add Your Text Now and Name now
17. Select your crop tool crop in close around image
Cutting off access paper
If you want to re-size image do so now
I re-sized mine so width was 475
18. Image/add borders symmetric checked
Size 3
Use dropper choose Light color
Repeat add border use dropper
choose dark color from image
Repeat add border use same light color
19. Apply your copyrights and watermark
20. Save your image in jpeg
Thanks for trying my tutorial I hope you enjoyed it.
If You use my tutorials in Stationary Please apply Credit
I would like to thank my testers at SassynSimple Group
For testing the tutorial and helping make it mistake free.