
©SassynSimple Tutorials
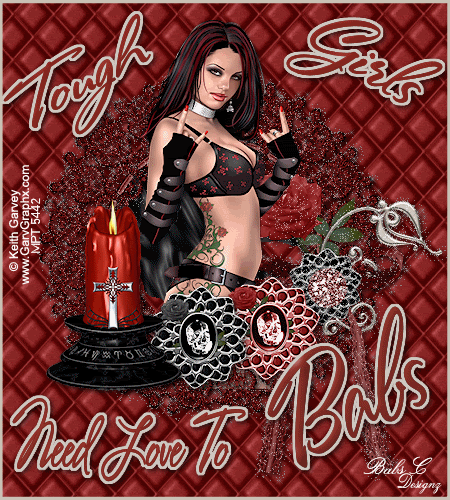
TOUGH GIRLS
DATE WRITTEN: Sept 25, 2009
THINGS NEEDED
PAINTSHOP PRO X2 OR SIMILAR PROGRAM. My tutorials can be adapted to other versions some settings may vary slightly.
You must have a good working knowledge of the programs I use.
TUBE: Keith Garvey I purchased it at MPT but you can buy it HERE
KIT: Linda’s Dream Designs PTU Kit You can purchase it here Dark DREAMS
PLUGINS: Eye Candy 4000 Bevel Boss, Xenoflex 2 Constellations
Let's Begin
First Please note that I will not repeat the following steps.
Once you set your drop shadow it will stay..
Always Close original image after you copy unless stated otherwise.
Always sharpen re-sized items one time.
1. Open your tube minimize for now
2. Open a new transparent image 450X500
Selections/select all.
Select paper 4 from the kit Under Edit copy
Edit/paste into Selection
Selections/select none
3. Select Frame 1 from the kit edit/copy
edit/paste into your image.
Re-size it 70%.
Effects/3D/drop shadow settings below.
Vertical and Horizontal set a 2
Opacity 70
Blur 8.00
Color Black
center frame
4. Still on your Frame layer select your magic wand
(settings Below)
click inside the frame window
Selections/modify Expand 10
Keep Selected

5. Add a new raster layer below your frame layer
Select paper 9 from the Kit edit/copy
edit/paste into selection
Selections/select none
6. Select your Tube edit/copy
edit/paste as new layer under your frame
Re-size it as needed
Place it in the center of the frame
7. Layers palette/Right Click Tube Layer/Duplicate 1 time
Now Right Click Duplicated Tube
Select Arrange/Bring To Top.
8. Select your Selections Tool (settings below)
Draw out a rectangle around the parts of your tube you do want to hide your frame you.
Then hit Delete on your keyboard.
Selections/select none.

9. Go Back to your Tube under your frame
apply same drop shadow
10. Select Brad Elements 3 and 4 from the kit
edit/Copy both of them
edit/paste as new layer into your image
Re-size them both to 30%.
Apply same drop shadow to both
Arrange them on the bottom part of your frame
11. Select Candle 1 from the Kit. Edit/Copy
Edit/paste into image as new layer
Re-size it 35%
Apply same drop shadow
Place it on the bottom right hand side of the frame
12. Using your dropper tool select colors from image
left click/foreground color
right click/background color
I pulled my colors from the candle
13. Select your Text Tool (settings Below)
a font of your Choice I used Stephanie Marie F.
Type out the word Tough.
Adjust your size and rotate left
layers palette/right click text layer convert to raster layer
(see image below).

14. Repeat Step 13 for the word Girls
But this time you will rotate your text to the right
15. Type out the bottom Text
once happy with size
Layers palette/right click text layer/convert to raster layer
16. Starting with your Top Text Layer Right Click Merge/merge down,
Till you have all the Text on one Layer.
17. Still on Text Layer Effects/Plugins/Eye Candy 4000 Bevel Boss
(Settings below)

18. Still on your Text layer
Under your Selections Tab do these steps
A. select all
B. select float
C. Select defloat
D modify expand 2
Keep selected
19. Layers palette right click/add new raster layer below text layer
Select your dropper tool
left click/foreground color select silver from your frame
Flood fill the text selections on the New layer
Selections/select none
20. Layers palette/right click top layer/add a new raster layer
Flood/fill layer with foreground color(silver)
Selections/select all
Selections/modify/contract 10
Hit delete on your keyboard
layers palette/right click rename this layer frame
21. Add a new raster layer
apply your watermarks and copyrights
ANIMATION
1. In PSP still
Layers palette/right click frame layer duplicate it 1 time
2. Staring with duplicate layer (top frame)
Go to Effects/Plugins/Xenoflex 2/ Constellations
Under the Settings Tab select small star constellations.
Then apply settings below
Layers palette/click the eye close off the copy of the frame (top)
3. Layers/palette/Select the original frame layer (bottom frame)
Apply the Constellations But hit random seed button 1 time.
4. Edit/copy/Copy merged
Take it to animation shop/right click anywhere paste as new animation
5. Back in PSP program close off the Bottom Frame layer
Open the top Frame layer.
Edit/Copy/copy merged
Take it to animation
right click first frame/paste/paste after current frame
Tutorial By. SassynSimple_BabsC
HERE or HERE
Copy and paste credit or use links below
http://groups.yahoo.com/group/sassynsimple/
http://sassynsimple.blogspot.com/
I want to thank the Members of SassynSimple Group for testing the Tutorial
I always appreciate their help in making the tutorials mistake free.

THINGS NEEDED
PAINTSHOP PRO X2 OR SIMILAR PROGRAM. My tutorials can be adapted to other versions some settings may vary slightly.
You must have a good working knowledge of the programs I use.
TUBE: Keith Garvey I purchased it at MPT but you can buy it HERE
KIT: Linda’s Dream Designs PTU Kit You can purchase it here Dark DREAMS
PLUGINS: Eye Candy 4000 Bevel Boss, Xenoflex 2 Constellations
Let's Begin
First Please note that I will not repeat the following steps.
Once you set your drop shadow it will stay..
Always Close original image after you copy unless stated otherwise.
Always sharpen re-sized items one time.
1. Open your tube minimize for now
2. Open a new transparent image 450X500
Selections/select all.
Select paper 4 from the kit Under Edit copy
Edit/paste into Selection
Selections/select none
3. Select Frame 1 from the kit edit/copy
edit/paste into your image.
Re-size it 70%.
Effects/3D/drop shadow settings below.
Vertical and Horizontal set a 2
Opacity 70
Blur 8.00
Color Black
center frame
4. Still on your Frame layer select your magic wand
(settings Below)
click inside the frame window
Selections/modify Expand 10
Keep Selected

5. Add a new raster layer below your frame layer
Select paper 9 from the Kit edit/copy
edit/paste into selection
Selections/select none
6. Select your Tube edit/copy
edit/paste as new layer under your frame
Re-size it as needed
Place it in the center of the frame
7. Layers palette/Right Click Tube Layer/Duplicate 1 time
Now Right Click Duplicated Tube
Select Arrange/Bring To Top.
8. Select your Selections Tool (settings below)
Draw out a rectangle around the parts of your tube you do want to hide your frame you.
Then hit Delete on your keyboard.
Selections/select none.

9. Go Back to your Tube under your frame
apply same drop shadow
10. Select Brad Elements 3 and 4 from the kit
edit/Copy both of them
edit/paste as new layer into your image
Re-size them both to 30%.
Apply same drop shadow to both
Arrange them on the bottom part of your frame
11. Select Candle 1 from the Kit. Edit/Copy
Edit/paste into image as new layer
Re-size it 35%
Apply same drop shadow
Place it on the bottom right hand side of the frame
12. Using your dropper tool select colors from image
left click/foreground color
right click/background color
I pulled my colors from the candle
13. Select your Text Tool (settings Below)
a font of your Choice I used Stephanie Marie F.
Type out the word Tough.
Adjust your size and rotate left
layers palette/right click text layer convert to raster layer
(see image below).

14. Repeat Step 13 for the word Girls
But this time you will rotate your text to the right
15. Type out the bottom Text
once happy with size
Layers palette/right click text layer/convert to raster layer
16. Starting with your Top Text Layer Right Click Merge/merge down,
Till you have all the Text on one Layer.
17. Still on Text Layer Effects/Plugins/Eye Candy 4000 Bevel Boss
(Settings below)

18. Still on your Text layer
Under your Selections Tab do these steps
A. select all
B. select float
C. Select defloat
D modify expand 2
Keep selected
19. Layers palette right click/add new raster layer below text layer
Select your dropper tool
left click/foreground color select silver from your frame
Flood fill the text selections on the New layer
Selections/select none
20. Layers palette/right click top layer/add a new raster layer
Flood/fill layer with foreground color(silver)
Selections/select all
Selections/modify/contract 10
Hit delete on your keyboard
layers palette/right click rename this layer frame
21. Add a new raster layer
apply your watermarks and copyrights
ANIMATION
1. In PSP still
Layers palette/right click frame layer duplicate it 1 time
2. Staring with duplicate layer (top frame)
Go to Effects/Plugins/Xenoflex 2/ Constellations
Under the Settings Tab select small star constellations.
Then apply settings below
Layers palette/click the eye close off the copy of the frame (top)

3. Layers/palette/Select the original frame layer (bottom frame)
Apply the Constellations But hit random seed button 1 time.
4. Edit/copy/Copy merged
Take it to animation shop/right click anywhere paste as new animation
5. Back in PSP program close off the Bottom Frame layer
Open the top Frame layer.
Edit/Copy/copy merged
Take it to animation
right click first frame/paste/paste after current frame
Tutorial By. SassynSimple_BabsC
HERE or HERE
Copy and paste credit or use links below
http://groups.yahoo.com/group/sassynsimple/
http://sassynsimple.blogspot.com/
I want to thank the Members of SassynSimple Group for testing the Tutorial
I always appreciate their help in making the tutorials mistake free.