©SassynSimple Tutorials
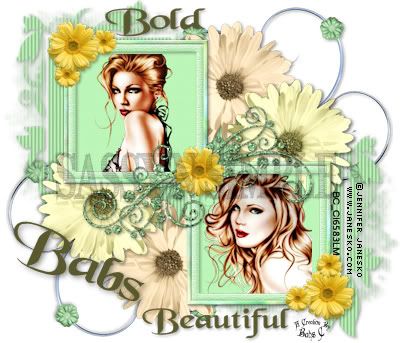
BOLD BEAUTIFUL
DATE WRITTEN: March 31, 2010
To do this Tutorial you need a Paintshop or a Corel program and Animation Shop. You must have a good working knowledge of the programs. Depending on your program settings may vary slightly.
TUBE: Of your choice
I am using the artwork of Jennifer Janesko was at it a CILM she is now HERE
KIT: Linda’s Dream Designs full size PTU Angel Chronicles 2nd Edition HERE
MASK: Gabeemask29-vi HERE
FONT: Of your choice I am using a DaFont Free font Black Chancey HERE
Read the following they will not repeated
Always Close original image after you copy unless stated otherwise.
Always sharpen re-sized items one time.
Right click, Left click refers to mouse buttons.
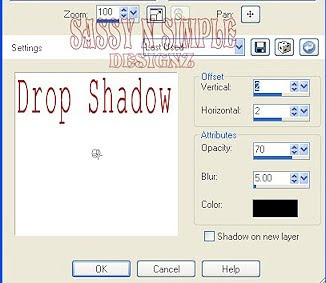
Drop shadow settings will always stay set
1. Open Tube and Gabeemask29-vi mask minimize for now.
2. Open a new transparent image 700x600 transparent image
Select white in your foreground color
Flood fill the image
3. Select doodle from the kit Edit/copy
Edit/paste as new layer into working image
Re-size it 40% Move to top right corner
Apply same drop shadow.
4. Still on doodle layer
Layers palette/right click duplicate 1 time
Image/mirror
Image/flip
5. Layers palette/right click/add new raster layer
Selections/select all
Keep selected
6. Select paper 4 from the kit Edit/copy
Edit/paste as new layer into working image
Selections/select none
7. Layers New Mask Layer/from Image
Select the Gabeemask29-vi mask in the window.
source luminance/checked
Invert mask data/checked click OK
8. Layers palette/Right click black/white mask
Delete/click yes.
next pop up window comes up select Yes
Right click mask layer Merge/merge group
9. Select frame 1 from the kit Edit/copy
Edit/paste as new layer into working image
Re-size the frame 50%
10. Effects/3D/drop shadow (settings below)
 11. Select your magic wand (settings below) click inside both windows of frame.
Selections/modify/expand 15
Keep selected.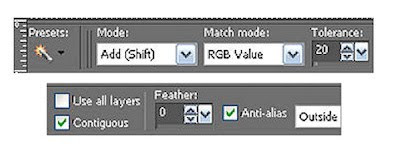
12. Layers palette/right click mask layer/add new raster layer
Select paper 11 from kit edit/copy
Edit/paste into selection
Selections/select none
13. Select your first close up tube Edit/copy
Edit/paste as new layer into working image below frame
Re-size as needed I re-sized 50%
Apply same drop shadow
Place in bottom right frame window center it
14. Select your second close up tube Edit/copy
Edit/paste as new layer into working image
Re-size as needed I re-sized 50%
Apply same drop shadowMove to top right frame window center it
15. Layers palette click on the eye on bottom layer
Right click any open layer/merge/merge visible
16. Select flower 6 from the kit Edit/copy
Edit/paste as new layer above mask layer
Re-size it 10%
Apply same drop shadow
Move to top right side of frame (see image)
17. Still on flower 6 layer
Layers palette/right click/duplicate 1 time
Image/mirror
Image/flip
Arrange it so that it shows but does not hide doodle
18. Select flower 7 from the kit Edit/copy
Edit/paste as new layer above mask layer
Re-size it 10%
Apply same drop shadow
Move to the right side of frame below other flower (see my image)
19. Still on flower 7 layer
Layers palette/right click/duplicate 1 time
Image/mirror
Image/flipArrange It if needed so that it shows more
20. Use dropper tool and select a color from image
Left click/foreground color
Right click/background color
21. Select your text tool (settings below) Select your font
Type out Bold
Use nodes to size it to fit at the top.
Layers palette/right click/convert to raster layer
apply same drop shadow
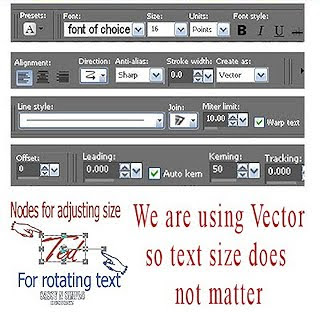
22. Repeat step 21 for the word Beautiful. And your name if you want it on the tag.
23. Re-size your image all layers/smart size so width is 400 height will adjust.
24. Save your time.
I hope you enjoy doing my Basic Steps
I want to thank the testers of Babs SassynSimple TagsnTuts for helping to make them mistake free.
To do this Tutorial you need a Paintshop or a Corel program and Animation Shop. You must have a good working knowledge of the programs. Depending on your program settings may vary slightly.
TUBE: Of your choice
I am using the artwork of Jennifer Janesko was at it a CILM she is now HERE
KIT: Linda’s Dream Designs full size PTU Angel Chronicles 2nd Edition HERE
MASK: Gabeemask29-vi HERE
FONT: Of your choice I am using a DaFont Free font Black Chancey HERE
Read the following they will not repeated
Always Close original image after you copy unless stated otherwise.
Always sharpen re-sized items one time.
Right click, Left click refers to mouse buttons.
Drop shadow settings will always stay set
1. Open Tube and Gabeemask29-vi mask minimize for now.
2. Open a new transparent image 700x600 transparent image
Select white in your foreground color
Flood fill the image
3. Select doodle from the kit Edit/copy
Edit/paste as new layer into working image
Re-size it 40% Move to top right corner
Apply same drop shadow.
4. Still on doodle layer
Layers palette/right click duplicate 1 time
Image/mirror
Image/flip
5. Layers palette/right click/add new raster layer
Selections/select all
Keep selected
6. Select paper 4 from the kit Edit/copy
Edit/paste as new layer into working image
Selections/select none
7. Layers New Mask Layer/from Image
Select the Gabeemask29-vi mask in the window.
source luminance/checked
Invert mask data/checked click OK
8. Layers palette/Right click black/white mask
Delete/click yes.
next pop up window comes up select Yes
Right click mask layer Merge/merge group
9. Select frame 1 from the kit Edit/copy
Edit/paste as new layer into working image
Re-size the frame 50%
10. Effects/3D/drop shadow (settings below)
 11. Select your magic wand (settings below) click inside both windows of frame.
Selections/modify/expand 15
Keep selected.

12. Layers palette/right click mask layer/add new raster layer
Select paper 11 from kit edit/copy
Edit/paste into selection
Selections/select none
13. Select your first close up tube Edit/copy
Edit/paste as new layer into working image below frame
Re-size as needed I re-sized 50%
Apply same drop shadow
Place in bottom right frame window center it
14. Select your second close up tube Edit/copy
Edit/paste as new layer into working image
Re-size as needed I re-sized 50%
Apply same drop shadowMove to top right frame window center it
15. Layers palette click on the eye on bottom layer
Right click any open layer/merge/merge visible
16. Select flower 6 from the kit Edit/copy
Edit/paste as new layer above mask layer
Re-size it 10%
Apply same drop shadow
Move to top right side of frame (see image)
17. Still on flower 6 layer
Layers palette/right click/duplicate 1 time
Image/mirror
Image/flip
Arrange it so that it shows but does not hide doodle
18. Select flower 7 from the kit Edit/copy
Edit/paste as new layer above mask layer
Re-size it 10%
Apply same drop shadow
Move to the right side of frame below other flower (see my image)
19. Still on flower 7 layer
Layers palette/right click/duplicate 1 time
Image/mirror
Image/flipArrange It if needed so that it shows more
20. Use dropper tool and select a color from image
Left click/foreground color
Right click/background color
21. Select your text tool (settings below) Select your font
Type out Bold
Use nodes to size it to fit at the top.
Layers palette/right click/convert to raster layer
apply same drop shadow

22. Repeat step 21 for the word Beautiful. And your name if you want it on the tag.
23. Re-size your image all layers/smart size so width is 400 height will adjust.
24. Save your time.
I hope you enjoy doing my Basic Steps
I want to thank the testers of Babs SassynSimple TagsnTuts for helping to make them mistake free.

