

DATE WRITTEN: March 26, 2010
To do this Tutorial you need a Paintshop or a Corel program and Animation Shop.
*** note you must have a good working knowledge of all programs to do my tutorials beginners may not be able to do them
TUBE: Of Your Choice (standing tube works best)
I am using Keith Garvey he was at My PSP Tubes
but is now HERE
I have a License mpt5442
KIT: Pinks Poetic Scrap FTU Tagger Playboy Blues HERE
TEMPLATE: Bitzy Beez Designz FTU Template 5 HERE
PLUGGIN: Xenoflex 2 Shatter
FONT: Of your choice
I used a DaFont FTU Teaspoon HERE
Read the following they will not repeated
Always Close original image after you copy unless stated otherwise.
Always sharpen re-sized items one time.left click, right click refers to mouse buttons.Drop shadow settings will always stay set
1. Open your Tube use dropper tool select a color
Left click/foreground color Minimize for now
Open the BBD_Template_5
2. Delete the Logo Layer from the templateLayers palette/select background layer/flood fill with foreground color
3. Select the Large Square Layer
Select your magic wand (settings Below) click on the square
Select Paper P11 from the kit Edit/copy
Edit/paste into selection on templateSelections/Select none

4. Select the Large Square frame layer
Layers palette/right click/merge/merge down
5. Select the Circle Layer
Select your magic wand Click on the circle
Select Paper P1 from the kit Edit/copy
Edit/paste into selection on templateSelections/Select none
Layers palette/right click/merge/merge down
6. Select the circle frame
Layers palette/right click/merge/merge down
7. Select the right rectangle back
Layers palette/right click/merge/merge down
8. Select the right rectangle Layer
Select your magic wand Click on the circle
Select Paper P7 from the kit Edit/copy
Edit/paste into selection on templateSelections/Select none
Layers palette/right click/merge/merge down
9. Select the left rectangle back
Layers palette/right click/merge/merge down
10. Select the Left rectangle Layer
Select your magic wand Click on the circle
Select Paper P8 from the kit Edit/copy
Edit/paste into selection on template
Selections/Select none
Layers palette/right click/merge/merge down
11. Select the middle rectangle back
Layers palette/right click/merge/merge down
12. Select the middle rectangle layer
Select Magic Wand Click on the middle rectangle
Select the color black in foreground color and flood fill
Keep Selected
13. Layers palette/right click middle rectangle/add new raster layer
Bring up your tube Use your dropper tool left click/foreground color
Flood fill the selection on the new layer
Selections Select none
(note you will skip the middle frame layer)
14. Layers palette click on line layer
Select it with your magic wand
Use dropper tool right click/foreground choose a light color from image
Flood fill your selection Selections/select none
15. Layers palette Select the line frame layer
Layers palette/right click/merge/merge down
16. Use dropper tool to select a dark color from you tube or image
Left click/foreground
Right click/background
17. Select your text tool (settings below) Type out Back Off (double space the words)
Use nodes to size it to fit in the line box
Layers palette/right click text/convert to raster layer
 18. Still on Text Effects/3d/inner bevel (settings below)
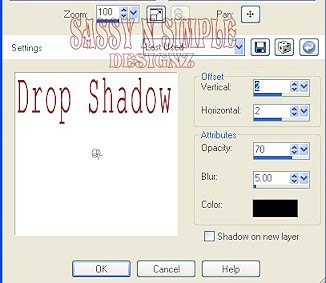
Effects/3D/Drop shadow
19. Select your Tube Edit/copy
Edit/paste into your template below the merged line layer
Re-size if needed I did not re-size
Apply same drop shadow
Center it in the middle rectangle
Layers palette/right click/duplicate 1 time
Right click/duplicate/arrange bring to top
Use eraser tool and remove the left leg.
20. Add elements if you would like to, your copy rights. And watermarks
21. Re-size your image so height is 400, width will adjust
22. Close off the merged layer, Black rectangle layer,
colored middle rectangle (raster 1)
and the middle rectangle frame layer
Right click any open layer/merge merge visible
You should have 5 layers now
23. Right click the colored middle rectangle layer (raster 1)/duplicate 2 times
ANIMATION
Open animation shop minimize for now.
1. Starting with the top copy 2 raster 1 (colored rectangle layer)
Effects/Plugins/Xenoflex 2/shatter (settings below)
Don’t panic when you see it shows outside the frame we will fix that
 2. Click on the middle colored rectangle
apply shatter again hit random seed button one time
3. Click on the bottom colored rectangle
apply shatter again hit random seed button one time
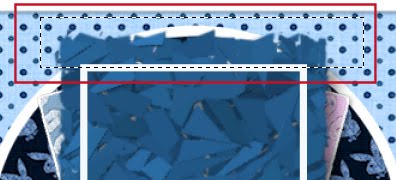
4. Now Select your selection tool (settings below) draw out a rectangle
around the shatter outside the frame one side at a time (see image below)
I closed off my top merged layer so I could see better

 5. Layers palette click the eye on the top and middle shatter layers
Make sure all other layers are open
6. Edit/copy/copy merged Take it to Animation shop
Right click workspace area paste as new animation.
7. Back in PSP close off the bottom shattered rectangle layer open middle
Edit/copy/copy merged Take it to Animation shop
Right click first frame/paste/paste after current frame.
8. Back in PSP close off the middle shattered rectangle layer open middle
Edit/copy/copy merged Take it to Animation shop
Right click second frame/paste/paste after current frame.
9. Save your animation
I hope you enjoy doing my Basic Steps
I want to thank the testers of Babs SassynSimple TagsnTuts for helping to make them mistake free.
