
©Sassy n Simple Tutorials
COFFEE TEA OR ME
Date Written: June 11, 2010
THINGS YOU NEED
A Paintshop or Corel Program
You will need a good working knowledge of the program.
TUBE: Anna Liwanag , you must buy it, I had a license at mpt but she is at PTE
KIT: Jan’s Island Treasures FTU Tagger Kit Coffee Tea or Me HERE
FONT: Doergon wave FTU at Dafont HERE
TEMPLATES: Bitzy Beez Designz FTU Template 7 HERE
PLUGINS:
ANIMATION SHOP
READ BELOW BEFORE STARTING
Settings may differ slightly depending on your version.
Close original after you copy it unless I state otherwise.
Sharpen all re-sized items 1 time.
RE-SIZE only one layer unless other wise stated.
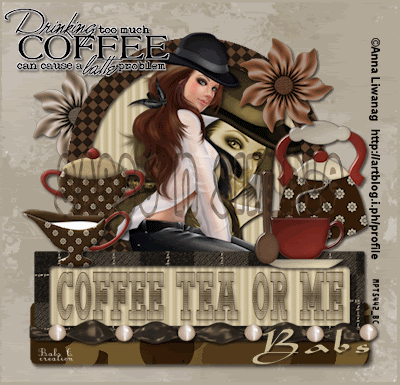
Refer to my image for placement of items.
Left click and right click refers to mouse buttons.
Now Lets Start
1. Open Bitzy Beez Designz Template 7.
Delete the Logo Layer
Selections/Select All
Select Paper 6 from kit Edit/copy
Edit/paste into selection on image
Selections/select none
2. Select Line 1 Layer
Select magic wand (settings below) click on The line
Selections/modify/expand 2
Keep selected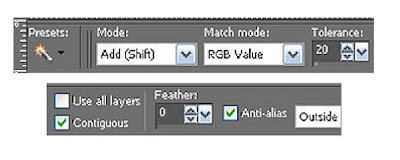
3. Select paper 1 from the kit
Select it under patterns in material palette
Angle 0 scale 50
Flood fill the selection
Selections/select none
4. Effects/3D/drop shadow (settings below)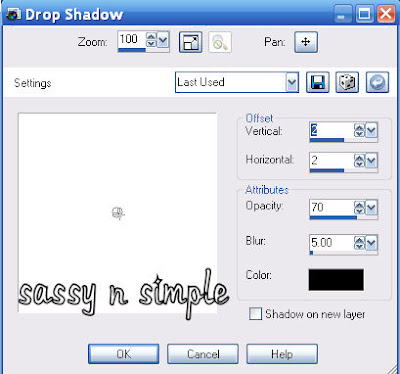
5. Select Line 2 Layer
Select magic wand click on The line
Selections/modify/expand 2
Keep selected
6. Select paper 7 from the kit
Select it under patterns in material palette
Angle 0 scale 50
Flood fill the selection
Selections/select none
Apply same drop shadow
7. Select Line 3 Layer
Select magic wand (settings below) click on The line
Selections/modify/expand 2
Keep selected
8. Select paper 3 from the kit
Select it under patterns in material palette
Angle 0 scale 50
Flood fill the selection
Selections/select none
Apply same drop shadow
9. Select Circle Layer Select
magic wand click on The circle
Selections/modify/expand 1
Keep selected
10. Select paper 2 from the kit
Select it under patterns in material palette
Angle 0 scale 50
Flood fill the selection
Selections/select none
Apply same drop shadow
11. Select your close up Tube Edit/copy
Edit/paste as new layer
Re-size as needed I re-sized 70%
Layers palette change blend to Luminance
Apply same drop shadow
Layers palette/right click/merge/merge down
12. Select Circle frame Layer Select
magic wand (settings below) click on The circle
Selections/modify/expand 1
Keep selected
13. Select paper 9 from the kit
Select it under patterns in material palette
Angle 45 scale 50
Flood fill the selection
Selections/select none
Apply same drop shadow
Layers palette/right click/merge/merge down
14. Select your full tube Edit/copy
Edit/paste as new layer into image
Re-size as needed I re-sized 65%
Apply same drop shadow
15. Select Line 4 Layer
Select magic wand click on The line
Selections/modify/expand 1
Keep selected
16. Select paper 2 from the kit
Select it under patterns in material palette
Angle 0 scale 50
Flood fill the selection
Selections/select none
Apply same drop shadow
17. Select Line 4 frame Layer
Select magic wand click on The line
Selections/modify/expand 1
Keep selected
18. Select paper 4 from the kit
Select it under patterns in material palette
Angle 45 scale 50
Flood fill the selection
Keep selected
19. Still on Line 4 frame
Selections/modify/contract 4
Selections/invert
Edit/clear
Selections/select none
Apply same drop shadow
Layers palette/right click/merge/merge down
20. Select dropper tool Select a dark color from image
Left click/foreground color
Right click/background color
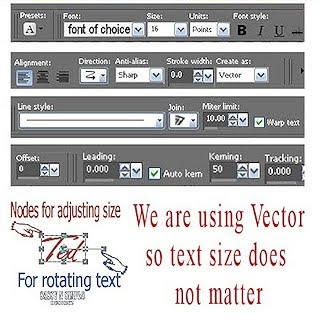
21. Select text tool (settings below)
Select Doergon wave as font
Type out COFFEE TEA OR ME
Use nodes to size it to fit in line 4 box
Layers palette/convert to raster layer
Apply same drop shadow
Layers palette/right click/merge/merge down
 22. Select Beaderibbon from kit Edit/copy
Edit/paste as new layer
Re-size 60%
Apply same drop shadow
Move it to bottom of text box
23. Select sugar bowl from kit Edit/copy
Edit/paste as new layer
Re-size 45%
Apply same drop shadow
Place on left side above text box
24. Select creamer from kit Edit/copy
Edit/paste as new layer
Re-size 45%
Apply same drop shadow
Place on left side above text box
25. Select tea kettle from kit Edit/copy
Edit/paste as new layer
Re-size 45%
Apply same drop shadow
Place on right side above text box
26. Select cup and saucer from kit Edit/copy
Edit/paste as new layer
Re-size 45%
Apply same drop shadow
Place on right side above text box
27. Select flower 2 from kit Edit/copy
Edit/paste as new layer
Re-size 35%
Apply same drop shadow
Place on right side at top of frame
28. Select word art (Drinking) from kit Edit/copy
Edit/paste as new layer
Re-size 60%
Apply same drop shadow
Place on top left side in the top line
29 Still on word art under your selections tab..
A. select all
B. select float
C. Select defloat.
D modify expand 2
Keep Selected
30. Add a New Raster Layer below the word art
Select white in foreground color
Flood fill selection on new layer
Selections/select none
31. Select flower 1 from kit Edit/copy
Edit/paste as new layer above Line 3
Re-size 35%
Apply same drop shadow
Place on right side at top of frame
Close off circle so you can see flower to move it
32. Add you name to your tag
Apply your watermarks and copy rights
33. Re-size your image so that width is 400 height will adjust.
If you Like Transparent backgrounds Go HERE
You can now save your image in jpeg or do optional animation below
ANIMATION
1. Close off background , Line 1, 2 and 3. By clicking the eye
Layers palette/right click any open layer/merge/merge visible
2. Open up back ground Layer and Line one
Edit/copy Merged
Take it to animation shop
Right click anywhere paste as new animation
3. Back in PSP close line 1 layer by clicking eye
Open Line 2 Layer
Edit/copy Merged
Take to animation shop
Right click first frame/paste/paste after current frame
4. Back in PSP close of line 2 layer by clicking eye
Open Line 3 layer
Edit/copy merged
Take to animation shop
Right click second frame/paste/paste after current frame
5. Click on frame 1
Edit /select all
Right click frame 1/change frame properties display time 25
6. Save your animation.
Thank you for trying my Tutorial hope you enjoyed it.
Date Written: June 11, 2010
THINGS YOU NEED
A Paintshop or Corel Program
You will need a good working knowledge of the program.
TUBE: Anna Liwanag , you must buy it, I had a license at mpt but she is at PTE
KIT: Jan’s Island Treasures FTU Tagger Kit Coffee Tea or Me HERE
FONT: Doergon wave FTU at Dafont HERE
TEMPLATES: Bitzy Beez Designz FTU Template 7 HERE
PLUGINS:
ANIMATION SHOP
READ BELOW BEFORE STARTING
Settings may differ slightly depending on your version.
Close original after you copy it unless I state otherwise.
Sharpen all re-sized items 1 time.
RE-SIZE only one layer unless other wise stated.
Refer to my image for placement of items.
Left click and right click refers to mouse buttons.
Now Lets Start
1. Open Bitzy Beez Designz Template 7.
Delete the Logo Layer
Selections/Select All
Select Paper 6 from kit Edit/copy
Edit/paste into selection on image
Selections/select none
2. Select Line 1 Layer
Select magic wand (settings below) click on The line
Selections/modify/expand 2
Keep selected

3. Select paper 1 from the kit
Select it under patterns in material palette
Angle 0 scale 50
Flood fill the selection
Selections/select none
4. Effects/3D/drop shadow (settings below)

5. Select Line 2 Layer
Select magic wand click on The line
Selections/modify/expand 2
Keep selected
6. Select paper 7 from the kit
Select it under patterns in material palette
Angle 0 scale 50
Flood fill the selection
Selections/select none
Apply same drop shadow
7. Select Line 3 Layer
Select magic wand (settings below) click on The line
Selections/modify/expand 2
Keep selected
8. Select paper 3 from the kit
Select it under patterns in material palette
Angle 0 scale 50
Flood fill the selection
Selections/select none
Apply same drop shadow
9. Select Circle Layer Select
magic wand click on The circle
Selections/modify/expand 1
Keep selected
10. Select paper 2 from the kit
Select it under patterns in material palette
Angle 0 scale 50
Flood fill the selection
Selections/select none
Apply same drop shadow
11. Select your close up Tube Edit/copy
Edit/paste as new layer
Re-size as needed I re-sized 70%
Layers palette change blend to Luminance
Apply same drop shadow
Layers palette/right click/merge/merge down
12. Select Circle frame Layer Select
magic wand (settings below) click on The circle
Selections/modify/expand 1
Keep selected
13. Select paper 9 from the kit
Select it under patterns in material palette
Angle 45 scale 50
Flood fill the selection
Selections/select none
Apply same drop shadow
Layers palette/right click/merge/merge down
14. Select your full tube Edit/copy
Edit/paste as new layer into image
Re-size as needed I re-sized 65%
Apply same drop shadow
15. Select Line 4 Layer
Select magic wand click on The line
Selections/modify/expand 1
Keep selected
16. Select paper 2 from the kit
Select it under patterns in material palette
Angle 0 scale 50
Flood fill the selection
Selections/select none
Apply same drop shadow
17. Select Line 4 frame Layer
Select magic wand click on The line
Selections/modify/expand 1
Keep selected
18. Select paper 4 from the kit
Select it under patterns in material palette
Angle 45 scale 50
Flood fill the selection
Keep selected
19. Still on Line 4 frame
Selections/modify/contract 4
Selections/invert
Edit/clear
Selections/select none
Apply same drop shadow
Layers palette/right click/merge/merge down
20. Select dropper tool Select a dark color from image
Left click/foreground color
Right click/background color
21. Select text tool (settings below)
Select Doergon wave as font
Type out COFFEE TEA OR ME
Use nodes to size it to fit in line 4 box
Layers palette/convert to raster layer
Apply same drop shadow
Layers palette/right click/merge/merge down

Edit/paste as new layer
Re-size 60%
Apply same drop shadow
Move it to bottom of text box
23. Select sugar bowl from kit Edit/copy
Edit/paste as new layer
Re-size 45%
Apply same drop shadow
Place on left side above text box
24. Select creamer from kit Edit/copy
Edit/paste as new layer
Re-size 45%
Apply same drop shadow
Place on left side above text box
25. Select tea kettle from kit Edit/copy
Edit/paste as new layer
Re-size 45%
Apply same drop shadow
Place on right side above text box
26. Select cup and saucer from kit Edit/copy
Edit/paste as new layer
Re-size 45%
Apply same drop shadow
Place on right side above text box
27. Select flower 2 from kit Edit/copy
Edit/paste as new layer
Re-size 35%
Apply same drop shadow
Place on right side at top of frame
28. Select word art (Drinking) from kit Edit/copy
Edit/paste as new layer
Re-size 60%
Apply same drop shadow
Place on top left side in the top line
29 Still on word art under your selections tab..
A. select all
B. select float
C. Select defloat.
D modify expand 2
Keep Selected
30. Add a New Raster Layer below the word art
Select white in foreground color
Flood fill selection on new layer
Selections/select none
31. Select flower 1 from kit Edit/copy
Edit/paste as new layer above Line 3
Re-size 35%
Apply same drop shadow
Place on right side at top of frame
Close off circle so you can see flower to move it
32. Add you name to your tag
Apply your watermarks and copy rights
33. Re-size your image so that width is 400 height will adjust.
If you Like Transparent backgrounds Go HERE
You can now save your image in jpeg or do optional animation below
ANIMATION
1. Close off background , Line 1, 2 and 3. By clicking the eye
Layers palette/right click any open layer/merge/merge visible
2. Open up back ground Layer and Line one
Edit/copy Merged
Take it to animation shop
Right click anywhere paste as new animation
3. Back in PSP close line 1 layer by clicking eye
Open Line 2 Layer
Edit/copy Merged
Take to animation shop
Right click first frame/paste/paste after current frame
4. Back in PSP close of line 2 layer by clicking eye
Open Line 3 layer
Edit/copy merged
Take to animation shop
Right click second frame/paste/paste after current frame
5. Click on frame 1
Edit /select all
Right click frame 1/change frame properties display time 25
6. Save your animation.
Thank you for trying my Tutorial hope you enjoyed it.