
©Sassy n Simple TutorialsHANG OUT
Date Written: July 14, 2010
THINGS YOU NEED
Paintshop or Corel Program
You will need a good working knowledge of the program.
TUBE: Psyco Jimi you must get it at MTA
I have a license
FONT: of your choice
TEMPLATES: Bitzy Beez Designs HERE
PLUGINS: Eye Candy 4000 Bevel Boss
Filter factory E Gradient Spokes
ANIMATION SHOP
READ BELOW BEFORE STARTING
Settings may differ slightly depending on your version.
Close original after you copy.
Re-size and sharpen only one layer
Left click and right click refers to mouse buttons.
Settings stay the same unless I say other wise.
Now Let's Start
1. Open the BBD Template 8
Delete the logo layer
If you want to change the color of background do so
2. Materials Palette set your colors to
Left click/ Foreground color a light color from tube
Right click/ Background color a different light color from tube
Now in foreground color Select Gradient tab
Select foreground-background gradient
Angle: 45 repeats: 1 Style: is linear setting
3. Select Circle layer
Select magic wand click on the circle (wand settings below)
Selections/modify/feather 1
Keep selected
 4. Flood fill with your gradient
To add Texture Effects/texture select a texture of choice
I used the Grid texture (settings below)
Click OK

5. Effects/plugins/Eye Candy 4000/Bevel Boss (settings below)
Click OK
Selections/select none
Selections/select none

6. Effects/3D/drop shadow (settings below)

7. Select LG flowers layer
under your selections tab..
A. select all B. select float
C. Select defloat.
D modify feather 1 Keep Selected
8. Flood fill each flower selection with gradient
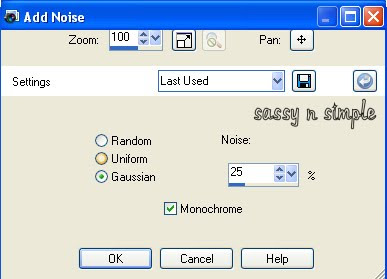
adjust/Add noise (settings below)
Effects/plugins/Eye Candy 4000/Bevel Boss
Click OK
Selections/select none
Apply same drop shadow
under your selections tab..
A. select all B. select float
C. Select defloat.
D modify feather 1 Keep Selected
8. Flood fill each flower selection with gradient
adjust/Add noise (settings below)

Effects/plugins/Eye Candy 4000/Bevel Boss
Click OK
Selections/select none
Apply same drop shadow
9. Select MD flowers layer under your selections tab..
A. select all
B. select float
C. Select defloat. D modify feather 1
Keep Selected
10. Select the gradient change angle to 315
Flood fill each flower selection with gradient
adjust/Add noise
Effects/plugins/Eye Candy 4000/Bevel Boss
Click OK
Selections/select none
Apply same drop shadow
11. Select SM flowers layer
under your selections tab..
A. select all
B. select float
C. Select defloat.
D modify feather 1
Keep Selected
12. Select gradient
Change angle 0 repeats to 2
Now flood fill each flower
adjust/Add noise
Effects/plugins/Eye Candy 4000/Bevel Boss
Selections/select none
Apply same drop shadow
13. Layers palette/right click merge/merge down into md flower
Left click/merge/merge down into lg flower layer
Left click/merge/ merge down into the Circle layer
14. Skip your Raster 5 layer (circle arrow).. We will come back to that
15. Select your tube Edit/copy
Edit/paste as new layer above the arrow layer
Re-size as needed. I re-sized 80%
Apply same drop shadow
Center in arrow
16. Select Line 1 layer Click on line with magic wand
Flood fill with your background color
Optional apply texture if you want to
Selections select none
Apply same drop shadow
17. Click on Line 2 click on it with magic wand
Flood fill with your foreground color
18. Select line 2 frame
click on it with magic wand
Keep Selected
19. Layers palette/right click/add new raster layer
Select gradient angle 45 and repeats 14
Flood fill selection with gradient
Effects/plugins/eye candy 4000 bevel boss
Click OK
20. Select chat circle layer
click on it with magic wand make
Sure to click the two circles also
Selections/modify feather 1
Select gradient angle 45 repeats 0
Flood fill the selections
Selections select none
Apply same drop shadow
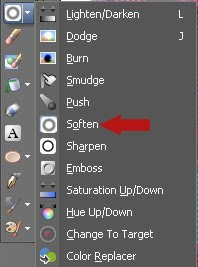
(tip if your chat box looks jagged select your soften tool size it 4
Go around the edges of chat box and soften)
A. select all
B. select float
C. Select defloat. D modify feather 1
Keep Selected
10. Select the gradient change angle to 315
Flood fill each flower selection with gradient
adjust/Add noise
Effects/plugins/Eye Candy 4000/Bevel Boss
Click OK
Selections/select none
Apply same drop shadow
11. Select SM flowers layer
under your selections tab..
A. select all
B. select float
C. Select defloat.
D modify feather 1
Keep Selected
12. Select gradient
Change angle 0 repeats to 2
Now flood fill each flower
adjust/Add noise
Effects/plugins/Eye Candy 4000/Bevel Boss
Selections/select none
Apply same drop shadow
13. Layers palette/right click merge/merge down into md flower
Left click/merge/merge down into lg flower layer
Left click/merge/ merge down into the Circle layer
14. Skip your Raster 5 layer (circle arrow).. We will come back to that
15. Select your tube Edit/copy
Edit/paste as new layer above the arrow layer
Re-size as needed. I re-sized 80%
Apply same drop shadow
Center in arrow
16. Select Line 1 layer Click on line with magic wand
Flood fill with your background color
Optional apply texture if you want to
Selections select none
Apply same drop shadow
17. Click on Line 2 click on it with magic wand
Flood fill with your foreground color
18. Select line 2 frame
click on it with magic wand
Keep Selected
19. Layers palette/right click/add new raster layer
Select gradient angle 45 and repeats 14
Flood fill selection with gradient
Effects/plugins/eye candy 4000 bevel boss
Click OK
20. Select chat circle layer
click on it with magic wand make
Sure to click the two circles also
Selections/modify feather 1
Select gradient angle 45 repeats 0
Flood fill the selections
Selections select none
Apply same drop shadow
(tip if your chat box looks jagged select your soften tool size it 4
Go around the edges of chat box and soften)

21. Now add the text you would like..since most
know how to do this I will not write the instructions for this.
22. Re-size image so that it is 400x400
23. Apply your watermarks and copy rights
24. Now close off the background layer, Merged layer and the arrow
Layers palette right click any open layer merge/merge visible
You should have 4 layers now.
25. If you want to make a transparent back ground Click HERE
Then when through delete the background layer
ANIMATION
1. Select Raster 5 (arrow Circle) In layers palette
Click on it with magic wand
Selections/modify expand 1
Select your gradient Angle 270 Repeats O
flood fill with gradient
Selections Select none
2. Layers palette/ right click arrow circle /duplicate it 3 times.
For a total of 4
3. Starting with the bottom original raster 5 layer
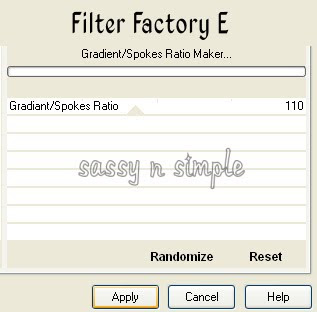
Effects/plugins/filter factory E gradient spokes (settings Below)
Click Apply
know how to do this I will not write the instructions for this.
22. Re-size image so that it is 400x400
23. Apply your watermarks and copy rights
24. Now close off the background layer, Merged layer and the arrow
Layers palette right click any open layer merge/merge visible
You should have 4 layers now.
25. If you want to make a transparent back ground Click HERE
Then when through delete the background layer
ANIMATION
1. Select Raster 5 (arrow Circle) In layers palette
Click on it with magic wand
Selections/modify expand 1
Select your gradient Angle 270 Repeats O
flood fill with gradient
Selections Select none
2. Layers palette/ right click arrow circle /duplicate it 3 times.
For a total of 4
3. Starting with the bottom original raster 5 layer
Effects/plugins/filter factory E gradient spokes (settings Below)
Click Apply

4. Select copy of raster 5 Layer apply the gradient spokes again
All settings the same except change Gradient Spoke ratio to 115
In layers palette click the eye close this layer
5. Select copy 2 of raster 5 Layer apply the gradient spokes again
All settings the same except change the Gradient Spoke ratio to 130
In layers palette click the eye close this layer
6. Select copy 3 of raster 5 Layer apply the gradient spokes again
All settings the same except change the Gradient Spoke ratio to 145
In layers palette click the eye close this layer
7. Edit/copy/copy merged
Take it to animation shop
Right click anywhere paste as new animation
8. Back in PSP close Raster 5 layer
Open copy of raster 5
Edit/copy/copy merged
Take it to animation shop Left click first frame
Paste after current frame
9. Back in PSP close copy Raster 5 layer
Open copy (2) of raster 5
Edit/copy/copy merged
Take it to animation shop Left click first frame
Paste after current frame
10. Back in PSP close copy (2) Raster 5 layer
Open copy (3) of raster 5
Edit/copy/copy merged
Take it to animation shop Left click first frame
Paste after current frame
Thanks for trying my tutorial I hope you enjoyed it.