
©Sassy n Simple
NEED A FRIEND
Date Written: July 21, 2010
THINGS YOU NEED
Paintshop or Corel Program
You will need a good working knowledge of the programs.
TUBE: Of your choice I am using Psyco Jimi get a License at MtA
License Mta_F1243
KIT: Linda’s Dream Designs PTU Tagger kit Wistful at TKO or TCB
FONT: Of your choice
MASK: Vix_Mask258 HERE
PLUGINS: VM Natural Sparkle
ANIMATION SHOP
READ BELOW BEFORE STARTING
Settings may differ slightly depending on your version.
Close original after you copy it unless I state otherwise.
Sharpen all re-sized items 1 time.
RE-SIZE only one layer unless other wise stated.
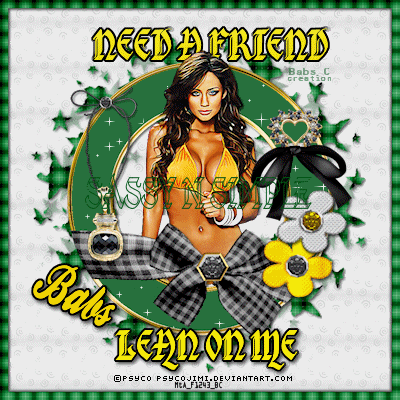
Refer to my image for placement of items.
Left click and right click refers to mouse buttons.
Now Lets Start
1. Open a new transparent Image 600x600
Selections/select all
Keep selected
2. Select Paper 10 from the kit Edit/copy
Edit/paste into selection
Selections/select none
3. Layers palette/right click/add new raster layer
Selections/select all
Keep selected
4. Select Paper 2 from the kit Edit/copy
Edit/paste into selection
Keep selected
You will paste this paper again
5. Selections/modify/contract 12
Edit/clear
Selections/select none
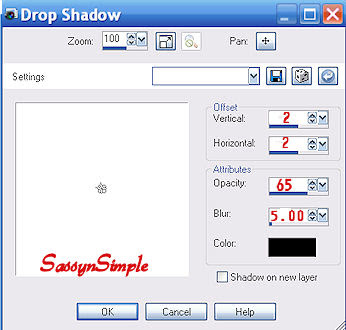
6. Effects/3D/drop shadow
(settings below)
Go back and apply drop shadow again change Horizontal and Vertical to -2
7. Layers palette/right click/add new raster layer
Selections/select all
Edit/paste into selection same paper 2
Selections/select none
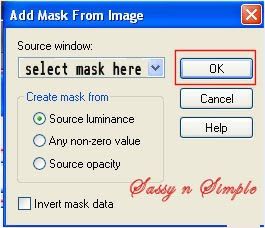
8. Layers/new mask Layer/from image
(settings Below)
Make sure to select Vix_Mask258 in the window
Click Ok
9. Layers palette/right click black/white mask
Delete
Would you like this mask merged into layer below YES
Layers palette/right click top mask/ merge/merge group
Layers palette/right click/merge/merge visible
10. Select Frame 3 From the kit Edit/copy
Edit/paste as new layer into your image
Re-size it 55%
Apply drop shadow change horizontal and vertical back to 2
Layers palette/right click/rename Frame
Frame should be in center of mask
11. Select your tube Edit/copy
Edit/paste as new layer under the frame
Re-size as needed I re-sized 70%
Center in frame
12. Use eraser tool to remove in parts showing below bottom of frame
Layers palette/right click tube/duplicate 1 time
13. Layers palette/right click duplicate of tube
Arrange/bring to top
Apply Drop Shadow
14. Using eraser tool erase any parts of the tube hiding bow
and bottom of frame
15. Select charm from Kit Edit/copy
Edit/paste as new layer into your image
Re-size 40%
Apply same drop shadow
Move to left side of frame
16. Select Brad 1 from kit Edit/copy
Edit/paste as new layer into your image
Re-size it 70%
Apply same drop shadow
Move to right side on top of bow
17. Select Brad 2 from kit Edit/copy
Edit/paste as new layer into your image
Re-size it 70%
Apply same drop shadow
Move to right side on top of brad 1
18. Select blackdiamondbow from kit
Edit/paste as new layer into your image
Re-size it 45%
Apply same drop shadow
Move to right side of frame at top
19. Now add any text you would Like to.
Re-size image all layers to 400x400
Smart size
Re-size all layers checked
Lock aspect ratio checked
20. Apply your watermarks and copyrights by adding a new layer
ANIMATION
Open Animation Shop and minimize for now.
1. Select your Frame Layer
Select your dropper tool left click/foreground color
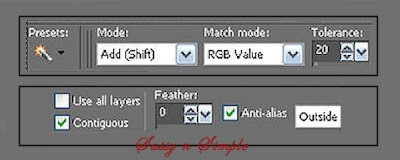
Now Select your magic wand (settings below)
Click in the green area of the frame make sure to click
Bottom part of frame also
Keep selected
2.layers Palette/right click frame/add new raster layer
Now flood fill the selection with foreground color
It should look like the image below
Keep Selected
3. Right click on your filled ( raster layer 7)Layer Duplicate 1 time
Keep selected
4. Effects/plugins/VM Natural Sparkle
(settings below)
Click OK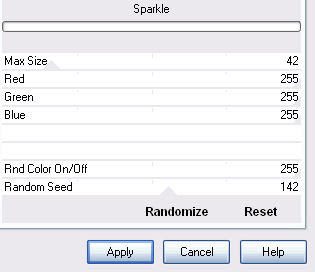
Close off the duplicate (top layer copy of raster 7)
by clicking eye in Layers palette
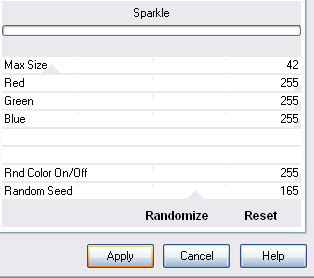
5. Select the Original bottom Layer (raster 7)
Effects/plugings/VM Natural Sparkle (settings below)
Click OK
 6. Edit/copy/copy merged
Take it to animation shop
Right click anywhere paste as new animation
7. Back in PSP close Original bottom raster layer 7 by clicking eye
Open copy of raster 7 (duplicate) by un-clicking the eye
Edit/copy/copy merged
Take it to animation shop
Right click first frame/paste/paste after current frame
8. Save your animation I did not change display speed
I hope you enjoyed the tutorial.
I want to thank my testers at Sassy n Simple Group for testing
the tutorial. I appreciate their helping me to weed out the mistakes .
If you use my tutorials for Stationary You must provide a creadit
and a Link back to my site in your footer

Date Written: July 21, 2010

THINGS YOU NEED
Paintshop or Corel Program
You will need a good working knowledge of the programs.
TUBE: Of your choice I am using Psyco Jimi get a License at MtA
License Mta_F1243
KIT: Linda’s Dream Designs PTU Tagger kit Wistful at TKO or TCB
FONT: Of your choice
MASK: Vix_Mask258 HERE
PLUGINS: VM Natural Sparkle
ANIMATION SHOP
READ BELOW BEFORE STARTING
Settings may differ slightly depending on your version.
Close original after you copy it unless I state otherwise.
Sharpen all re-sized items 1 time.
RE-SIZE only one layer unless other wise stated.
Refer to my image for placement of items.
Left click and right click refers to mouse buttons.
Now Lets Start
1. Open a new transparent Image 600x600
Selections/select all
Keep selected
2. Select Paper 10 from the kit Edit/copy
Edit/paste into selection
Selections/select none
3. Layers palette/right click/add new raster layer
Selections/select all
Keep selected
4. Select Paper 2 from the kit Edit/copy
Edit/paste into selection
Keep selected
You will paste this paper again
5. Selections/modify/contract 12
Edit/clear
Selections/select none
6. Effects/3D/drop shadow
(settings below)
Go back and apply drop shadow again change Horizontal and Vertical to -2

7. Layers palette/right click/add new raster layer
Selections/select all
Edit/paste into selection same paper 2
Selections/select none
8. Layers/new mask Layer/from image
(settings Below)
Make sure to select Vix_Mask258 in the window
Click Ok

9. Layers palette/right click black/white mask
Delete
Would you like this mask merged into layer below YES
Layers palette/right click top mask/ merge/merge group
Layers palette/right click/merge/merge visible
10. Select Frame 3 From the kit Edit/copy
Edit/paste as new layer into your image
Re-size it 55%
Apply drop shadow change horizontal and vertical back to 2
Layers palette/right click/rename Frame
Frame should be in center of mask
11. Select your tube Edit/copy
Edit/paste as new layer under the frame
Re-size as needed I re-sized 70%
Center in frame
12. Use eraser tool to remove in parts showing below bottom of frame
Layers palette/right click tube/duplicate 1 time
13. Layers palette/right click duplicate of tube
Arrange/bring to top
Apply Drop Shadow
14. Using eraser tool erase any parts of the tube hiding bow
and bottom of frame
15. Select charm from Kit Edit/copy
Edit/paste as new layer into your image
Re-size 40%
Apply same drop shadow
Move to left side of frame
16. Select Brad 1 from kit Edit/copy
Edit/paste as new layer into your image
Re-size it 70%
Apply same drop shadow
Move to right side on top of bow
17. Select Brad 2 from kit Edit/copy
Edit/paste as new layer into your image
Re-size it 70%
Apply same drop shadow
Move to right side on top of brad 1
18. Select blackdiamondbow from kit
Edit/paste as new layer into your image
Re-size it 45%
Apply same drop shadow
Move to right side of frame at top
19. Now add any text you would Like to.
Re-size image all layers to 400x400
Smart size
Re-size all layers checked
Lock aspect ratio checked
20. Apply your watermarks and copyrights by adding a new layer
ANIMATION
Open Animation Shop and minimize for now.
1. Select your Frame Layer
Select your dropper tool left click/foreground color
Now Select your magic wand (settings below)
Click in the green area of the frame make sure to click
Bottom part of frame also
Keep selected

2.layers Palette/right click frame/add new raster layer
Now flood fill the selection with foreground color
It should look like the image below
Keep Selected
3. Right click on your filled ( raster layer 7)Layer Duplicate 1 time
Keep selected
4. Effects/plugins/VM Natural Sparkle
(settings below)
Click OK

Close off the duplicate (top layer copy of raster 7)
by clicking eye in Layers palette
5. Select the Original bottom Layer (raster 7)
Effects/plugings/VM Natural Sparkle (settings below)
Click OK
 6. Edit/copy/copy merged
 Take it to animation shop
Right click anywhere paste as new animation
7. Back in PSP close Original bottom raster layer 7 by clicking eye
Open copy of raster 7 (duplicate) by un-clicking the eye
Edit/copy/copy merged
Take it to animation shop
Right click first frame/paste/paste after current frame
8. Save your animation I did not change display speed
I hope you enjoyed the tutorial.
I want to thank my testers at Sassy n Simple Group for testing
the tutorial. I appreciate their helping me to weed out the mistakes .
If you use my tutorials for Stationary You must provide a creadit
and a Link back to my site in your footer