
©Sassy n Simple
BEAUTY AND BRAWN
Written Aug 6, 2010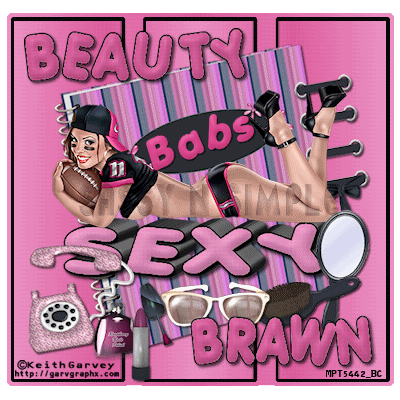
THINGS YOU NEED
Paintshop or Corel Program
You will need a good working knowledge of the program.
TUBE: Keith Garvey my license was at MPT but
he is now at PTE
KIT: Scraps and Tubes Tagger FTU Day Girl HERE
FONT: Of your choice I used Porky
TEMPLATES: BBD_Template 9 HERE
PLUGINS: Penta color dot, Eye Candy 5 Impact Extrude and
Eye Candy 4000 Bevel boss
ANIMATION SHOP
READ BELOW BEFORE STARTING
Settings may differ slightly depending on your version.
Close original after you copy it unless I state otherwise.
Sharpen all re-sized items 1 time.
RE-SIZE only one layer unless other wise stated.
Refer to my image for placement of items.
Left click and right click refers to mouse buttons.
Now Lets Start
1. Open The BBD Template 9
Delete the Logo Layer
2. Open your tube Select
Light color left click/foreground Color
Dark Color right click/background color
Minimize tube for now
3. Click on material Palette Select Gradient Tab
Find foreground/background gradient
Select it
Angle 90
Repeats 1
4. Layers palette select the Square template Layer
Select magic wand (settings below) click on square
Selections/modify expand 1
Keep Selected
6. Layers palette select the Lines 2 Layer
Click on each rectangle with magic wand
Keep selected
7. Layers palette/right click lines 2/add a new raster Layer
Flood fill each selection with gradient Angle 90 repeats 3
Keep Selected
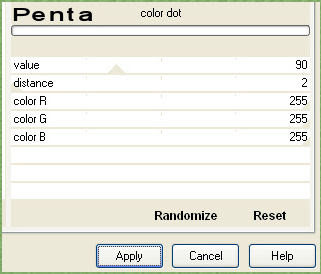
8. Effects/plugins/penta color dot same settings
Apply
Keep selected
9. Layers palette/right click add a new raster Layer
Materials palette click on foreground
Change angle of gradient to 45 Repeats 3
Flood fill each selection with gradient
Keep selected
10. Effects/plugins/penta color dot same settings
Apply
Keep selected
11. Layers palette/right click add a new raster Layer
Materials palette click on foreground
Change angle of gradient to 0 Repeats 3
Flood fill each selection with gradient
Keep selected
12. Effects/plugins/penta color dot same settings
Apply
Selections/select none
13. Layers palette/ right click original gray lines 2/ delete layer
14. Layers palette select SEXY Layer
With magic wand click on gray area of each letter
Keep Selected
15. Layers palette/right click/add new raster layer
Flood fill with light foreground color (left click)
Effects/plugins/penta color dot same settings
Selections/select none
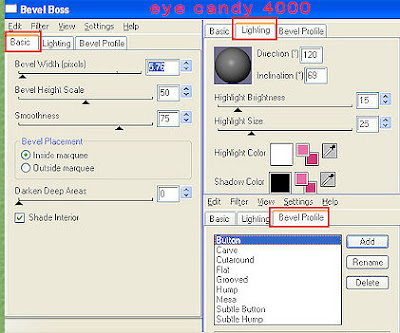
16. Effects/Plugins/Eye Candy 4000 bevel boss
(settings below)
Click OK
17. Effects/plugins/Eye Candy 5 Impact Extrude
(settings below)
Click OKLayers palette/right click/merge/merge down into original Sexy layer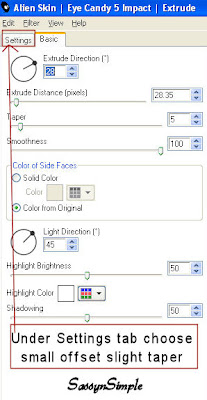 18. Effects/3D/Drop shadow
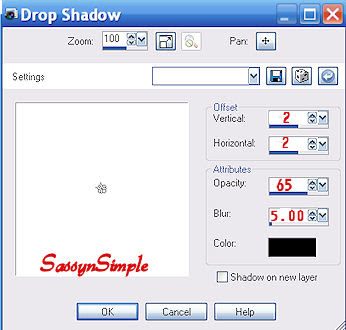
(settings below)
Click OK
19. Layers palette select Beauty Brawn Layer
With magic wand click on the gray area of each letter
Keep Selected
20. Layers palette/right click/add new raster Layer
Flood fill all letters selections with background color (right click)
Keep Selected
21. Effects/Plugins/Eye Candy 4000 bevel boss same settings
Selections/select none
22. Layers/right click/merge/merge down colored letters down into
Original beauty brawn Layer
Effects/3d/ drop shadow
23. Select your Raster 3 Layer
Select Journal Album from Kit Edit/copy
Edit/paste as new Layer
No re-size
Apply Same drop shadow
Image/free rotate/ 10.00 left all boxes unchecked
24. Select Ribbon Eyelets from Kit Edit/copy
Edit/paste as new Layer
Re-size 45%
Apply Same drop shadow
Image/free rotate/ 10.00 left, all boxes unchecked
Place on right side of journal
25. Select the Sexy word Layer
Select your Tube Edit/copy
Edit/paste as new Layer
Re-size as needed I re-sized 90%
Arrange so it is laying on the word sexy
Apply same drop shadow
26. Select the Mirror from Kit Edit/copy
Edit/paste as new layer
Re-size 40%
Apply same drop shadow
Image/free rotate/ 10.00 right, all boxes unchecked
Move to bottom right side of journal
27.Select the hair brush from Kit Edit/copy
Edit/paste as new layer
Re-size 40%
Apply same drop shadow
Move to bottom right side of journal
28. Select the Sunglasses from Kit Edit/copy
Edit/paste as new layer
Re-size 40%
Apply same drop shadow
Move to bottom center of journal
29. Select the phone from Kit Edit/copy
Edit/paste as new layer
Re-size 35%
Apply same drop shadow
Image/free rotate/ 10.00 left, all boxes unchecked
Move to bottom left side of journal
30. Select the nail polish from Kit Edit/copy
Edit/paste as new layer
Re-size 40%
Apply same drop shadow
Move next to phone
31. Select the Lipstick from kit Edit/copy
Edit Paste as new layer
Re-size 40%
Apply same drop shadow
Move near the nail polish
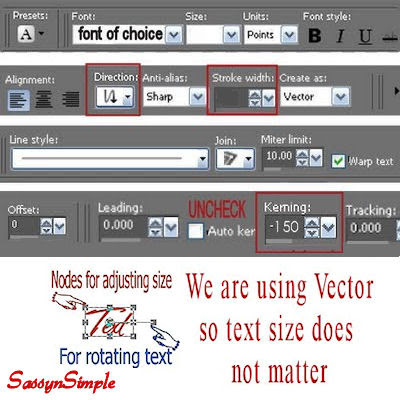
32. Select your text tool Select Porky for font (settings below)
Type out your name
Use nodes to size it to fit in journal oval
Layers palette/right click/convert to raster layer
33. Apply Steps 5 penta color dot and step 16 Bevel boss
34. Re-size all Layers, smart size to 400x400
Add a new raster layer apply your copyrights and watermark
35. Close off the bottom 6 Layers all the way up to Raster 3 Layer
Layers palette/right click any open layer/merge/merge visible
You should now have 7 layers
Open all layers back up
If you want a transparent background delete the bottom
white background layer
ANIMATION
Open Animation shop minimize
1. Layers palette right click the eye on Raster 3 and raster 2
and close them
2. Edit/copy/copy merged
Take it to animation shop right click anywhere in workspace
Paste as new animation
3. Back in PSP Close off Raster 1 by clicking the eye
Open Raster 2 layer Edit/copy/copy merged
Take it to animation shop
right click first frame/paste after current layer
4. Back in PSP Close off Raster 2 by clicking the eye
Open Raster 3 layer Edit/copy/copy merged
Take it to animation shop
right click first frame/paste after current layer
Thanks for trying my tutorial I hope you enjoyed it.
5. Save your animation I did not change display time.
I hope you enjoyed this tutorial
I want to Thank my SassynSimple Group Testers for testing this Tutorial

BEAUTY AND BRAWN
Written Aug 6, 2010
THINGS YOU NEED
Paintshop or Corel Program
You will need a good working knowledge of the program.
TUBE: Keith Garvey my license was at MPT but
he is now at PTE
FONT: Of your choice I used Porky
TEMPLATES: BBD_Template 9 HERE
PLUGINS: Penta color dot, Eye Candy 5 Impact Extrude and
Eye Candy 4000 Bevel boss
ANIMATION SHOP
READ BELOW BEFORE STARTING
Settings may differ slightly depending on your version.
Close original after you copy it unless I state otherwise.
Sharpen all re-sized items 1 time.
RE-SIZE only one layer unless other wise stated.
Refer to my image for placement of items.
Left click and right click refers to mouse buttons.
Now Lets Start
1. Open The BBD Template 9
Delete the Logo Layer
2. Open your tube Select
Light color left click/foreground Color
Dark Color right click/background color
Minimize tube for now
3. Click on material Palette Select Gradient Tab
Find foreground/background gradient
Select it
Angle 90
Repeats 1
4. Layers palette select the Square template Layer
Select magic wand (settings below) click on square
Selections/modify expand 1
Keep Selected

6. Layers palette select the Lines 2 Layer
Click on each rectangle with magic wand
Keep selected
7. Layers palette/right click lines 2/add a new raster Layer
Flood fill each selection with gradient Angle 90 repeats 3
Keep Selected
8. Effects/plugins/penta color dot same settings
Apply
Keep selected
9. Layers palette/right click add a new raster Layer
Materials palette click on foreground
Change angle of gradient to 45 Repeats 3
Flood fill each selection with gradient
Keep selected
10. Effects/plugins/penta color dot same settings
Apply
Keep selected
11. Layers palette/right click add a new raster Layer
Materials palette click on foreground
Change angle of gradient to 0 Repeats 3
Flood fill each selection with gradient
Keep selected
12. Effects/plugins/penta color dot same settings
Apply
Selections/select none
13. Layers palette/ right click original gray lines 2/ delete layer
14. Layers palette select SEXY Layer
With magic wand click on gray area of each letter
Keep Selected
15. Layers palette/right click/add new raster layer
Flood fill with light foreground color (left click)
Effects/plugins/penta color dot same settings
Selections/select none
16. Effects/Plugins/Eye Candy 4000 bevel boss
(settings below)
Click OK

17. Effects/plugins/Eye Candy 5 Impact Extrude
(settings below)
Click OKLayers palette/right click/merge/merge down into original Sexy layer
 18. Effects/3D/Drop shadow
(settings below)
Click OK

19. Layers palette select Beauty Brawn Layer
With magic wand click on the gray area of each letter
Keep Selected
20. Layers palette/right click/add new raster Layer
Flood fill all letters selections with background color (right click)
Keep Selected
21. Effects/Plugins/Eye Candy 4000 bevel boss same settings
Selections/select none
22. Layers/right click/merge/merge down colored letters down into
Original beauty brawn Layer
Effects/3d/ drop shadow
23. Select your Raster 3 Layer
Select Journal Album from Kit Edit/copy
Edit/paste as new Layer
No re-size
Apply Same drop shadow
Image/free rotate/ 10.00 left all boxes unchecked
24. Select Ribbon Eyelets from Kit Edit/copy
Edit/paste as new Layer
Re-size 45%
Apply Same drop shadow
Image/free rotate/ 10.00 left, all boxes unchecked
Place on right side of journal
25. Select the Sexy word Layer
Select your Tube Edit/copy
Edit/paste as new Layer
Re-size as needed I re-sized 90%
Arrange so it is laying on the word sexy
Apply same drop shadow
26. Select the Mirror from Kit Edit/copy
Edit/paste as new layer
Re-size 40%
Apply same drop shadow
Image/free rotate/ 10.00 right, all boxes unchecked
Move to bottom right side of journal
27.Select the hair brush from Kit Edit/copy
Edit/paste as new layer
Re-size 40%
Apply same drop shadow
Move to bottom right side of journal
28. Select the Sunglasses from Kit Edit/copy
Edit/paste as new layer
Re-size 40%
Apply same drop shadow
Move to bottom center of journal
29. Select the phone from Kit Edit/copy
Edit/paste as new layer
Re-size 35%
Apply same drop shadow
Image/free rotate/ 10.00 left, all boxes unchecked
Move to bottom left side of journal
30. Select the nail polish from Kit Edit/copy
Edit/paste as new layer
Re-size 40%
Apply same drop shadow
Move next to phone
31. Select the Lipstick from kit Edit/copy
Edit Paste as new layer
Re-size 40%
Apply same drop shadow
Move near the nail polish
32. Select your text tool Select Porky for font (settings below)
Type out your name
Use nodes to size it to fit in journal oval
Layers palette/right click/convert to raster layer

33. Apply Steps 5 penta color dot and step 16 Bevel boss
34. Re-size all Layers, smart size to 400x400
Add a new raster layer apply your copyrights and watermark
35. Close off the bottom 6 Layers all the way up to Raster 3 Layer
Layers palette/right click any open layer/merge/merge visible
You should now have 7 layers
Open all layers back up
If you want a transparent background delete the bottom
white background layer
ANIMATION
Open Animation shop minimize
1. Layers palette right click the eye on Raster 3 and raster 2
and close them
2. Edit/copy/copy merged
Take it to animation shop right click anywhere in workspace
Paste as new animation
3. Back in PSP Close off Raster 1 by clicking the eye
Open Raster 2 layer Edit/copy/copy merged
Take it to animation shop
right click first frame/paste after current layer
4. Back in PSP Close off Raster 2 by clicking the eye
Open Raster 3 layer Edit/copy/copy merged
Take it to animation shop
right click first frame/paste after current layer
Thanks for trying my tutorial I hope you enjoyed it.
5. Save your animation I did not change display time.
I hope you enjoyed this tutorial
I want to Thank my SassynSimple Group Testers for testing this Tutorial