©Sassy n Simple
CUTE N SPECIAL
Date Written: Aug 23, 2010

THINGS YOU NEED
Paintshop or Corel Program
You will need a good working knowledge of the program.
TUBE: Ismael Rac PTU you must purchase it you will find him HERE
KIT: Fania ladybug-mariquita FTU HERE
FONT: Of Your Choice
MASK: Essex Girl sg_checkered.pspmask HERE
READ BELOW BEFORE STARTING
Settings may differ slightly depending on your version.
Close original after you copy it unless I state otherwise.
Sharpen all re-sized items 1 time.
RE-SIZE only one layer unless other wise stated.
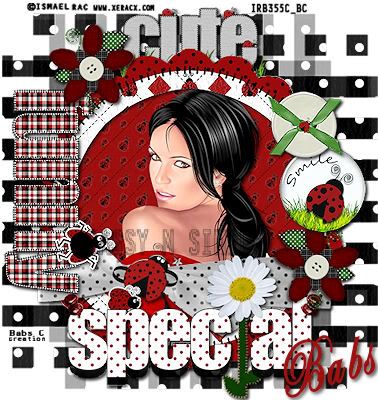
Refer to my image for placement of items.
Left click and right click refers to mouse buttons.
Now Lets Start
1. Open a new transparent Image 500x500
This is your working Image
I will use the initial (WI) for working Image
Select white in your foreground color and flood fill image
2. Layers palette/right click/add new raster Layer
Selections/select all
Select paper 3 from kit Edit/copy
Edit/paste into selection
Selections/select none
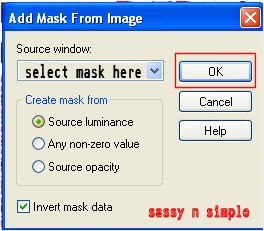
3. Layers/new mask Layer/from image (settings below)
Make sure to select sg_checkered.psp_mask in the window
Click Ok

4. Layers palette/right click black/white mask
Delete
Would you like this mask merged into layer below YES
Layers palette/right click top mask/ merge/merge group
5. Select FAS Element 12 From the kit Edit/copy
Edit/paste as new Layer in WI
Re-size it 35% Adjust/sharpen
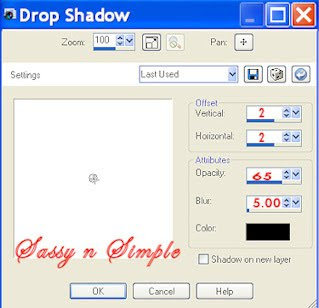
6. Effects/3D/drop shadow (settings B elow)
elow)
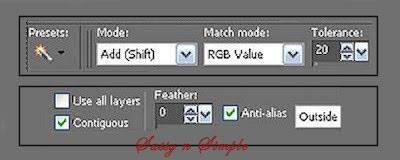
7. Select Magic Wand Click inside frame window
Selections/modify/expand 12
Keep Selected

8. Layers palette/ right click raster 1/add new raster Layer
Select Paper FAS paper 5 from kit edit/copy
Edit/paste into selection on new layer in WI
Selections/select none
9. Select your Tube Edit/copy
Edit/paste as new layer above raster 3 (below frame) in WI
Re-size as needed I re-sized 55% adjust/sharpen
Apply Same drops shadow
10. Layers palette/click eye on raster 1 closing it
Right click on any layer merge/merge visible
Move the merged image down some
11. Select FAS element 33 from the kit Edit/copy
Edit/paste as new layer in WI above raster 1
Re-size it 15% adjust/sharpen
Apply same drop shadow
Move to the top of frame so that grass is not showing
12. Select FAS element 31 from kit edit/copy
Edit/paste as new layer in WI
Re-size it 25% adjust/sharpen
Apply same drop shadow
13. Image/free rotate 90 Right
All boxes unchecked
Move it to the left side of frame
14. Select FAS Element 17 from kit Edit/copy
Edit/paste as new layer above merged layer in WI
Re-size it 25% adjust/sharpen
Place towards bottom of frame
Apply same drop shadow
15. Select FAS element 4 from kit Edit/copy
Edit/paste as new layer in WI
Re-size it 15% adjust/sharpen
Apply same drop shadow
Move it to the right side near the ribbon
16. Layers palette/right click element 4/duplicate 1 time
Image/mirror
Move it between cute and funny on left side of frame
17. Select element 32 from kit Edit/copy
Edit/paste as new layer above flower (top layer)
Re-size it 30% adjust/sharpen
Apply same drop shadow
Move it to the bottom of frame
18. Select FAS element 10 from kit edit/copy
Edit/paste as new layer in WI
Re-size it 20% adjust/sharpen
Move above flower
19. Select FAS element 3 edit/copy
Edit/paste as new layer in WI
Re-size 25% adjust/sharpen
Apply same drop shadow
Move above smile button
20. Layers Palette/right click/merge/merge visible
21. Use your crop tool to crop in close around the mask
22. Add a new layer apply watermark and copyrights
23. Add text if you want to.. Then save in jpg form
Thanks for trying my tutorial I hope you enjoyed it.
I want to thank my testers at SassynSimple Group for testing this tutorial.
They help to make my tutorials better.
©Sassy n Simple

THINGS YOU NEED
Paintshop or Corel Program
You will need a good working knowledge of the program.
TUBE: Ismael Rac PTU you must purchase it you will find him HERE
KIT: Fania ladybug-mariquita FTU HERE
FONT: Of Your Choice
MASK: Essex Girl sg_checkered.pspmask HERE
READ BELOW BEFORE STARTING
Settings may differ slightly depending on your version.
Close original after you copy it unless I state otherwise.
Sharpen all re-sized items 1 time.
RE-SIZE only one layer unless other wise stated.
Refer to my image for placement of items.
Left click and right click refers to mouse buttons.
Now Lets Start
1. Open a new transparent Image 500x500
This is your working Image
I will use the initial (WI) for working Image
Select white in your foreground color and flood fill image
2. Layers palette/right click/add new raster Layer
Selections/select all
Select paper 3 from kit Edit/copy
Edit/paste into selection
Selections/select none
3. Layers/new mask Layer/from image (settings below)
Make sure to select sg_checkered.psp_mask in the window
Click Ok

4. Layers palette/right click black/white mask
Delete
Would you like this mask merged into layer below YES
Layers palette/right click top mask/ merge/merge group
5. Select FAS Element 12 From the kit Edit/copy
Edit/paste as new Layer in WI
Re-size it 35% Adjust/sharpen
6. Effects/3D/drop shadow (settings B
 elow)
elow)7. Select Magic Wand Click inside frame window
Selections/modify/expand 12
Keep Selected

8. Layers palette/ right click raster 1/add new raster Layer
Select Paper FAS paper 5 from kit edit/copy
Edit/paste into selection on new layer in WI
Selections/select none
9. Select your Tube Edit/copy
Edit/paste as new layer above raster 3 (below frame) in WI
Re-size as needed I re-sized 55% adjust/sharpen
Apply Same drops shadow
10. Layers palette/click eye on raster 1 closing it
Right click on any layer merge/merge visible
Move the merged image down some
11. Select FAS element 33 from the kit Edit/copy
Edit/paste as new layer in WI above raster 1
Re-size it 15% adjust/sharpen
Apply same drop shadow
Move to the top of frame so that grass is not showing
12. Select FAS element 31 from kit edit/copy
Edit/paste as new layer in WI
Re-size it 25% adjust/sharpen
Apply same drop shadow
13. Image/free rotate 90 Right
All boxes unchecked
Move it to the left side of frame
14. Select FAS Element 17 from kit Edit/copy
Edit/paste as new layer above merged layer in WI
Re-size it 25% adjust/sharpen
Place towards bottom of frame
Apply same drop shadow
15. Select FAS element 4 from kit Edit/copy
Edit/paste as new layer in WI
Re-size it 15% adjust/sharpen
Apply same drop shadow
Move it to the right side near the ribbon
16. Layers palette/right click element 4/duplicate 1 time
Image/mirror
Move it between cute and funny on left side of frame
17. Select element 32 from kit Edit/copy
Edit/paste as new layer above flower (top layer)
Re-size it 30% adjust/sharpen
Apply same drop shadow
Move it to the bottom of frame
18. Select FAS element 10 from kit edit/copy
Edit/paste as new layer in WI
Re-size it 20% adjust/sharpen
Move above flower
19. Select FAS element 3 edit/copy
Edit/paste as new layer in WI
Re-size 25% adjust/sharpen
Apply same drop shadow
Move above smile button
20. Layers Palette/right click/merge/merge visible
21. Use your crop tool to crop in close around the mask
22. Add a new layer apply watermark and copyrights
23. Add text if you want to.. Then save in jpg form
Thanks for trying my tutorial I hope you enjoyed it.
I want to thank my testers at SassynSimple Group for testing this tutorial.
They help to make my tutorials better.
©Sassy n Simple
