©Sassy n Simple
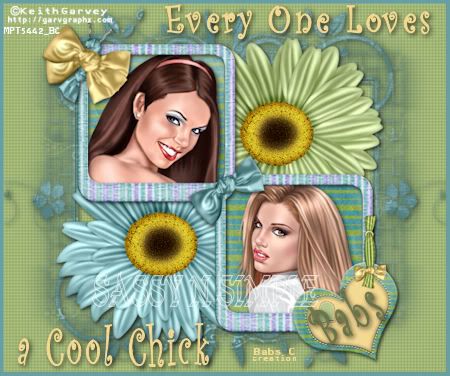
COOL CHICK
Date Written: Aug 28. 2010
THINGS YOU NEED
Paintshop or Corel Program
You will need a good working knowledge of the programs.
TUBE: Keith Garvey you must purchase it he is now at PTE
I have a License mpt5442
KIT: Disyas Digital Designs is PTU HERE
FONT: of your choice
MASK: Sdt_Mask145 HERE
PLUGINS: Penta Dot HERE
READ BELOW BEFORE STARTING
Settings may differ slightly depending on your version.
Close original after you copy it unless I state otherwise.
Sharpen all re-sized items 1 time.
RE-SIZE only one layer unless other wise stated.
Refer to my image for placement of items.
Left click and right click refers to mouse buttons.
Now Lets Start
1. Open The Sdt_Mask145 and your tubes and minimize for now.
2. Open a new transparent Image 600x500
This is your Working image
3. Select Frame Disyas FR 2 from the kit Edit/copy
Edit/paste as new layer into your working image
4. Effects/3D/Drop Shadow (settings below)
Date Written: Aug 28. 2010

THINGS YOU NEED
Paintshop or Corel Program
You will need a good working knowledge of the programs.
TUBE: Keith Garvey you must purchase it he is now at PTE
I have a License mpt5442
KIT: Disyas Digital Designs is PTU HERE
FONT: of your choice
MASK: Sdt_Mask145 HERE
PLUGINS: Penta Dot HERE
READ BELOW BEFORE STARTING
Settings may differ slightly depending on your version.
Close original after you copy it unless I state otherwise.
Sharpen all re-sized items 1 time.
RE-SIZE only one layer unless other wise stated.
Refer to my image for placement of items.
Left click and right click refers to mouse buttons.
Now Lets Start
1. Open The Sdt_Mask145 and your tubes and minimize for now.
2. Open a new transparent Image 600x500
This is your Working image
3. Select Frame Disyas FR 2 from the kit Edit/copy
Edit/paste as new layer into your working image
4. Effects/3D/Drop Shadow (settings below)

5. Select your magic wand (settings below)
Click inside both windows
Selections/modify/expand 12
Keep selected

6. Layers palette/right click on raster 1/add a new raster layer
Select paper 5 from the kit Edit/copy
Edit/paste into selection
Selections/select none
7. Select One of your Tubes Edit/copy
Edit/paste as new layer into working image
Re-size as needed to fit in frame
I re-sized the right one 50%
Apply drop shadow
Move into the right frame
Repeat this for your second tube
I re-sized the left tube 40%
8. Layers palette click the eye on raster 1 to close it
Right click/any open layer/merge/merge visible
Open raster 1 back up
9. Select Flower 2 from the kit Edit/copy
Edit /paste as new layer into working image
Do not re-size
Apply drop shadow
Move it up to the bottom between the two frames
10. Select Flower 3 from the kit Edit/copy
Edit /paste as new layer into working image
Do not re-size
Apply drop shadow
Move it up to the top between the two frames
11. Select Tag 2 from the Kit Edit/copy
Edit/paste as new layer in working image above merged layer
Do not re-size
Apply same drop shadow
Move onto the side of the right bottom frame
12. Select the butterfly 4 from the kit Edit/copy
Edit/paste as new layer into working image
Re-size it 40%
Apply drop shadow
Image/free rotate Right 20.00 uncheck boxes
Move to the top left corner of the top frame
13. Layers palette close raster 1 by clicking the eye
Right click any open layer/merge/merge visible.
14. Right click on raster 1/add a new raster layer
Selections/select all
Keep selected
15. Select paper 8 From the Kit Edit/copy
Edit/paste into selection
Selections/select none
16. Under Layers on your tool bar select new mask layer/from image.
Select the sdtmask145 in the window.
source Luminance is checked and invert mask data is checked
Click OK
17. Layers palette/right click black/white mask
Delete
Would you like this mask merged into layer below YES
Layers palette/right click top mask/ merge/merge group
18. Using dropper tool left click/foreground color
Select the dark green from the flower
Click on raster 1 to select it
Flood fill with foreground color
19. Effects/Plugins/penta color dot (settings below)
Click Apply

20. Layers palette/Right click any layer/merge/merge visible
21. Image add borders 5 symmetric checked
Use dropper tool chose a color from the blue flower
22. Re-size all layers smart size so width is 400 height will adjust
23. Apply Text I figure everyone should know how to do this
With out instructions
24. Apply copyrights and watermarks
Save your image
Thanks for trying my tutorial I hope you enjoyed it.
Please if you use it to make a stat apply below credit in your footer
Tutorial by: ©Sassy n Simple
HERE or HERE
Links to use
http://www.sassynsimple.com/
And to here http://groups.yahoo.com/group/sassynsimple/

