 ©SassynSimple Tutorials
Date Written: Jan 17, 2011
PROGRAMS NEEDED
Paintshop or Corel Program
ITEMS YOU NEED
TUBE: Of your Choice I used Keith Garvey Cupid I bought it at MPT
But he is at PTE now
I have a license for this tube mpt5442
KIT: Skys Scraps FTU Tagger Valentines Day HERE TEMPLATE: Bitzy Beez Designz 2011-Template_03 HERE
FONT: Of your choice I used MC Sweetie Hearts FTU HERE
READ BELOW BEFORE STARTING
Settings may differ slightly depending on your version.
Close original after you copy it unless I state otherwise.
Sharpen all re-sized items 1 time.
RE-SIZE only one layer unless other wise stated.
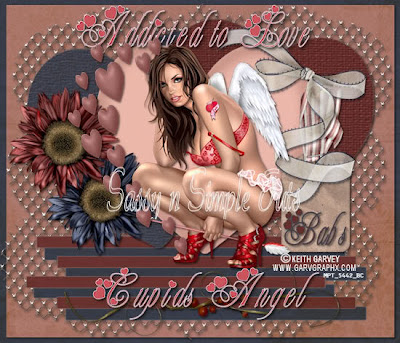
Refer to my image for placement of items.
Left click and right click refers to mouse buttons.
Now Lets Start
1. Select Your Tube and minimize it for now
2. Select BBD_2011_Template_03 and open it
Delete the Logo Layer
This will be our working image
3. Layers Palette click on the Background Layer
Selections Select All
Select Paper 3 from the kit Edit/copy
Edit/paste into selection on template
Keep Selected
Minimize the paper you will need it again
4. Layers palette right click background layer
Add a new raster layer
Select Paper 2 from the kit Edit/copy
Edit/paste into selection on template
Selections Select none
Re-size layer 97%
Uncheck all layers smart size selected
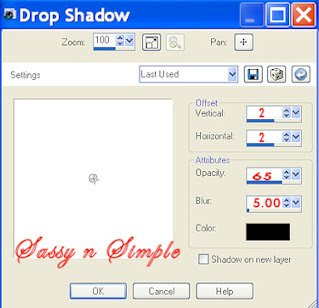
5. Effect/3D Effects/ Drop shadow
(settings below)

6. Click on Chain Layer
Apply same drop shadow
7. Click on Lines 1 Layer
under your selections tab..
A. select all
B. select float
C. Select defloat
D. Modify/expand 1
Pull up Paper 3 Edit/copy
Edit/paste into selection on template
Selections/select none
Apply same drop shadow
Minimize paper
7. Click on Lines 2 Layer
under your selections tab..
A. select all
B. select float
C. Select defloat
D. Modify/expand 1
Select Paper 5 from the kit Edit/copy
Edit/paste into selection on template
Selections/select none
Apply same drop shadow
Minimize paper
8. Click on heart 1 Layer
under your selections tab..
A. select all
B. select float
C. Select defloat
Keep Selected
7. Layers palette/Right click heart 1 layer/add new raster layer
Pull up Paper 3 Edit/copy
Edit/paste into selection on template
Selections/select none
Layer palette change blend to overlay
Right click layer/merge/merge down
Apply same drop shadow
9. Click on heart 2 Layer
under your selections tab..
A. select all
B. select float
C. Select defloat
Keep Selected
10. Layers palette/Right click heart 2 layer/add new raster layer
Pull up Paper 5 Edit/copy
Edit/paste into selection on template
Selections/select none
Layer palette change blend to overlay
Right click layer/merge/merge down
Apply same drop shadow
11. Click on heart 3 Layer
under your selections tab..
A. select all
B. select float
C. Select defloat
Keep Selected
12. Layers palette/Right click heart 3 layer/add new raster layer
Pull up Paper 3 Edit/copy
Edit/paste into selection on template
Selections/select none
Layer palette change blend to color Legacy
Right click layer/merge/merge down
Apply same drop shadow
13. Select Heart Cluster
Adjust Hue/Saturation/ Colorize
Hue 2 Saturation 63
Apply Same Drop shadow
(note if you use a different kit you select color from it
Use Hue and saturation for that color)
14. Select Tag element 18 from the Kit Edit/copy
Edit/paste as new layer into template above heart 1 layer
Re-size it 75%
Apply same drop shadow
Place on right side of heart
15. Select flower 13 from the kit Edit/copy
Edit/paste as new layer into template
Re-size it 55%
Apply same drop shadow
Move to left bottom side of heart
16. Select flower 12 from the kit Edit/copy
Edit/paste as new layer into template
Re-size it 55%
Apply same drop shadow
Move it above the other flower
17. Select bow 3 from the kit Edit/copy
Edit/paste as new layer into template
Re-size it 75%
Image/flip
Apply same drop shadow
Move to right side of heart
19. Select ribbon 9 from the kit Edit/copy
Edit/paste as new layer into template
Re-size it 75%
Image/flip
Apply same drop shadow
Move to the bottom of the lines
20. Select your tube Edit/copy
Edit/paste as new layer into template
Re-size as needed, I re-sized 75%
Apply same drop shadow
Move it slightly to the right
21. Apply any text you would like to now.
If you want the effect I got
Select two different colors in foreground and background
Set your font stroke width to 1
22. Once you have your text placed
Re-size your image all layers smart size
So width is 550 height will adjust
23. Apply copyrights, watermarks
Then save your image
Thanks for trying my tutorial I hope you enjoyed it.
If You use my tutorials in Stationary Please apply Credit
I really want to thank my Sassy n Simple Group Testers for helping test
This and make it mistake free. They do a wonderful job testing my tutorials.
Marsha
Melody
Linda
Ruth
I now put my Stationary tutorials in Incredimail Letter Form
These can only be accessed by joining My group below
Our PSP Hideaways
Public group hosting weekly challenges
Apply same drop shadow
7. Click on Lines 1 Layer
under your selections tab..
A. select all
B. select float
C. Select defloat
D. Modify/expand 1
Pull up Paper 3 Edit/copy
Edit/paste into selection on template
Selections/select none
Apply same drop shadow
Minimize paper
7. Click on Lines 2 Layer
under your selections tab..
A. select all
B. select float
C. Select defloat
D. Modify/expand 1
Select Paper 5 from the kit Edit/copy
Edit/paste into selection on template
Selections/select none
Apply same drop shadow
Minimize paper
8. Click on heart 1 Layer
under your selections tab..
A. select all
B. select float
C. Select defloat
Keep Selected
7. Layers palette/Right click heart 1 layer/add new raster layer
Pull up Paper 3 Edit/copy
Edit/paste into selection on template
Selections/select none
Layer palette change blend to overlay
Right click layer/merge/merge down
Apply same drop shadow
9. Click on heart 2 Layer
under your selections tab..
A. select all
B. select float
C. Select defloat
Keep Selected
10. Layers palette/Right click heart 2 layer/add new raster layer
Pull up Paper 5 Edit/copy
Edit/paste into selection on template
Selections/select none
Layer palette change blend to overlay
Right click layer/merge/merge down
Apply same drop shadow
11. Click on heart 3 Layer
under your selections tab..
A. select all
B. select float
C. Select defloat
Keep Selected
12. Layers palette/Right click heart 3 layer/add new raster layer
Pull up Paper 3 Edit/copy
Edit/paste into selection on template
Selections/select none
Layer palette change blend to color Legacy
Right click layer/merge/merge down
Apply same drop shadow
13. Select Heart Cluster
Adjust Hue/Saturation/ Colorize
Hue 2 Saturation 63
Apply Same Drop shadow
(note if you use a different kit you select color from it
Use Hue and saturation for that color)
14. Select Tag element 18 from the Kit Edit/copy
Edit/paste as new layer into template above heart 1 layer
Re-size it 75%
Apply same drop shadow
Place on right side of heart
15. Select flower 13 from the kit Edit/copy
Edit/paste as new layer into template
Re-size it 55%
Apply same drop shadow
Move to left bottom side of heart
16. Select flower 12 from the kit Edit/copy
Edit/paste as new layer into template
Re-size it 55%
Apply same drop shadow
Move it above the other flower
17. Select bow 3 from the kit Edit/copy
Edit/paste as new layer into template
Re-size it 75%
Image/flip
Apply same drop shadow
Move to right side of heart
19. Select ribbon 9 from the kit Edit/copy
Edit/paste as new layer into template
Re-size it 75%
Image/flip
Apply same drop shadow
Move to the bottom of the lines
20. Select your tube Edit/copy
Edit/paste as new layer into template
Re-size as needed, I re-sized 75%
Apply same drop shadow
Move it slightly to the right
21. Apply any text you would like to now.
If you want the effect I got
Select two different colors in foreground and background
Set your font stroke width to 1
22. Once you have your text placed
Re-size your image all layers smart size
So width is 550 height will adjust
23. Apply copyrights, watermarks
Then save your image
Thanks for trying my tutorial I hope you enjoyed it.
If You use my tutorials in Stationary Please apply Credit
I really want to thank my Sassy n Simple Group Testers for helping test
This and make it mistake free. They do a wonderful job testing my tutorials.
Marsha
Melody
Linda
Ruth
I now put my Stationary tutorials in Incredimail Letter Form
These can only be accessed by joining My group below
Our PSP Hideaways
Public group hosting weekly challenges

