
LAZY DAY QUEEN

LAZY DAY QUEEN
Date Written: March 6, 2011
PROGRAMS NEEDED
Paintshop or Corel Program
ITEMS YOU NEED
TUBE: Of your Choice I used Elias Chatzoudis which I purchased at PTE
And have a license for it.
KIT: Scrap Dimensions FTU Spring Hope HERE
MASK: GabbeeMask41 FTU HERE
FONT: Of your choice I used FTU font Joint by Pizza Dude HERE
READ BELOW BEFORE STARTING
Settings may differ slightly depending on your version.
Close original after you copy it unless I state otherwise.
Sharpen all re-sized items 1 time.
RE-SIZE only one layer unless other wise stated.
Refer to my image for placement of items.
Left click and right click refers to mouse buttons.
Now Lets Start
1. Select your Tube open it and the GabbeeMask41 minimize them for now.
2. Open a new transparent image 550x500
If you wish to re-size you can do so later
Do not fill if you want a transparent background
3. Layers palette right click raster 1 add a new raster layer
Selections/all
Select SH paper 3 from the kit Edit/copy
Edit/paste into selection
Selections/select none
4. Layers/New Mask layer/From Image
(settings below)
Make sure to select GabbeeMask41 in drop down window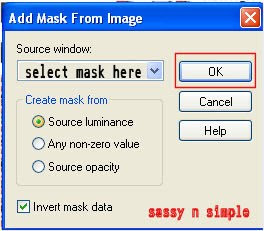
5. Layers palette/right click black/white mask
Delete
Would you like this mask merged into layer below YES
Layers palette/right click top mask/ merge/merge group
I moved my mask slightly down from top and slightly to the left
6. Effects/3D Effects/Drop shadow
(settings below)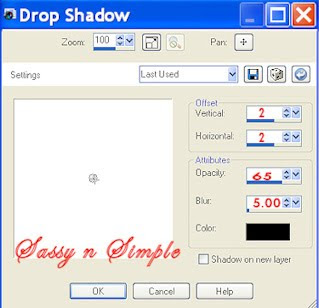
7. Select SH Window from the kit Edit/copy
Edit/paste as new layer into your image
Re-size it 60%
Apply same drop shadow
Window should be centered in image
8. Select your free hand selection tool
(settings below)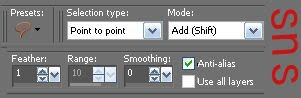
Select around the window starting with top left
Corner and going around entire window frame do not go outside of frame
(see image below if not sure how)
Keep Selected
Date Written: March 6, 2011
PROGRAMS NEEDED
Paintshop or Corel Program
ITEMS YOU NEED
TUBE: Of your Choice I used Elias Chatzoudis which I purchased at PTE
And have a license for it.
KIT: Scrap Dimensions FTU Spring Hope HERE
MASK: GabbeeMask41 FTU HERE
FONT: Of your choice I used FTU font Joint by Pizza Dude HERE
READ BELOW BEFORE STARTING
Settings may differ slightly depending on your version.
Close original after you copy it unless I state otherwise.
Sharpen all re-sized items 1 time.
RE-SIZE only one layer unless other wise stated.
Refer to my image for placement of items.
Left click and right click refers to mouse buttons.
Now Lets Start
1. Select your Tube open it and the GabbeeMask41 minimize them for now.
2. Open a new transparent image 550x500
If you wish to re-size you can do so later
Do not fill if you want a transparent background
3. Layers palette right click raster 1 add a new raster layer
Selections/all
Select SH paper 3 from the kit Edit/copy
Edit/paste into selection
Selections/select none
4. Layers/New Mask layer/From Image
(settings below)
Make sure to select GabbeeMask41 in drop down window

5. Layers palette/right click black/white mask
Delete
Would you like this mask merged into layer below YES
Layers palette/right click top mask/ merge/merge group
I moved my mask slightly down from top and slightly to the left
6. Effects/3D Effects/Drop shadow
(settings below)

7. Select SH Window from the kit Edit/copy
Edit/paste as new layer into your image
Re-size it 60%
Apply same drop shadow
Window should be centered in image
8. Select your free hand selection tool
(settings below)

Select around the window starting with top left
Corner and going around entire window frame do not go outside of frame
(see image below if not sure how)
Keep Selected
 . Layers palette/right click/add a new raster layer above group raster 2
Select SH Paper 2 from the kit Edit/copy
Edit/paste into selection on new raster 3 layer
Selections/select none
9. Select SH Wrap 2 from the kit Edit/copy
Edit/paste as new layer above Window raster layer 2
Re-size it 65%
Apply same drop shadow
Left side of wrap should be even with left side of frame
Wrap top should touch 5th line of the frame
10. Select SH Daisy 2 from the kit Edit/copy
Edit/paste as new layer
Re-size it 60%
Apply same drop shadow
Move it to the left bottom corner of the window
11. Still on Daisy Layer
Layers palette/right click duplicate 1 time
Image/mirror
12. Select SH Daisy 1 from the kit Edit/copy
Edit/paste as new layer
Re-size it 30%
Apply same drop shadow
Move it to the top left side of window (see my image)
13. Select SH Daisy 3 from the kit Edit/copy
Edit/paste as new layer
Re-size it 25%
Apply same drop shadow
Move it to the left side centered it between other 2 flowers (see my image)
14. Select your tube edit/copy
Edit/paste as new layer into your image
Re-size as needed, I re-sized 85%
Apply same drop shadow
The bottom of your tube should be near bottom of window
Centered in the image
15. Add your Text now.
I used two different colors with a stroke width of 1
I placed my Lazy Day Queen Layer
Under my tube Layer
My Name is Placed as top layer
16. Add a new raster layer
add your copyrights and watermark
17. You can save the image as a png if you want transparent background.
I save mine using animation shop.
Thanks for trying my tutorial I hope you enjoyed it.
I want to thank Linda, Marsha and Ruth for testing my tutorials.
I now put all my stationary tutorials in Incredimail letter form
you have to join my group to access them HERE
we also offer weekly challenges
If You use my tutorials in Stationary Please apply Credit
