
©SassynSimple Tutorials
GEARED UP
Date Written: Feb, 3 2011
GEARED UP
Date Written: Feb, 3 2011

PROGRAMS YOU NEED
You are responsible for finding things you need to do this tutorial.
You will need a good working knowledge of the programs I use.
Paintshop or Corel Program
ITEMS YOU NEED
Thank all Of you whose items I used to make this tag.
I do appreciate the use of them.
TUBE: Of your Choice I used Keith Garvey you must buy it at PTE
I have a license for this tube
KIT: Bello Scarto’s Steampunk Farewell Journey
MASK: Bitzy Beez Designz BBD_2011_Mask 27
FONT: Of your choice
READ BELOW BEFORE STARTING
Settings may differ slightly depending on program you use I use x2
Close original after you copy it unless I state otherwise.
RE-SIZE only one layer and sharpen once if needed
Left click and right click refers to mouse buttons.
Refer to my image for placement of items.
Now Lets Start
1. Select your Tube and mask minimize them for now
2. Open a new transparent image 600x500
Selections/select all
3. Select Paper 9 from the kit edit/copy
Edit/paste into selection on your image
Selections/select none
4. Layers/new mask layer/from image
Select the BBD-2011_Mask 27 in the window
(settings below)
Click Ok
Re-size the mask 105%

5. Effects/3D/ Drop Shadow
(settings below)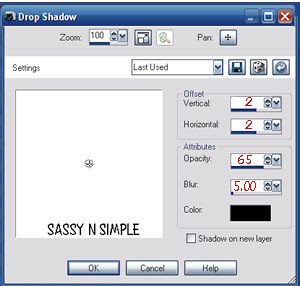
6. Select Element 22 gear from the kit
Edit/copy
Edit/paste as new layer into your image
Re-size it 40%
Apply same drop shadow
Move to the right side of mask centered
7. Select Element 30 watch from the kit
Edit/copy
Edit/paste as new layer into your image
Re-size it 60%
Apply same drop shadow
Image/free rotate 10.00 left boxes not checked
Move to to right side of mask above gear
8. Select element 20 heart from the kit
Edit/copy
Edit/paste as new layer into your image
Image/free rotate 15.00 Left
No re-size needed
Apply same drop shadow
9. Select element 16 anchor chain from the kit
Edit/copy
Edit/paste as new layer into your image
Re-size it 50%
Apply same drop shadow move to right side of image
Anchor near bottom of watch
10. Select your tube edit/copy
Edit/paste as new layer into your image
Re-size as needed, I re-sized 70%
11. Select Element 13 flower from the kit
Edit/copy
Edit/paste as new layer into your image
Re-size it 35%
Apply same drop shadow
Move to bottom right side of image
12. Layer palette/right click flower duplicate 1 time
Image/mirror
Move the mirror to the left side centered
13. Select Element 12 flower from the kit
Edit/copy
Edit/paste as new layer into your image
Re-size it 35%
Apply same drop shadow
Image/mirror
Move to bottom next to other flower
14. Select element 21 metal flowers from the kit
Edit/copy
Edit/paste as new layer into your image
Re-size it 40%
Move it to left bottom side of image between the flowers
15. Select element 11 butterfly from the kit
Edit/copy
Edit/paste as new layer into your image
Re-size it 40%
Move to top left side of image
16. Apply any text you wish
17. Re-size your image I re-sized mine to 500 width
Height will adjust
18. Add a new raster layer apply copyrights and watermark
Layers palette/right click any layer/merge/merge visible
Save your image in png format
This is a sample background that would like
nice if you wanted to make a stat using this tutorial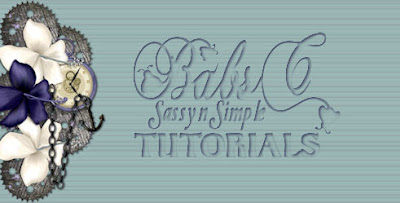 Thanks for trying my tutorial I hope you enjoyed it.
I want to thank Marsha and Ruth for testing my tutorials
If You use my tutorials in Stationary Please apply a credit in your footer
with a link back to where my tutorial is located.
I now put most of my stationary tutorials in Incredimail letter form
you have to join my group to access them HERE
we also offer weekly challenges
Would you like to test my tutorials you can apply
HERE
(tester must read and do tutorials as written)
©SassynSimple Tutorials
(settings below)

6. Select Element 22 gear from the kit
Edit/copy
Edit/paste as new layer into your image
Re-size it 40%
Apply same drop shadow
Move to the right side of mask centered
7. Select Element 30 watch from the kit
Edit/copy
Edit/paste as new layer into your image
Re-size it 60%
Apply same drop shadow
Image/free rotate 10.00 left boxes not checked
Move to to right side of mask above gear
8. Select element 20 heart from the kit
Edit/copy
Edit/paste as new layer into your image
Image/free rotate 15.00 Left
No re-size needed
Apply same drop shadow
9. Select element 16 anchor chain from the kit
Edit/copy
Edit/paste as new layer into your image
Re-size it 50%
Apply same drop shadow move to right side of image
Anchor near bottom of watch
10. Select your tube edit/copy
Edit/paste as new layer into your image
Re-size as needed, I re-sized 70%
11. Select Element 13 flower from the kit
Edit/copy
Edit/paste as new layer into your image
Re-size it 35%
Apply same drop shadow
Move to bottom right side of image
12. Layer palette/right click flower duplicate 1 time
Image/mirror
Move the mirror to the left side centered
13. Select Element 12 flower from the kit
Edit/copy
Edit/paste as new layer into your image
Re-size it 35%
Apply same drop shadow
Image/mirror
Move to bottom next to other flower
14. Select element 21 metal flowers from the kit
Edit/copy
Edit/paste as new layer into your image
Re-size it 40%
Move it to left bottom side of image between the flowers
15. Select element 11 butterfly from the kit
Edit/copy
Edit/paste as new layer into your image
Re-size it 40%
Move to top left side of image
16. Apply any text you wish
17. Re-size your image I re-sized mine to 500 width
Height will adjust
18. Add a new raster layer apply copyrights and watermark
Layers palette/right click any layer/merge/merge visible
Save your image in png format
This is a sample background that would like
nice if you wanted to make a stat using this tutorial
 Thanks for trying my tutorial I hope you enjoyed it.
I want to thank Marsha and Ruth for testing my tutorials
If You use my tutorials in Stationary Please apply a credit in your footer
with a link back to where my tutorial is located.
I now put most of my stationary tutorials in Incredimail letter form
you have to join my group to access them HERE
we also offer weekly challenges
Would you like to test my tutorials you can apply
HERE
(tester must read and do tutorials as written)
©SassynSimple Tutorials