©Sassy n Simple
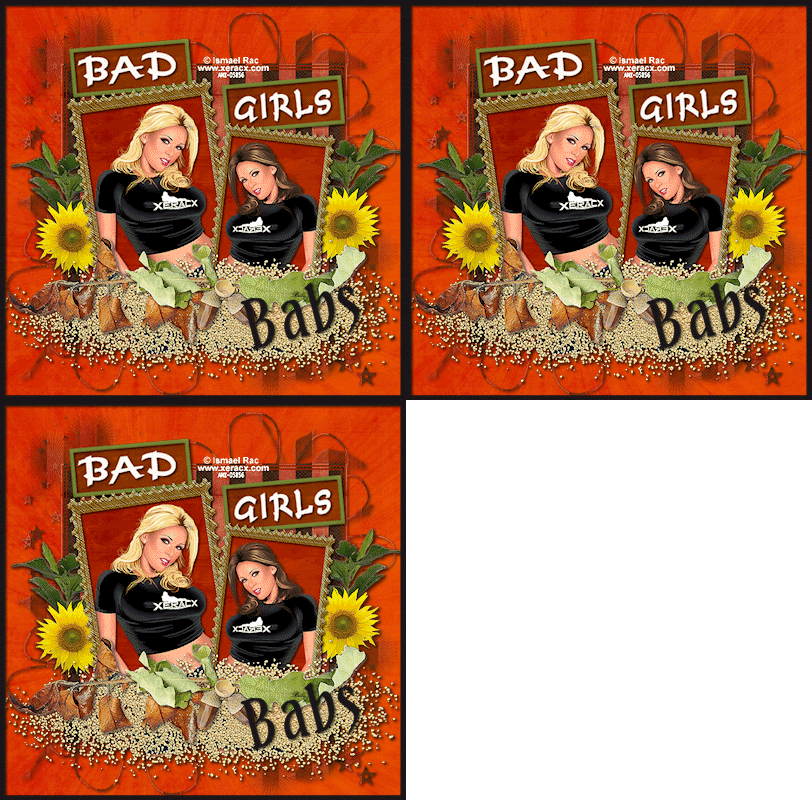
BAD GIRLS
DATE WRITTEN: Nov 5, 2009
THINGS NEEDED
Jasc Paintshop Pro or Corel Paint Program
PLUGINS: VM Natural Lightsplash.
You must have a good working knowledge of the programs I use.
ITEMS NEEDED
TUBE: Ismael Rac I purchased at AMI but he has is own store now HERE
KIT: Diva Designz PTU Tagger Fall Wishes purchase HERE or HERE
MASK: zuzzanna_mask 34 HERE included in my supplies
FONT: Of your choice
MY SUPPLIES: HERE
READ BELOW BEFORE STARTING
Settings may differ slightly depending on your version.
Close original after you copy it unless I state otherwise.
Sharpen all re-sized items 1 time.
RE-SIZE only one layer unless other wise stated.
Refer to my image for placement of items.
Left click and right click refers to mouse buttons.
Let's Begin
Open your tubes (2) and the mask minimize for now.
1. Open a new image 700x700 Selections/select all.
Select paper 2 from the kit, edit/copy
Edit/paste into selection.
Selections/select none
2. Select paper 8 from the kit. Edit/copy,
Edit/paste as new layer into your image.
3. Layers New Mask Layer/from Image
Select the zuzzanna_mask34in the window
source luminance/checked Invert mask data/checked
Click ok
4. Layers palette/Right click mask layer Merge/merge group
5. Select Frame 2 from the Kit Edit/copy
Edit/paste as new layer into your image
Re-size it 75%
Effects/3D/drop shadow
Vertical and horizontal 2
Opacity 70
Blur 5.00
color black
Shadow on new layer not checked
6. Still on Frame Layer Select your magic wand
(settings below) click inside both frame windows
Selections/modify/ expand 8
Keep Selected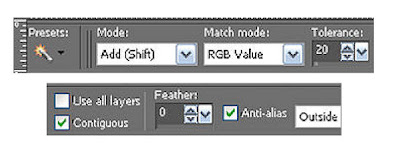
7. Right Click on the mask layer Add a new raster layer.
Select Paper 2 from the Kit Edit copy,
Edit/paste into selection.
Selections/select none
8. Select your Tubes Edit/copy,
Edit/paste as new layer into your image Each Tube.
Take one Tube Image/free rotate/Left 10.00 (see other settings below).
Now Take the other Tube image Image/free rotate/ right 5.00
apply your drop shadow to both tubes.
Center them in the frame window.
Uncheck the following boxes
Rotate all layers
Rotate single layer around canvas
9. Now Close off your background and mask layer
right click any open layer and merge/merge visible.
10. Select Flower element 4 from the kit, Edit/copy,
Edit/paste as new layer into your image. Under your frame layer
Re-size it 25%.
Move it to the right side of your frame leaving some of it behind the frame.
Duplicate it 1 time. Image/mirror your duplicate.
Make sure some of it is slightly behind your frame.
11. Open the Tag template in my supplies.
Select the Tag Back Layer in your layers palette, Edit/copy,
Edit/paste as new layer into your image.
Select your magic wand and click on the Tag Back
select Paper 3 from the kit edit/copy
Edit/paste into selection.
Selections/select none.
Duplicate it 1 time.
Move one to the right side one to the left side. (do not rotate yet).
12. Back to my template select the frame layer in your layers palette. Edit/copy,
Edit/paste as new layer into your image.
Click on it with your magic wand.
Use your dropper tool select a color from your image left click/foreground color.
Then flood fill the selection. Selections/select none. Duplicate it 1 time
13. Now Position the frames over each of your tag backs.
In your layers palette,
Drag the frame Down so that it is above the matching back.
Once you do that Right Click on the frame in layers palette and merge down.
14. Back in the Tag Template select the BAD Layer Edit/copy,
Edit/paste as new layer into your image over the right Tag/merged layer.
Apply your drop shadow.
In your layers Palette Right Click the Bad Layer merge/merge down.
Now Repeat this for the word Girls.
In your layers palette Drag your tags Below your merged Frame Layer.
15. On The Bad Layer Image/free rotate 5.00 to the right.
Free rotate the Girl Tag Layer only change it to Left this time
16. Now close off your background layer
right click any layer in the layers palette merge/merge visible.
Apply your drop shadow.
17. Select dropper tool to select a color from your image
left click/foreground color,
right click/background layer
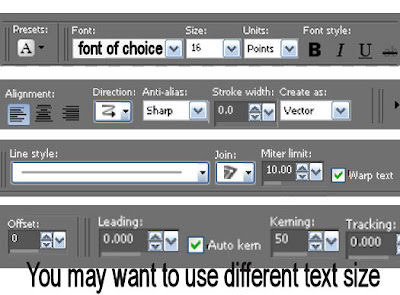
select the Text tool (settings below)
Select a font of your choice.
Type our your name.
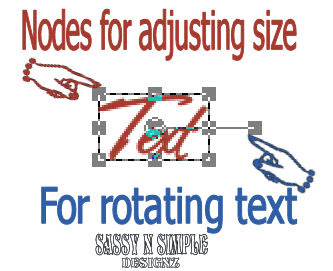
Use your nodes to size your text. Rotate it to the Right.
layers palette/right click convert to raster layer.
Apply your drop shadow.
18. Using your crop tool Crop your image close in but do not cut off any of the mask.
19. Select your rectangle tool
see settings below.
Set your foreground color to black
close off your Background color.
Start at top Left Corner ending in the right bottom corner
draw out your rectangle
Object/align/center in canvas then
Right click on the layer in your layers palette convert to raster layer
apply your same drop shadow.
20. Add your watermark and copyrights.
Re-size image all layers/smart size.
So that width is 400 height will adjust21 Close Background Layer right click in layers palette merge Visible.
Should only have two layers now..
22. Duplicate your back ground layer 2 times.

21 Layers palette/click eye to close Background Layer
right click any layer merge/ merge Visible.
You should only have two layers now..
22. Duplicate your back ground layer 3 times.
ANIMATION Open your Animation shop I will refer to it as AS
1. In On your bottom background layer Effects/VM Natural Lightsplash
Apply settings below.
Leave this layer open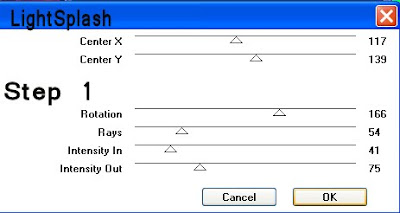
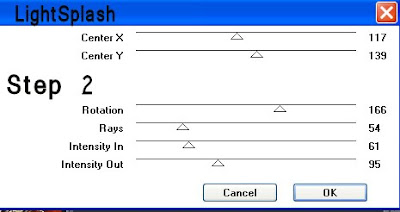
2. On the middle background Layer Effects/VM Natural Lightsplash Apply settings below.
Close off this layer
3. On the top background Layer Effects/VM Natural Lightsplash
Apply settings below.
Close off this Layer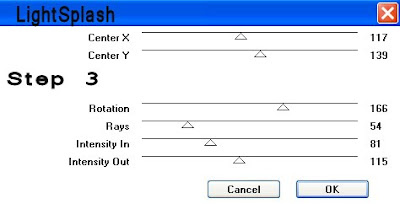
4. Only your merged layer and bottom background layer should be open Edit/copy merged
5. Go to AS and right click anywhere in the workspace paste as new animation.
6. Back In PsP close off the bottom Background Layer.
Open the middle background layer Edit/copy merged
Back in AS right click the first frame paste/paste after current frame.
7. Back in PsP close off the middle back layer.
Open the Top back ground Layer. Edit/copy merged.
In AS right click paste/after current Frame.
BAD GIRLS

DATE WRITTEN: Nov 5, 2009
THINGS NEEDED
Jasc Paintshop Pro or Corel Paint Program
PLUGINS: VM Natural Lightsplash.
You must have a good working knowledge of the programs I use.
ITEMS NEEDED
TUBE: Ismael Rac I purchased at AMI but he has is own store now HERE
KIT: Diva Designz PTU Tagger Fall Wishes purchase HERE or HERE
MASK: zuzzanna_mask 34 HERE included in my supplies
FONT: Of your choice
MY SUPPLIES: HERE
READ BELOW BEFORE STARTING
Settings may differ slightly depending on your version.
Close original after you copy it unless I state otherwise.
Sharpen all re-sized items 1 time.
RE-SIZE only one layer unless other wise stated.
Refer to my image for placement of items.
Left click and right click refers to mouse buttons.
Let's Begin
Open your tubes (2) and the mask minimize for now.
1. Open a new image 700x700 Selections/select all.
Select paper 2 from the kit, edit/copy
Edit/paste into selection.
Selections/select none
2. Select paper 8 from the kit. Edit/copy,
Edit/paste as new layer into your image.
3. Layers New Mask Layer/from Image
Select the zuzzanna_mask34in the window
source luminance/checked Invert mask data/checked
Click ok
4. Layers palette/Right click mask layer Merge/merge group
5. Select Frame 2 from the Kit Edit/copy
Edit/paste as new layer into your image
Re-size it 75%
Effects/3D/drop shadow
Vertical and horizontal 2
Opacity 70
Blur 5.00
color black
Shadow on new layer not checked
6. Still on Frame Layer Select your magic wand
(settings below) click inside both frame windows
Selections/modify/ expand 8
Keep Selected

7. Right Click on the mask layer Add a new raster layer.
Select Paper 2 from the Kit Edit copy,
Edit/paste into selection.
Selections/select none
8. Select your Tubes Edit/copy,
Edit/paste as new layer into your image Each Tube.
Take one Tube Image/free rotate/Left 10.00 (see other settings below).
Now Take the other Tube image Image/free rotate/ right 5.00
apply your drop shadow to both tubes.
Center them in the frame window.
Uncheck the following boxes
Rotate all layers
Rotate single layer around canvas
9. Now Close off your background and mask layer
right click any open layer and merge/merge visible.
10. Select Flower element 4 from the kit, Edit/copy,
Edit/paste as new layer into your image. Under your frame layer
Re-size it 25%.
Move it to the right side of your frame leaving some of it behind the frame.
Duplicate it 1 time. Image/mirror your duplicate.
Make sure some of it is slightly behind your frame.
11. Open the Tag template in my supplies.
Select the Tag Back Layer in your layers palette, Edit/copy,
Edit/paste as new layer into your image.
Select your magic wand and click on the Tag Back
select Paper 3 from the kit edit/copy
Edit/paste into selection.
Selections/select none.
Duplicate it 1 time.
Move one to the right side one to the left side. (do not rotate yet).
12. Back to my template select the frame layer in your layers palette. Edit/copy,
Edit/paste as new layer into your image.
Click on it with your magic wand.
Use your dropper tool select a color from your image left click/foreground color.
Then flood fill the selection. Selections/select none. Duplicate it 1 time
13. Now Position the frames over each of your tag backs.
In your layers palette,
Drag the frame Down so that it is above the matching back.
Once you do that Right Click on the frame in layers palette and merge down.
14. Back in the Tag Template select the BAD Layer Edit/copy,
Edit/paste as new layer into your image over the right Tag/merged layer.
Apply your drop shadow.
In your layers Palette Right Click the Bad Layer merge/merge down.
Now Repeat this for the word Girls.
In your layers palette Drag your tags Below your merged Frame Layer.
15. On The Bad Layer Image/free rotate 5.00 to the right.
Free rotate the Girl Tag Layer only change it to Left this time
16. Now close off your background layer
right click any layer in the layers palette merge/merge visible.
Apply your drop shadow.
17. Select dropper tool to select a color from your image
left click/foreground color,
right click/background layer
select the Text tool (settings below)
Select a font of your choice.
Type our your name.
Use your nodes to size your text. Rotate it to the Right.
layers palette/right click convert to raster layer.
Apply your drop shadow.


18. Using your crop tool Crop your image close in but do not cut off any of the mask.
19. Select your rectangle tool
see settings below.
Set your foreground color to black
close off your Background color.
Start at top Left Corner ending in the right bottom corner
draw out your rectangle
Object/align/center in canvas then
Right click on the layer in your layers palette convert to raster layer
apply your same drop shadow.
20. Add your watermark and copyrights.
Re-size image all layers/smart size.
So that width is 400 height will adjust21 Close Background Layer right click in layers palette merge Visible.
Should only have two layers now..
22. Duplicate your back ground layer 2 times.

21 Layers palette/click eye to close Background Layer
right click any layer merge/ merge Visible.
You should only have two layers now..
22. Duplicate your back ground layer 3 times.
ANIMATION Open your Animation shop I will refer to it as AS
1. In On your bottom background layer Effects/VM Natural Lightsplash
Apply settings below.
Leave this layer open

2. On the middle background Layer Effects/VM Natural Lightsplash Apply settings below.
Close off this layer

3. On the top background Layer Effects/VM Natural Lightsplash
Apply settings below.
Close off this Layer

4. Only your merged layer and bottom background layer should be open Edit/copy merged
5. Go to AS and right click anywhere in the workspace paste as new animation.
6. Back In PsP close off the bottom Background Layer.
Open the middle background layer Edit/copy merged
Back in AS right click the first frame paste/paste after current frame.
7. Back in PsP close off the middle back layer.
Open the Top back ground Layer. Edit/copy merged.
In AS right click paste/after current Frame.
I hope you enjoyed this tutorial.
Using my Tutorials to make your Stationary?
Please place a credit like below in your footer
Tutorial by Babs C
HERE or HERE
Link back to the links below please
http://sassynsimpletagtuts.blogspot.com/
http://groups.yahoo.com/group/sassynsimple/
I want to thank all the testers for testing my tutorials
I appreciate their help so much.
©Sassy n Simple
