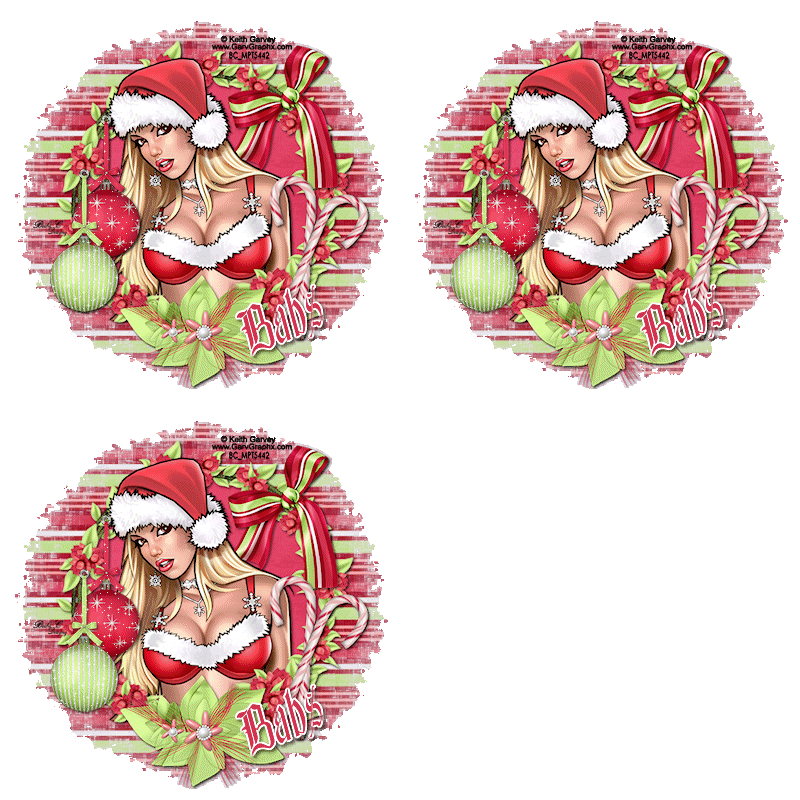
©Sassy n Simple
HOLIDAY SPARKLE
HOLIDAY SPARKLE

DATE WRITTEN: Nov 25, 2009
PROGRAMS NEEDED
Jasc Paintshop Pro or Corel Paint Program
Animations Shop
PLUGINS: VM Natural Sparkle
You must have a good working knowledge of the programs I use.
ITEMS NEEDED
TUBE: Keith Garvey I purchased it at MPT but you can buy it HERE
KIT: Bel Vidotti Feliz_Natal FTU HERE
FONT: Font of your choice I used Glastonbury Wide Shadow HERE
MASK: Narah_mask_Esfera010 site unknown, will be happy to add link
MY SUPPLIES: HERE
(contains the Mask above)
If you choose a different kit re-sizing may change.
READ BELOW BEFORE STARTING
Settings may differ slightly depending on your version.
Close original after you copy it unless I state otherwise.
Sharpen all re-sized items 1 time.
RE-SIZE only one layer unless other wise stated.
Refer to my image for placement of items.
Left click and right click refers to mouse buttons.
1. Select your tube and the Narah_mask_Esfera010 from my supplies minimize for now.
2. Open a new transparent image 600x600 do not fill this layer yet.
3. Add a new raster Layer,
Selections/Select All
Select Paper 17 from the kit. Edit/copy,
Edit paste into Selection.
Selections/Select None.
4. Layers New Mask Layer/from Image Select the mask in the window.
source luminance/checked Invert mask data/unchecked
Click OK
5. Layers palette/ Right click black/white mask layer Delete/click yes.
When the next pop up window comes up select Yes
Right click mask layer Merge/merge group.
6. Select Frame Element 84 from the kit, Edit/copy,
Edit/paste as new layer into your image.
Do not Re-size it.
Center in your Mask.
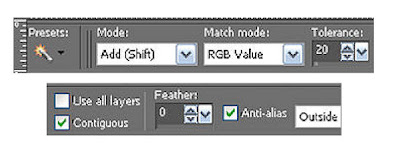
7. With your magic wand (settings below) click inside of your frame.
Selections/modify/Expand 4.
Keep selected.
8. Layers Palette/Right click on your mask layer/add a new raster Layer
Select Paper 02 from the Kit Edit/copy,
Edit/paste into selection.
Selections/Select None.
9. Now Click back on your Frame Layer Effects/3D/drop shadow
Vertical and horizontal 2
Opacity 70
Blur 5.00
color black
Shadow on new layer not checked
10. Select your Tube, Edit/copy,
Edit/paste as new layer into your image below your frame.
Center in your frame.
11. Layers palette/right click/Tube Layer duplicate1 time
Right click it in layers palette Arrange/bring it to the top.
Using your eraser tool erase any parts hiding the bottom of your frame.
Now Click back on Tube below frame and apply your drop shadow.
12. Select Bow Element 10 from the kit. Edit/copy,
Edit/paste as new layer into your image as top layer.
Re-size it 75%.
Place it on the Right side of your frame towards the top.
Apply same drop shadow.
13. Select Flower element 23 from the kit, Edit/copy,
Edit/paste as new layer into your image.
Re-size it 70%.
Place it centered at the bottom of your frame.
Apply same drop shadow.
14. Select the candy cane element 55 from the kit, Edit/copy,
Edit/paste as new layer into your image.
Re-size it 75%.
Move it to the right side of your frame In between the bow and Flower.
Apply same drop shadow.
PROGRAMS NEEDED
Jasc Paintshop Pro or Corel Paint Program
Animations Shop
PLUGINS: VM Natural Sparkle
You must have a good working knowledge of the programs I use.
ITEMS NEEDED
TUBE: Keith Garvey I purchased it at MPT but you can buy it HERE
KIT: Bel Vidotti Feliz_Natal FTU HERE
FONT: Font of your choice I used Glastonbury Wide Shadow HERE
MASK: Narah_mask_Esfera010 site unknown, will be happy to add link
MY SUPPLIES: HERE
(contains the Mask above)
If you choose a different kit re-sizing may change.
READ BELOW BEFORE STARTING
Settings may differ slightly depending on your version.
Close original after you copy it unless I state otherwise.
Sharpen all re-sized items 1 time.
RE-SIZE only one layer unless other wise stated.
Refer to my image for placement of items.
Left click and right click refers to mouse buttons.
1. Select your tube and the Narah_mask_Esfera010 from my supplies minimize for now.
2. Open a new transparent image 600x600 do not fill this layer yet.
3. Add a new raster Layer,
Selections/Select All
Select Paper 17 from the kit. Edit/copy,
Edit paste into Selection.
Selections/Select None.
4. Layers New Mask Layer/from Image Select the mask in the window.
source luminance/checked Invert mask data/unchecked
Click OK
5. Layers palette/ Right click black/white mask layer Delete/click yes.
When the next pop up window comes up select Yes
Right click mask layer Merge/merge group.
6. Select Frame Element 84 from the kit, Edit/copy,
Edit/paste as new layer into your image.
Do not Re-size it.
Center in your Mask.
7. With your magic wand (settings below) click inside of your frame.
Selections/modify/Expand 4.
Keep selected.

8. Layers Palette/Right click on your mask layer/add a new raster Layer
Select Paper 02 from the Kit Edit/copy,
Edit/paste into selection.
Selections/Select None.
9. Now Click back on your Frame Layer Effects/3D/drop shadow
Vertical and horizontal 2
Opacity 70
Blur 5.00
color black
Shadow on new layer not checked
10. Select your Tube, Edit/copy,
Edit/paste as new layer into your image below your frame.
Center in your frame.
11. Layers palette/right click/Tube Layer duplicate1 time
Right click it in layers palette Arrange/bring it to the top.
Using your eraser tool erase any parts hiding the bottom of your frame.
Now Click back on Tube below frame and apply your drop shadow.
12. Select Bow Element 10 from the kit. Edit/copy,
Edit/paste as new layer into your image as top layer.
Re-size it 75%.
Place it on the Right side of your frame towards the top.
Apply same drop shadow.
13. Select Flower element 23 from the kit, Edit/copy,
Edit/paste as new layer into your image.
Re-size it 70%.
Place it centered at the bottom of your frame.
Apply same drop shadow.
14. Select the candy cane element 55 from the kit, Edit/copy,
Edit/paste as new layer into your image.
Re-size it 75%.
Move it to the right side of your frame In between the bow and Flower.
Apply same drop shadow.
15. Select your dropper tool
left click mouse/foreground color
right click mouse/background color.
select a color from you image
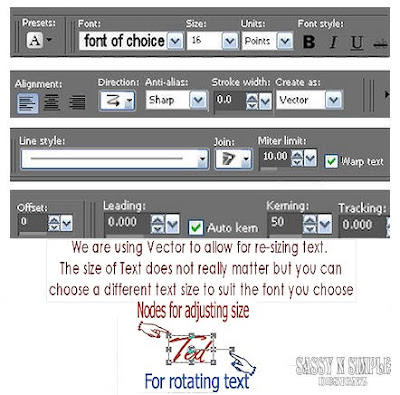
16. Select your Text tool a font of your Choice
I used Glastonbury Wide Shadow.
Type out your Name.
Use your nodes to size it like you want
then rotate bar to rotate the text to the Left.
layers palette/right click/ convert to raster layer
 17. Still on your text layer under selections tab do all of the following..
A. select all,
B. select float.
C. Select defloat.
D modify expand 2
18. Add a new raster layer under your text layer.
Select white in your foreground color
flood fill the selection
. Selections/select none
19. Now add your copyrights and watermark.
You want these placed close in to your image.
Close off your background layer and merge Visible.
Select white in your foreground color
flood fill the selection
. Selections/select none
19. Now add your copyrights and watermark.
You want these placed close in to your image.
Close off your background layer and merge Visible.
19. Now add your copyrights and watermark.
Close off your background layer and merge Visible.
Close off your background layer and merge Visible.
20. Still on merged Layer under selections tab do all of the following..
A. select all,
B. select float.
C. Select defloat.
D modify expand 3 (keep selected)
21. Add a New Raster Layer under your merged layer.
Select the color whit in your foreground Color and flood fill the selection.
Selections/select none.
22. Select Christmas Ball elements 39 and 40, Starting with Ball 40 Edit/copy,
Edit/paste as new layer into your image. Until you have both ball inserted into image.
Re-size the both 85%
Move them to the left side of your frame one below the other.
Apply Same drop shadow.
23. Select top Christmas ball layers palette/Right click/Merge/merge down.
24. Image/re-size all layers/smart size width 400 height will adjust.
Close off your Christmas Ball Layer.
layers palette/right click/merge/merge visible
you should now have 2 layers.
24. Image/re-size all layers/smart size width 400 height will adjust.
Close off your Christmas Ball Layer.
layers palette/right click/merge/merge visible
you should now have 2 layers.
ANIMATION
open your Animation Shop minimize it for now
1. Duplicate your Christmas Ball layer 2 times
Now close top and middle layers
2. Select your Bottom Layer under selections tab do all of the following
A. select all
B. select float
C. Select defloat.
Keep Selected until I say to dis-select
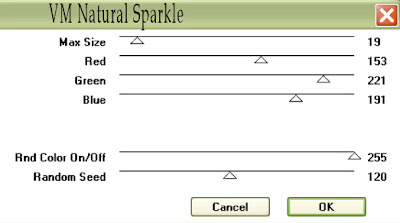
3. Effects/Plugins/VM Natural Sparkle
(Settings Below)

4. Select your Middle Ball Layer.
Apply your Sparkle again same settings But change your Random Seed to 135.
In your layers Palette click the eye and close this layer.
5. Select your Top Ball Layer.
Apply your Sparkle again same settings
But change your Random Seed to 150.
In your layers Palette click the eye and close this layer.
Selections/select none
6. Now only your Merged layer and Bottom ball layer should be open.
Edit/Copy merged.
7. take it to animation shop
right click anywhere in your workspace Paste as new animation
right click anywhere in your workspace Paste as new animation
8. Back in your PSP close off your Bottom Ball Layer
Open your Middle Ball layer
Edit/copy merged
9. Take it to animation shop
Right click first frame Paste/paste after current Frame
10. Back In PSP close off your middle Ball layer
Open your Top Ball Layer, Edit/copy merged
Open your Middle Ball layer
Edit/copy merged
9. Take it to animation shop
Right click first frame Paste/paste after current Frame
10. Back In PSP close off your middle Ball layer
Open your Top Ball Layer, Edit/copy merged
11. Take it to animation shop
right click paste/paste after current frame.
right click paste/paste after current frame.
12. Save your Image, I did not change my display times.
I hope you enjoyed this tutorial.
Using my Tutorials to make your Stationary?
Please place a credit like below in your footer
Tutorial by Babs C
HERE or HERE
Link back to the links below please
http://sassynsimpletagtuts.blogspot.com/
http://groups.yahoo.com/group/sassynsimple/
I want to thank all the testers for testing my tutorials
I appreciate their help so much.
©Sassy n Simple
