
©SassynSimple Tutorials
SEALED WITH A KISS
Jan 22, 2009

THINGS NEEDED
Jasc Paintshop Pro or Corel Paint Program Settings may vary slightly.
You must have a good working knowledge of the programs I use.
TUBE: Keith Garvey was at MPT but you can buy it HERE
KIT: Digicats (&dogs) PTU TAGGER KIT Sealed With A Kiss Buy HERE
MASK: Weescottslass WSL_342 HERE
FONT: Of your Choice
MY SUPPLIES: mask and Lips brushes HERE
If you choose a different kit re-sizing may change.
Let's Begin
A few things you need to do but will not be repeated.
Always Close original image after you copy unless stated otherwise.
Always sharpen re-sized items one time.
Right Click Left Click refers to mouse buttons.
Open your Tube, WSL_342 and the Lip brush from my supplies minimize for now.
1. Open a new transparent image 700x700 do not fill
2. Layers palette/right click/add new raster layer Selections/select all
Select paper 37 from the kit edit/copy
Edit/paste into selection.
Selections/select none
3. Layers New Mask Layer/from Image
Select WSL_Mask342 in the window.
source luminance/checked
uncheck the Invert mask data box
4. In your layers palette do the following
Right click black/white mask layer
Delete/click yes.
Next pop up window click Yes
Right click mask layer Merge/merge group.
5. Still on mask Layer re-size it 90%
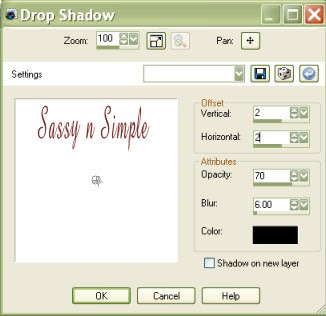
6. Effects/3D/drop shadow (settings below)
7. Select frame 02 from the kit, Edit/copy,
Edit/paste as new layer into your image.
Image/Re-size it 65%
Apply same drop shadow
8. Select your tube, Edit/copy,
Edit/paste as new layer into your image above your frame
Image/Re-size if needed I re-sized mine 95%
Apply same drop shadow.
Center in frame
9. Still on tube layer/eraser brush remove any parts below bottom of frame.
10. Select the Heart pendant Edit/copy,
Edit/paste as new layer into your image
Image/Re-size it 65%
Apply same drop shadow
Move it to the bottom of frame.
11. Select Candy Heart 05b Edit/copy,
Edit/paste as new layer into your image.
Image/resize 30%
Image/free rotate/20 left
Move it to right side of heart pendant at bottom of frame
12. Select Envelope Edit/copy,
Edit/paste as new layer into your image
Re-size it 35%
Apply same drop shadow
Image/Free Rotate/ Left 20
Move it to the Left Side of frame in the middle
Image/free rotate it 20 Left
13. Select Button 01 from the kit Edit/copy,
Edit/paste as new layer into your image.
Re-size it 40%
Apply same drop shadow
Image/free rotate/ 20 right
Move to the bottom of envelope.
14. Repeat step 13 But paste it under your envelope
And move it to the top of envelope
15. Select the Love stamp, Edit/copy,
Edit/paste as new layer into your image under pendant ribbon
Re-size it 40%
Apply same drop shadow.
Place on right side of frame slightly under ribbon
On the frame if you wish.
16. Using Dropper tool select a color from image that will stand out
Left click/ foreground color
Right click/background color
17. Select your text tool (settings below) Type out Sealed With A Kiss
I typed Sealed first, with second and a kiss third separately.
Size it with you nodes
Layers palette/right click/convert to raster layer
Apply same drop shadow
Place close to tube on the top right side of frame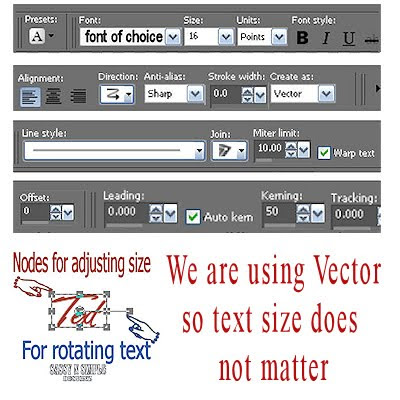
18. Add Your Name if you wish follow step 17 I changed my font.
19. Add your copyrights a watermark.. Do not put in the open spaces you will need those.. Refer to my image
21. Image re-size your image 400 in width height will adjust
Layers palette/close off background layer
right click any layer/merge/merge visible
22, selections tab do all of the following..
A. select all,
B. select float.
C. Select defloat.
D modify expand 2
22. Use dropper tool select a color a light to medium color
Left click/foreground color
Open background layer flood fill selection
Selection select none
Right click/merge/merge visible
23. Select one of the Lip brushes in my supplies
File/export/custom brush
24. Select a dark color that will stand out from your image
25. Select Brush find the Lip brush size it 125
Add a new raster Layer
Apply Brush click mouse 2 times
Top Left corner
26. Add a new raster layer Change brush size to 100
Apply brush click mouse 2 times
Place it on right side of frame under your text
27. Add a new raster layer Change brush size to 80
Apply brush click mouse 2 times
Place it on bottom right side of frame
28. Add a new raster layer Change brush size to 55
Apply brush click mouse 2 times
Place this on over the envelope
29. Layers palette close off all the lip layers Except the bottom Layer (raster 1)
ANIMATION
Open your animation shop minimize it for now
1. In Psp Edit/copy /copy Merged. Go to Animation Shop
right click in workspace/paste as new animation.
2. Back in PSP Close Lip raster Layer 1(bottom.
Open Lip raster Layer 2 (Next Layer up)
Edit/copy/copy merged
In Animation shop right click first frame/paste/paste after current frame
3. Back in PSP Close Lip raster Layer 2.
Open Lip raster Layer 3 (next Layer up)
Edit/copy/copy merged
In Animation shop right click second frame/paste/paste after current frame
4. Back in PSP Close Lip raster Layer 3
Open Lip raster Layer 4 (next layer up)
Edit/copy/copy merged
In Animation shop right click third frame/paste/paste after current frame
5. In animation shop make sure first frame is highlighted in blue
Edit/select all
Right click on first frame/frame properties change display time to 40
Now edit select none
Right click on last frame/frame properties change display time to 120
6. Now save your animation.
I hope you enjoyed this Tutorial.
I would Like to Thank the Babs_SassynSimple_TagsnTuts Testers for testing my tutorial for me.
No PTU items are shared during the testing of my tutorials. They provide their own Tubes and Kits.
Jan 22, 2009
THINGS NEEDED
Jasc Paintshop Pro or Corel Paint Program Settings may vary slightly.
You must have a good working knowledge of the programs I use.
TUBE: Keith Garvey was at MPT but you can buy it HERE
KIT: Digicats (&dogs) PTU TAGGER KIT Sealed With A Kiss Buy HERE
MASK: Weescottslass WSL_342 HERE
FONT: Of your Choice
MY SUPPLIES: mask and Lips brushes HERE
If you choose a different kit re-sizing may change.
Let's Begin
A few things you need to do but will not be repeated.
Always Close original image after you copy unless stated otherwise.
Always sharpen re-sized items one time.
Right Click Left Click refers to mouse buttons.
Open your Tube, WSL_342 and the Lip brush from my supplies minimize for now.
1. Open a new transparent image 700x700 do not fill
2. Layers palette/right click/add new raster layer Selections/select all
Select paper 37 from the kit edit/copy
Edit/paste into selection.
Selections/select none
3. Layers New Mask Layer/from Image
Select WSL_Mask342 in the window.
source luminance/checked
uncheck the Invert mask data box
4. In your layers palette do the following
Right click black/white mask layer
Delete/click yes.
Next pop up window click Yes
Right click mask layer Merge/merge group.
5. Still on mask Layer re-size it 90%
6. Effects/3D/drop shadow (settings below)

7. Select frame 02 from the kit, Edit/copy,
Edit/paste as new layer into your image.
Image/Re-size it 65%
Apply same drop shadow
8. Select your tube, Edit/copy,
Edit/paste as new layer into your image above your frame
Image/Re-size if needed I re-sized mine 95%
Apply same drop shadow.
Center in frame
9. Still on tube layer/eraser brush remove any parts below bottom of frame.
10. Select the Heart pendant Edit/copy,
Edit/paste as new layer into your image
Image/Re-size it 65%
Apply same drop shadow
Move it to the bottom of frame.
11. Select Candy Heart 05b Edit/copy,
Edit/paste as new layer into your image.
Image/resize 30%
Image/free rotate/20 left
Move it to right side of heart pendant at bottom of frame
12. Select Envelope Edit/copy,
Edit/paste as new layer into your image
Re-size it 35%
Apply same drop shadow
Image/Free Rotate/ Left 20
Move it to the Left Side of frame in the middle
Image/free rotate it 20 Left
13. Select Button 01 from the kit Edit/copy,
Edit/paste as new layer into your image.
Re-size it 40%
Apply same drop shadow
Image/free rotate/ 20 right
Move to the bottom of envelope.
14. Repeat step 13 But paste it under your envelope
And move it to the top of envelope
15. Select the Love stamp, Edit/copy,
Edit/paste as new layer into your image under pendant ribbon
Re-size it 40%
Apply same drop shadow.
Place on right side of frame slightly under ribbon
On the frame if you wish.
16. Using Dropper tool select a color from image that will stand out
Left click/ foreground color
Right click/background color
17. Select your text tool (settings below) Type out Sealed With A Kiss
I typed Sealed first, with second and a kiss third separately.
Size it with you nodes
Layers palette/right click/convert to raster layer
Apply same drop shadow
Place close to tube on the top right side of frame

18. Add Your Name if you wish follow step 17 I changed my font.
19. Add your copyrights a watermark.. Do not put in the open spaces you will need those.. Refer to my image
21. Image re-size your image 400 in width height will adjust
Layers palette/close off background layer
right click any layer/merge/merge visible
22, selections tab do all of the following..
A. select all,
B. select float.
C. Select defloat.
D modify expand 2
22. Use dropper tool select a color a light to medium color
Left click/foreground color
Open background layer flood fill selection
Selection select none
Right click/merge/merge visible
23. Select one of the Lip brushes in my supplies
File/export/custom brush
24. Select a dark color that will stand out from your image
25. Select Brush find the Lip brush size it 125
Add a new raster Layer
Apply Brush click mouse 2 times
Top Left corner
26. Add a new raster layer Change brush size to 100
Apply brush click mouse 2 times
Place it on right side of frame under your text
27. Add a new raster layer Change brush size to 80
Apply brush click mouse 2 times
Place it on bottom right side of frame
28. Add a new raster layer Change brush size to 55
Apply brush click mouse 2 times
Place this on over the envelope
29. Layers palette close off all the lip layers Except the bottom Layer (raster 1)
ANIMATION
Open your animation shop minimize it for now
1. In Psp Edit/copy /copy Merged. Go to Animation Shop
right click in workspace/paste as new animation.
2. Back in PSP Close Lip raster Layer 1(bottom.
Open Lip raster Layer 2 (Next Layer up)
Edit/copy/copy merged
In Animation shop right click first frame/paste/paste after current frame
3. Back in PSP Close Lip raster Layer 2.
Open Lip raster Layer 3 (next Layer up)
Edit/copy/copy merged
In Animation shop right click second frame/paste/paste after current frame
4. Back in PSP Close Lip raster Layer 3
Open Lip raster Layer 4 (next layer up)
Edit/copy/copy merged
In Animation shop right click third frame/paste/paste after current frame
5. In animation shop make sure first frame is highlighted in blue
Edit/select all
Right click on first frame/frame properties change display time to 40
Now edit select none
Right click on last frame/frame properties change display time to 120
6. Now save your animation.
I hope you enjoyed this Tutorial.
I would Like to Thank the Babs_SassynSimple_TagsnTuts Testers for testing my tutorial for me.
No PTU items are shared during the testing of my tutorials. They provide their own Tubes and Kits.