

DATE WRITTEN: Jan, 12, 2010
THINGS NEEDED
Jasc Paintshop Pro or Corel Paint Program Settings may vary slightly.
You must have a good working knowledge of the programs I use.
TUBE: MediEvil Creations Tube is in Kit but check out her Blog HERE for more beautiful creations.
KIT: Linda’s Dream Designs PTU Tagger Kit Sweet n Spicey HERE or HERE
MASK: Naran_mask_Esfera003 I do not have the site If this is your please let me know and I will be happy to put in your link..
PLUGINS: MuRa’s seamless edge HERE
FONT: Adam Gorry Lights FTU HERE
MY SUPPLIES: HERE
If you choose a different kit re-sizing may change.
Let's Begin
A few things you need to do but will not be repeated.
Always Close original image after you copy unless stated otherwise.
Always sharpen re-sized items one time.
Right Click Left Click refers to mouse buttons.
Tip scan tutorial open elements zoom out to make them small line at the bottom of workspace
1. Open the posers or tubes of your choice. mask and font in my supply folder. Minimize them for now..
2. Open a new transparent image 700x700
Selections/select all.
Select Paper 7 Edit/copy, Edit/paste into your Image
Selections/Select None.
3. Select the doodle from the kit
Edit/copy, Edit/paste as new layer into your image.
Re-size 85%
Place it on the left side near the edge
Duplicate 1 time
Image/mirror
4. Effects/3D/Drop shadow settings below.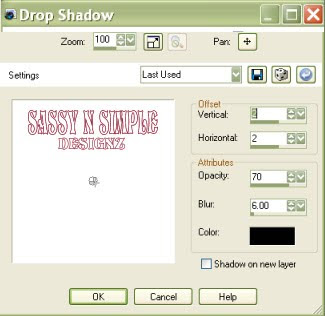
5. Right click layers palette/Add a new raster Layer
Selections/select All
Select Paper 6, Edit/copy, Edit/paste into selection
Selections/Select none.
6. Layers New Mask Layer/from Image
Select the mask in the window.
source luminance/checked uncheck the Invert mask data box
7. Layers palette do the following
Right click black/white mask layer Delete/click yes.
Next pop up window click Yes
Right click mask layer Merge/merge group.
Apply drop shadow to the mask.
8. Select Frame 1 from the Element folder
Edit/copy, Edit/paste as new layer into your image.
Re-size it 85%
Apply same drop shadow.
11. Select Medisweet3 poser from the elements folder
Edit/copy, Edit/paste as new layer into your image.
Selection tool rectangle Select only her Head area stop at pigtails
Edit/copy, Edit Paste as new layer into your image under the frame.
Center in the frame window
Apply same drop shadow.
12. Select doodle 2 flower from element folder
Edit/copy, Edit/paste as new layer into your image.
Re-size it 50%
Apply same drop shadow.
Place on top right side of frame.
13. Select bow 3 from element folder
Edit/copy, Edit/paste as new layer into your image.
Re-size it 50%
Apply same drop shadow
Place on the left top side of frame
14. Select ribbon charm 3 from element folder
Edit/copy, Edit/paste as new layer into your image.
Apply same drop shadow.
Place at the bottom of your frame. Refer to my image
15. Select Medisweet4 poser from element folder
Edit/copy, Edit/paste as new layer into your image.
Re-size it 85%
Apply same drop shadow
Place her on the ribbon
16. Layers Palette click on the ribbon layer
Selection tool draw a rectangle draw around the left side of ribbon just past fold
Edit/copy,
Keep selection selected..
17. Add a new raster Layer above your Poser that is on the ribbon
Edit/paste into selection.
Selections select none.
18.Image/add border 5 choose a dark color from image
Image /add border 5 choose a light color from image
Image add border 5 choose same dark color
19. Using your dropper tool choose the pink in the bow..
Left click/foreground
Right click/background
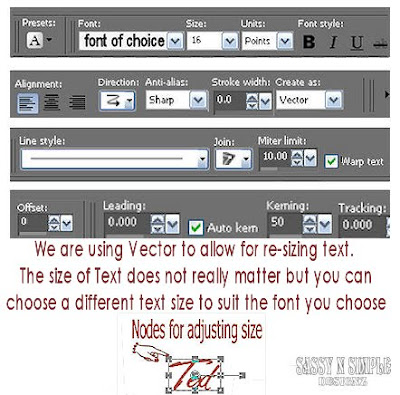
20. Select your text tool (Settings below) Select the font in my supplies or one of choice Type out the word spicy
Size with nodes
Layers palette/right click/convert to raster layer
Place on the top left side
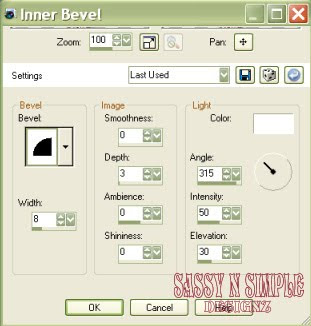
21. Effects/3d/Inner Bevel (settings below). Apply same drop shadow.
22. Select Text tool again change the settings in the image below..
Size with nodes
Layers palette/right click/convert to raster layer
Place on left side of image.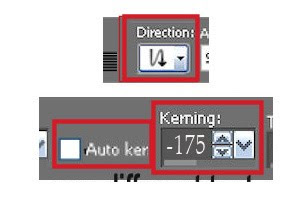
23. Repeat inner bevel. Apply same drop shadow.
Layers palette/right click layer/merge/merge down
24. If you want to add your name repeat steps 19 and 20 make sure to change settings back to vertical and kerning back to 50
Layers palette/right click layer/merge/merge down I did not apply bevel to my name.
25. New raster layer under your text layer apply watermarks and copyright.
If you used the Medi posers from the Kit open the watermark in my supplies
Edit/copy, Edit/paste as new layer into your image.
Place it near the poser on the ribbon
26. Re-size your image to your liking smart size/all layers. I re-sized to 350 width height will adjust.
27. Close off the merged text layer
Right click any layer/merge/merge visible
ANIMATION
Open animation shop minimize for now.
1. In PSP duplicate your merged text layer 1 time.
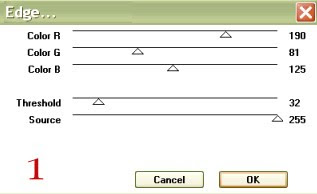
Starting with duplicate layer (top) Effects/plugins/Mura’s Seamless/Edge
(settings below)
Layers Palette/click the eye close this layer.
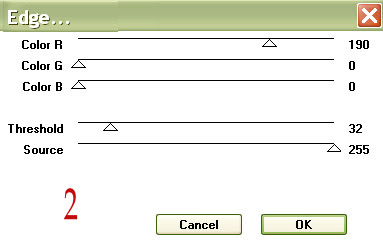
2. In psp Select the bottom merged text layer
Effects/plugins/Mura’s Seamless/Edge (settings below)
3. Edit/ copy/copy merged Take it to Animation Shop
Right click anywhere in workspace paste as new animation
4. Back in PSP close the bottom text layer Open the top Layer
Edit/copy/copy merged
Take it to Animation shop
Right click first frame/paste/paste after current layer.
5. I did not change display time.
Make a folder and save your image in it. When you hit "save as" there I will be an options button click on it and set your compression factor to 4. This will take away the grainy look that you get sometimes.
I would Like to Thank the Babs_SassynSimple_TagsnTuts Testers for testing my tutorial for me.
I hope you enjoyed this Tutorial.
THINGS NEEDED
Jasc Paintshop Pro or Corel Paint Program Settings may vary slightly.
You must have a good working knowledge of the programs I use.
TUBE: MediEvil Creations Tube is in Kit but check out her Blog HERE for more beautiful creations.
KIT: Linda’s Dream Designs PTU Tagger Kit Sweet n Spicey HERE or HERE
MASK: Naran_mask_Esfera003 I do not have the site If this is your please let me know and I will be happy to put in your link..
PLUGINS: MuRa’s seamless edge HERE
FONT: Adam Gorry Lights FTU HERE
MY SUPPLIES: HERE
If you choose a different kit re-sizing may change.
Let's Begin
A few things you need to do but will not be repeated.
Always Close original image after you copy unless stated otherwise.
Always sharpen re-sized items one time.
Right Click Left Click refers to mouse buttons.
Tip scan tutorial open elements zoom out to make them small line at the bottom of workspace
1. Open the posers or tubes of your choice. mask and font in my supply folder. Minimize them for now..
2. Open a new transparent image 700x700
Selections/select all.
Select Paper 7 Edit/copy, Edit/paste into your Image
Selections/Select None.
3. Select the doodle from the kit
Edit/copy, Edit/paste as new layer into your image.
Re-size 85%
Place it on the left side near the edge
Duplicate 1 time
Image/mirror
4. Effects/3D/Drop shadow settings below.

5. Right click layers palette/Add a new raster Layer
Selections/select All
Select Paper 6, Edit/copy, Edit/paste into selection
Selections/Select none.
6. Layers New Mask Layer/from Image
Select the mask in the window.
source luminance/checked uncheck the Invert mask data box
7. Layers palette do the following
Right click black/white mask layer Delete/click yes.
Next pop up window click Yes
Right click mask layer Merge/merge group.
Apply drop shadow to the mask.
8. Select Frame 1 from the Element folder
Edit/copy, Edit/paste as new layer into your image.
Re-size it 85%
Apply same drop shadow.
11. Select Medisweet3 poser from the elements folder
Edit/copy, Edit/paste as new layer into your image.
Selection tool rectangle Select only her Head area stop at pigtails
Edit/copy, Edit Paste as new layer into your image under the frame.
Center in the frame window
Apply same drop shadow.
12. Select doodle 2 flower from element folder
Edit/copy, Edit/paste as new layer into your image.
Re-size it 50%
Apply same drop shadow.
Place on top right side of frame.
13. Select bow 3 from element folder
Edit/copy, Edit/paste as new layer into your image.
Re-size it 50%
Apply same drop shadow
Place on the left top side of frame
14. Select ribbon charm 3 from element folder
Edit/copy, Edit/paste as new layer into your image.
Apply same drop shadow.
Place at the bottom of your frame. Refer to my image
15. Select Medisweet4 poser from element folder
Edit/copy, Edit/paste as new layer into your image.
Re-size it 85%
Apply same drop shadow
Place her on the ribbon
16. Layers Palette click on the ribbon layer
Selection tool draw a rectangle draw around the left side of ribbon just past fold
Edit/copy,
Keep selection selected..
17. Add a new raster Layer above your Poser that is on the ribbon
Edit/paste into selection.
Selections select none.
18.Image/add border 5 choose a dark color from image
Image /add border 5 choose a light color from image
Image add border 5 choose same dark color
19. Using your dropper tool choose the pink in the bow..
Left click/foreground
Right click/background
20. Select your text tool (Settings below) Select the font in my supplies or one of choice Type out the word spicy
Size with nodes
Layers palette/right click/convert to raster layer
Place on the top left side

21. Effects/3d/Inner Bevel (settings below). Apply same drop shadow.

22. Select Text tool again change the settings in the image below..
Size with nodes
Layers palette/right click/convert to raster layer
Place on left side of image.

23. Repeat inner bevel. Apply same drop shadow.
Layers palette/right click layer/merge/merge down
24. If you want to add your name repeat steps 19 and 20 make sure to change settings back to vertical and kerning back to 50
Layers palette/right click layer/merge/merge down I did not apply bevel to my name.
25. New raster layer under your text layer apply watermarks and copyright.
If you used the Medi posers from the Kit open the watermark in my supplies
Edit/copy, Edit/paste as new layer into your image.
Place it near the poser on the ribbon
26. Re-size your image to your liking smart size/all layers. I re-sized to 350 width height will adjust.
27. Close off the merged text layer
Right click any layer/merge/merge visible
ANIMATION
Open animation shop minimize for now.
1. In PSP duplicate your merged text layer 1 time.
Starting with duplicate layer (top) Effects/plugins/Mura’s Seamless/Edge
(settings below)
Layers Palette/click the eye close this layer.

2. In psp Select the bottom merged text layer
Effects/plugins/Mura’s Seamless/Edge (settings below)

3. Edit/ copy/copy merged Take it to Animation Shop
Right click anywhere in workspace paste as new animation
4. Back in PSP close the bottom text layer Open the top Layer
Edit/copy/copy merged
Take it to Animation shop
Right click first frame/paste/paste after current layer.
5. I did not change display time.
Make a folder and save your image in it. When you hit "save as" there I will be an options button click on it and set your compression factor to 4. This will take away the grainy look that you get sometimes.
I would Like to Thank the Babs_SassynSimple_TagsnTuts Testers for testing my tutorial for me.
I hope you enjoyed this Tutorial.