©SassynSimple Tutorials
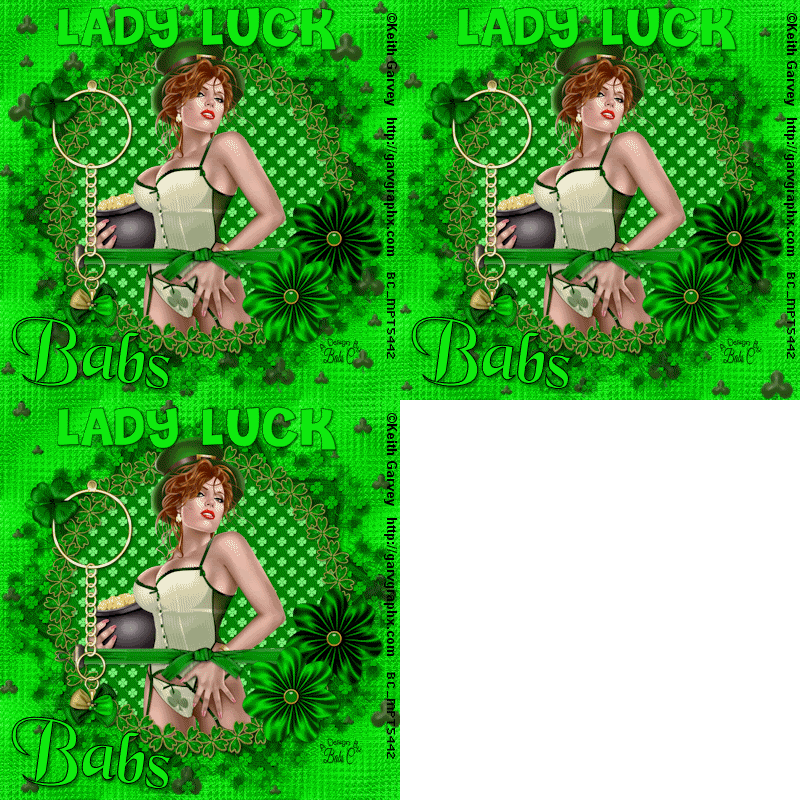
LADY LUCK
DATE WRITTEN: Feb 27, 2010
DATE WRITTEN: Feb 27, 2010

To do this Tutorial you need a Paintshop or a Corel program and Animation Shop. You must have a good working knowledge of the programs. Depending on your program settings may vary slightly.
TUBE: Keith Garvey was at MPT but you can buy it HERE
KIT: Fantasy Moments FTU Tagger ST Patty HERE
MASK: Essex Girl sg_braid-star page 24 HERE
FONT: Of your choice
MY SUPPLIES: Clover Floaties HERE
Read the following they will not repeated
Always Close original image after you copy unless stated otherwise.
Always sharpen re-sized items one time.
Right click, Left click refers to mouse buttons.
Let's Begin Now
1. Open Tube, and the sg_braided-star minimize for now.
2. Open a new transparent image 700x700
Selections/select all
Select paper 12 from the kit Edit/copy
Edit/paste into selection
Selections select none
3. Add a new raster layer
Selections/select all.
Keep selected
4. Select Paper 1 from the kit. Edit/copy
Edit/paste as new layer into your working image
Selections/select none
5. Layers New Mask Layer/from Image
Select the mask in the window.
source luminance/checked
Invert mask data/checked click ok.
6. Layers palette/Right click black/white mask
Delete/click yes.
next pop up window comes up select Yes
Right click mask layer Merge/merge group.
7. Select Element 77 (frame) from the kit edit/copy
Edit/paste as new layer into your working image
Re-size it 85%
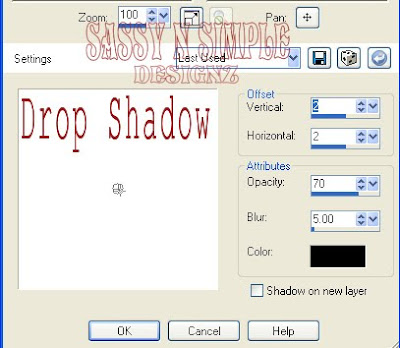
8. Effects/3D/Drop Shadow (settings Below)

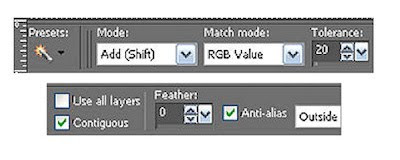
9. Select magic wand (settings below) Click inside the frame
Selections/modify/expand 18
Keep selected
 10. Add a new raster Layer under your frame layer
Select Paper 2 from the kit, Edit/copy
Edit/paste into selection
Selections/select none
11. Select your tube, edit/copy
Edit/paste as new layer into your working image
Re-size as needed I did not re-size
Apply same drop shadow
Center in your frame
12. Select your selection tool (settings below)
Click on frame layer and draw a rectangle around the bottom of frame
Edit/copy
Keep selected

13. Add a new raster layer above your tube layer
Edit/paste into selection
Selections/select none
Now your frame should be hiding the bottom part of your tube.
14. Select Element 13 (ribbon) from the kit Edit/copy
Edit/paste as new layer into your working image
Re-size it 50%
Place towards the bottom of frame (see image)
15. Select elements 36 and 37 from the kit Edit/copy each one
Edit/paste as new layer into your working image
Re-size them 40%
Apply drop shadow
Place on right bottom corner of frame
16. Select element 71 (charm) from the kit Edit/copy
Edit/paste as new layer into your working image
Re-size it 50%
Apply same drop shadow
Place on left side of frame
17. In your foreground color Select the color black
In your background color use dropper tool and select a color from
The image.
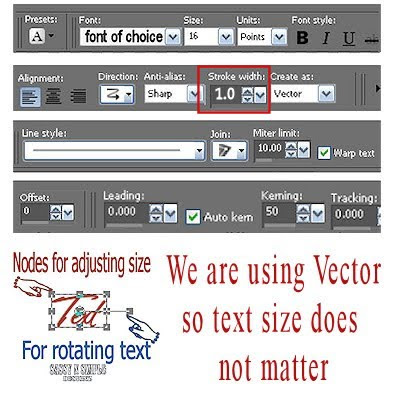
18. Select your text tool (settings below) Type out Lady Luck
Size with your nodes
Layers palette/right click/convert to raster layer
Apply drop shadow.

19. If you want to add your name repeat step 18 I used a different text
For my name.
20. Re-size all layers/smart size 400 width height will adjust.
21. Add your copyrights and water mark
22. Close off the background layer
Layers palette/right click/merge/merge visible
Open up your background layer
ANIMATION
open your Animation Shop
1. Open the Clover floaties in my supplies in your animation shop
Click first clover frame Edit/copy
2. Back in Psp add a new raster layer above your background layer
Selections/select all
Edit/paste into selection your clover floaties should now be in this layer
Selections/select none
3. Back in Animation shop click on clover frame 2
Edit/copy
4. Back in Psp add a new raster layer above the clover floatie layer
Selections/select all
Edit/paste into selection your clover floaties should now be in this layer
Selections/select none
5. Back in Animation shop click on clover frame 3
Edit/copy
6. Back in Psp add a new raster layer above the clover floatie layer
Selections/select all
Edit/paste into selection your clover floaties should now be in this layer
Selections/select none
7. Now close off the middle and top clover floatie layer
Edit/copy/copy merged
Take to animations shop and paste as new animation
8. Back in PsP close off bottom floatie layer open middle floatie layer
Edit/copy/copy merged
Take it to animation shop right click first frame/paste after current frame.
9. Back in PsP close off middle floatie layer open top floatie layer
Edit/copy/copy merged
Take it to animation shop right click second frame/paste after current frame.
10. In Animation shop click first frame
Edit/select all/right click frame/frame properties change display time to 20
11. Save your animation
I hope you enjoy doing my Basic Steps
I want to thank the testers of Babs SassynSimple TagsnTuts for helping to make them mistake free.
