
DATE WRITTEN: Feb 17, 2010
To do this Tutorial you need a Paintshop or a Corel program and Animation Shop. You must have a good working knowledge of the programs. Depending on your program settings may vary slightly.
TUBE: Ismael Rac I got it at AMI you must purchase it HERE NOW
KIT: Linda’s Dream Designs Passion Abloom PTU tagger puchase it at TKO
MASK: Zuzzanna Zuz_Mask_56 HERE
FONT: Of Your choice you will need 2
Read the following they will not repeated
Always Close original image after you copy unless stated otherwise.
Always sharpen re-sized items one time.
Right click, Left click refers to mouse buttons.
Drop shadow settings will always stay set
1. Open your Tube and the Zuz_Mask 56 mask, minimize for now.
2. Open a new transparent image 700x750 flood fill with white
3. Layers palette/right click/add new raster Layer
Selections/select all
Select Paper 2 from kit. Edit copy
Edit/paste into selection
Selections/select none
4. Layers New Mask Layer/from Image
Select Zuz_Mask_56 in the window.
source luminance/checked
Invert mask data/checked click ok.
5. Layers palette/Right click black/white mask
Delete/click yes.
next pop up window comes up select Yes
Right click mask layer Merge/merge group.
Right click/merge/merge down
6. Select Frame 1 from the kit, Edit/copy
Edit/paste as new layer into your working image
Re-size 85%
Image/free rotate left 15.00
uncheck boxes below
all layers
rotate single layer around canvas center
7. Still on frame Effects/3D/Drop Shadow (settings Below)
Vertical and horizontal 2
Vertical and horizontal 2
Opacity 70
Blur 5.00
color black
Shadow on new layer not checked
8. With magic wand (settings below) click inside your frame window
Selections/modify/expand 12
Keep selected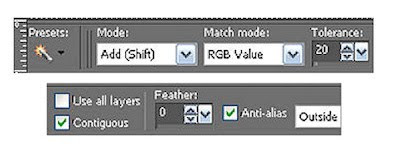
9. Add a new raster layer under your frame
Select Paper 6 from the kit Edit/copy
Edit paste into selection
Selections/Select none
10. Select your Tube Edit/copy
Edit/paste as new layer into your working image below frame
Re-size if needed I re-sized 50%
Apply same drop shadow
Image/free rotate 15.00 left
Center in frame
11. Select Flower 5 from the kit, Edit copy
Edit/paste as new layer into your working image above frame
Re-size 50%
Apply same drop shadow
Place on right bottom corner of frame
Layers palette/right click/duplicate 1 time
Move duplicate to left top corner of frame
12. Select button 1 from kit, Edit/copy
Edit/paste as new layer into your working image below your bottom flower layer
Re-size 30%
Apply same drop shadow
Move just above the top of the bottom flower (see my image)
Layers palette/right click/duplicate 1 time
Move this to the left side of bottom flower (see my image)
13. Apply copyrights and watermark
14. Layers palette/right click any layer/merge/merge visible
15. Re-size your image 450 in width height will adjust
16. Use dropper tool select a color that will stand out
17. Select your text tool (settings below) select a medium to fat print style font Type out TAKE IT OFF
Use node to size it place at top.
Layers palette/right click/convert to raster layer
Apply same drop shadow.
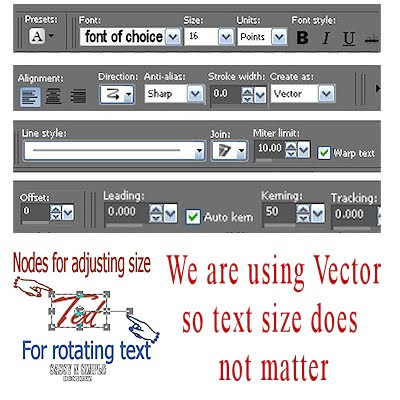
18. Still using text tool select a different font type out SPRING IS HERE
Size with nodes so it fits under your frame
Use rotation bar to rotate it.
Apply same drop shadow
Layers palette/right click/convert to raster layer
20. If you want to add your name repeat step 18.
21. Close of the text Layer TAKE IT OFF by clicking the eye on the layer in layers palette
22. Edit/copy/copy merged
ANIMATION:
Open animation shop
1. Right click anywhere in work space paste as new animation
2. Now right click the frame duplicate selected.. Do this until you have a total of 5 frames. If you get to many frames delete the frames you do not need..
3. Click first frame Edit/select all move this animation over so that it does not take up entire window but leave it large enough that you can view the first frame entirely..
4. Back in PSP close off all layers open the Text Layer TAKE IT OFF
Edit/copy
5. Back in Animation shop right click in your open workspace/paste as new animation
6. On the tool bar Effect/Image Effects (see images below) for settings
Click OK. You should have 5 frames
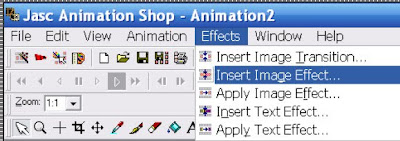
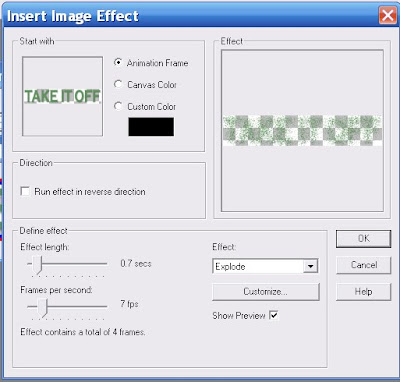
7. Click on the first frame Edit/select all
8. Make sure you have this tool selected (see image below) click on the first frame of the Text hold mouse down drag it into your first Anim ation placing it at the top where it should go do not release your mouse button until you have it where you want it.. Top/Centered
9. Should you not be happy with placement go to edit click undo drag click back on the animation where you got the text from and to that again. Now you can drag it again and place it better.
10. On your image Go to Edit/select none. Now right click first frame/frame properties change display time to 40 all frames should be 10
11. Save your animation
I hope you enjoy doing my Basic Steps
I want to thank the testers of Babs SassynSimple TagsnTuts for helping to make them mistake free.
To do this Tutorial you need a Paintshop or a Corel program and Animation Shop. You must have a good working knowledge of the programs. Depending on your program settings may vary slightly.
TUBE: Ismael Rac I got it at AMI you must purchase it HERE NOW
KIT: Linda’s Dream Designs Passion Abloom PTU tagger puchase it at TKO
MASK: Zuzzanna Zuz_Mask_56 HERE
FONT: Of Your choice you will need 2
Read the following they will not repeated
Always Close original image after you copy unless stated otherwise.
Always sharpen re-sized items one time.
Right click, Left click refers to mouse buttons.
Drop shadow settings will always stay set
1. Open your Tube and the Zuz_Mask 56 mask, minimize for now.
2. Open a new transparent image 700x750 flood fill with white
3. Layers palette/right click/add new raster Layer
Selections/select all
Select Paper 2 from kit. Edit copy
Edit/paste into selection
Selections/select none
4. Layers New Mask Layer/from Image
Select Zuz_Mask_56 in the window.
source luminance/checked
Invert mask data/checked click ok.
5. Layers palette/Right click black/white mask
Delete/click yes.
next pop up window comes up select Yes
Right click mask layer Merge/merge group.
Right click/merge/merge down
6. Select Frame 1 from the kit, Edit/copy
Edit/paste as new layer into your working image
Re-size 85%
Image/free rotate left 15.00
uncheck boxes below
all layers
rotate single layer around canvas center
7. Still on frame Effects/3D/Drop Shadow (settings Below)
Vertical and horizontal 2
Vertical and horizontal 2
Opacity 70
Blur 5.00
color black
Shadow on new layer not checked
8. With magic wand (settings below) click inside your frame window
Selections/modify/expand 12
Keep selected

9. Add a new raster layer under your frame
Select Paper 6 from the kit Edit/copy
Edit paste into selection
Selections/Select none
10. Select your Tube Edit/copy
Edit/paste as new layer into your working image below frame
Re-size if needed I re-sized 50%
Apply same drop shadow
Image/free rotate 15.00 left
Center in frame
11. Select Flower 5 from the kit, Edit copy
Edit/paste as new layer into your working image above frame
Re-size 50%
Apply same drop shadow
Place on right bottom corner of frame
Layers palette/right click/duplicate 1 time
Move duplicate to left top corner of frame
12. Select button 1 from kit, Edit/copy
Edit/paste as new layer into your working image below your bottom flower layer
Re-size 30%
Apply same drop shadow
Move just above the top of the bottom flower (see my image)
Layers palette/right click/duplicate 1 time
Move this to the left side of bottom flower (see my image)
13. Apply copyrights and watermark
14. Layers palette/right click any layer/merge/merge visible
15. Re-size your image 450 in width height will adjust
16. Use dropper tool select a color that will stand out
17. Select your text tool (settings below) select a medium to fat print style font Type out TAKE IT OFF
Use node to size it place at top.
Layers palette/right click/convert to raster layer
Apply same drop shadow.

18. Still using text tool select a different font type out SPRING IS HERE
Size with nodes so it fits under your frame
Use rotation bar to rotate it.
Apply same drop shadow
Layers palette/right click/convert to raster layer
20. If you want to add your name repeat step 18.
21. Close of the text Layer TAKE IT OFF by clicking the eye on the layer in layers palette
22. Edit/copy/copy merged
ANIMATION:
Open animation shop
1. Right click anywhere in work space paste as new animation
2. Now right click the frame duplicate selected.. Do this until you have a total of 5 frames. If you get to many frames delete the frames you do not need..
3. Click first frame Edit/select all move this animation over so that it does not take up entire window but leave it large enough that you can view the first frame entirely..
4. Back in PSP close off all layers open the Text Layer TAKE IT OFF
Edit/copy
5. Back in Animation shop right click in your open workspace/paste as new animation
6. On the tool bar Effect/Image Effects (see images below) for settings
Click OK. You should have 5 frames


7. Click on the first frame Edit/select all
8. Make sure you have this tool selected (see image below) click on the first frame of the Text hold mouse down drag it into your first Anim
 ation placing it at the top where it should go do not release your mouse button until you have it where you want it.. Top/Centered
 9. Should you not be happy with placement go to edit click undo drag click back on the animation where you got the text from and to that again. Now you can drag it again and place it better.
10. On your image Go to Edit/select none. Now right click first frame/frame properties change display time to 40 all frames should be 10
11. Save your animation
I hope you enjoy doing my Basic Steps
I want to thank the testers of Babs SassynSimple TagsnTuts for helping to make them mistake free.
