
©SassynSimple Tutorials
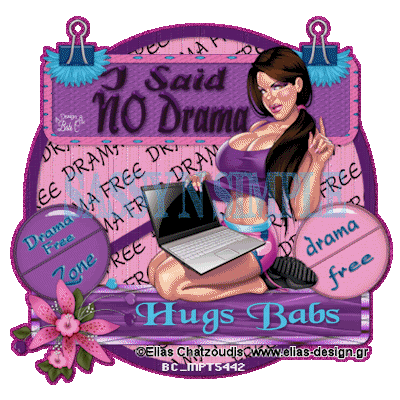
NO DRAMA
NO DRAMA
DATE WRITTEN: March 7, 2010
To do this Tutorial you need a Paintshop or a Corel program and Animation Shop. You must have a good working knowledge of the programs. Depending on your program settings may vary slightly.
TUBE: Elias Chatzoudis PTU was at MPT but you can buy it HERE
I have a license MPT5442
KIT: Bitzy Beez Designz FTU Tagger Kit Drama Free HERE
TEMPLATE: Bitzy Beez Designs FTU HERE
FONT: Of your choice
Read the following they will not repeated
Always Close original image after you copy unless stated otherwise.
Always sharpen re-sized items one time.
Right click, Left click refers to mouse buttons.
Drop shadow settings will always stay set
1. Open your Tube minimize for now, and the Bitzy Beez Designs Template 4.
2. Working with the template delete the Logo Layer
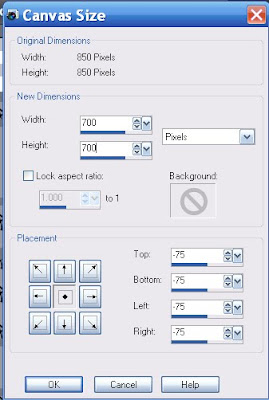
Image/canvas size 700x700 (Settings below)
Note** If you prefer you can use your crop tool and crop the image.
3. Select the circle layer
under selections tab do all of the following..
A. select all,
B. select float.
C. Select defloat.
Keep selected.
4. Select paper 17 from the kit Edit/copy
Edit/paste into selection on working image
Selections/select none
5. Select the circle frame Layer
under selections tab do all of the following..
A. select all,
B. select float.
C. Select defloat.
Keep selected.
6. Add a new raster layer above the circle frame layer
Select paper 18 from the kit Edit/copy
Edit/paste into selection
Selections/select none
7. Still on Circle frame
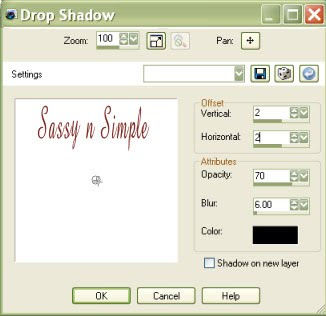
Effects/3D/drop shadow (settings below)
Delete greyscale circle frame layer
8. Select Box 1 Layer
under selections tab do all of the following..
A. select all,
B. select float.
C. Select defloat.
Keep selected.
9. Select paper 8 from the kit Edit/copy
Edit/paste into selection on working image
Selections/select none
10. Select Box 1 frame Layer
under selections tab do all of the following..
A. select all,
B. select float.
C. Select defloat.
Keep selected.
11. Add a new raster layer above the box 1 frame layer
Select paper 11 from the kit Edit/copy
Edit/paste into selection on working image
Selections/select none
Apply same drop shadow
Delete greyscale box 1 frame layer
11. Select Box 2 Layer
under selections tab do all of the following..
A. select all,
B. select float.
C. Select defloat.
Keep selected.
12. Select Paper 15 from the kit Edit/copy
Edit/paste into selection on working image
Selections/select none
13. Select Box 2 Frame Layer
under selections tab do all of the following..
A. select all,
B. select float.
C. Select defloat.
Keep selected.
12. Add a new raster Layer above Box frame 2 layer
Select paper 2 from the kit Edit/copy
Edit/paste into selection on working image
Selections/select none
Apply same drop shadow
Delete greyscale Box frame 2 Layer.
13. Select your tube Edit/copy
Edit/paste as new layer into your working image
Re-size if needed I re-sized mine 90%
Apply same drop shadow.
Place slightly off center to the right.
14. Select button 4 from the kit Edit/copy
Edit/paste as new layer into your working image under the tube layer
Re-size it 40%
Apply same drop shadow.
Place it on the right side behind tube
15. Select button 2 from the kit Edit/copy
Edit/paste as new layer into your working image under the tube layer
Re-size it 40%
Apply same drop shadow.
Place it on the left side near the top of the bottom box
16. Select flower 10 from the kit Edit/copy
Edit/paste as new layer into your working image above the tube layer
Re-size it 55%
Apply same drop shadow.
Place it on the left side of the bottom box
17. Select clip 1 from the kit Edit/copy
Edit/paste as new layer into your working image under the tube layer
Re-size it 25%
Apply same drop shadow.
Place it on the left side of the top box
Layers palette/right click/duplicate 1 time
Image/mirror
18. Select word art 6 from the kit Edit/copy
Edit/paste as new layer above the tube layer.
re-size not needed
Apply same drop shadow
place in top box
19. If you wish to add your name it is optional.
20. Re-size the image so that the width is 400 all layers/smart size.
21. Apply your copyrights and watermark place them as close to image as you can get.
22. Close off your background layer Keep closed.
Layers palette/right click/merge/merge visible.
Re-size merged layer 95%
23. On merged image
under selections tab do all of the following..
A. select all,
B. select float.
C. Select defloat.
D modify expand 3
Keep selected.
23. Add a new layer under your merged image.
Use dropper tool select a color from the image darker works best
Flood fill the selection
Selections/select none
Layers palette/right click/duplicate 2 times
ANIMATION:
Open Animation Shop minimize for now
1. In PSP On The top duplicated layer copy 2 of raster 1
Adjust/add noise Gaussian checked monochrome checked 75%
Layers palette close this layer by clicking the eye
2. In PSP On The middle duplicated layer copy of raster 1
Adjust/add noise Gaussian checked monochrome checked 50%
Layers palette close this layer by clicking the eye
3. In PSP On The bottom duplicated layer raster 1
Adjust/add noise Gaussian checked monochrome checked 25%
Edit/copy Merged
4. Take it to Animation shop right click workspace paste as new layer
5. Back in PSP close the bottom layer raster 1. Open the Middle layer copy of raster 1
Edit copy Merged
6. Take it to Animation shop right click first frame/paste/paste after current frame
7. Back in PSP close the middle layer raster 1. Open the Top layer copy 2 of raster 1
Edit copy Merged
8. Take it to Animation shop right click second frame/paste/paste after current frame
9. Save your animation
I hope you enjoy doing my Basic Steps
I want to thank the testers of Babs SassynSimple TagsnTuts for helping to make them mistake free.

To do this Tutorial you need a Paintshop or a Corel program and Animation Shop. You must have a good working knowledge of the programs. Depending on your program settings may vary slightly.
TUBE: Elias Chatzoudis PTU was at MPT but you can buy it HERE
I have a license MPT5442
KIT: Bitzy Beez Designz FTU Tagger Kit Drama Free HERE
TEMPLATE: Bitzy Beez Designs FTU HERE
FONT: Of your choice
Read the following they will not repeated
Always Close original image after you copy unless stated otherwise.
Always sharpen re-sized items one time.
Right click, Left click refers to mouse buttons.
Drop shadow settings will always stay set
1. Open your Tube minimize for now, and the Bitzy Beez Designs Template 4.
2. Working with the template delete the Logo Layer
Image/canvas size 700x700 (Settings below)
Note** If you prefer you can use your crop tool and crop the image.

3. Select the circle layer
under selections tab do all of the following..
A. select all,
B. select float.
C. Select defloat.
Keep selected.
4. Select paper 17 from the kit Edit/copy
Edit/paste into selection on working image
Selections/select none
5. Select the circle frame Layer
under selections tab do all of the following..
A. select all,
B. select float.
C. Select defloat.
Keep selected.
6. Add a new raster layer above the circle frame layer
Select paper 18 from the kit Edit/copy
Edit/paste into selection
Selections/select none
7. Still on Circle frame
Effects/3D/drop shadow (settings below)
Delete greyscale circle frame layer

8. Select Box 1 Layer
under selections tab do all of the following..
A. select all,
B. select float.
C. Select defloat.
Keep selected.
9. Select paper 8 from the kit Edit/copy
Edit/paste into selection on working image
Selections/select none
10. Select Box 1 frame Layer
under selections tab do all of the following..
A. select all,
B. select float.
C. Select defloat.
Keep selected.
11. Add a new raster layer above the box 1 frame layer
Select paper 11 from the kit Edit/copy
Edit/paste into selection on working image
Selections/select none
Apply same drop shadow
Delete greyscale box 1 frame layer
11. Select Box 2 Layer
under selections tab do all of the following..
A. select all,
B. select float.
C. Select defloat.
Keep selected.
12. Select Paper 15 from the kit Edit/copy
Edit/paste into selection on working image
Selections/select none
13. Select Box 2 Frame Layer
under selections tab do all of the following..
A. select all,
B. select float.
C. Select defloat.
Keep selected.
12. Add a new raster Layer above Box frame 2 layer
Select paper 2 from the kit Edit/copy
Edit/paste into selection on working image
Selections/select none
Apply same drop shadow
Delete greyscale Box frame 2 Layer.
13. Select your tube Edit/copy
Edit/paste as new layer into your working image
Re-size if needed I re-sized mine 90%
Apply same drop shadow.
Place slightly off center to the right.
14. Select button 4 from the kit Edit/copy
Edit/paste as new layer into your working image under the tube layer
Re-size it 40%
Apply same drop shadow.
Place it on the right side behind tube
15. Select button 2 from the kit Edit/copy
Edit/paste as new layer into your working image under the tube layer
Re-size it 40%
Apply same drop shadow.
Place it on the left side near the top of the bottom box
16. Select flower 10 from the kit Edit/copy
Edit/paste as new layer into your working image above the tube layer
Re-size it 55%
Apply same drop shadow.
Place it on the left side of the bottom box
17. Select clip 1 from the kit Edit/copy
Edit/paste as new layer into your working image under the tube layer
Re-size it 25%
Apply same drop shadow.
Place it on the left side of the top box
Layers palette/right click/duplicate 1 time
Image/mirror
18. Select word art 6 from the kit Edit/copy
Edit/paste as new layer above the tube layer.
re-size not needed
Apply same drop shadow
place in top box
19. If you wish to add your name it is optional.
20. Re-size the image so that the width is 400 all layers/smart size.
21. Apply your copyrights and watermark place them as close to image as you can get.
22. Close off your background layer Keep closed.
Layers palette/right click/merge/merge visible.
Re-size merged layer 95%
23. On merged image
under selections tab do all of the following..
A. select all,
B. select float.
C. Select defloat.
D modify expand 3
Keep selected.
23. Add a new layer under your merged image.
Use dropper tool select a color from the image darker works best
Flood fill the selection
Selections/select none
Layers palette/right click/duplicate 2 times
ANIMATION:
Open Animation Shop minimize for now
1. In PSP On The top duplicated layer copy 2 of raster 1
Adjust/add noise Gaussian checked monochrome checked 75%
Layers palette close this layer by clicking the eye
2. In PSP On The middle duplicated layer copy of raster 1
Adjust/add noise Gaussian checked monochrome checked 50%
Layers palette close this layer by clicking the eye
3. In PSP On The bottom duplicated layer raster 1
Adjust/add noise Gaussian checked monochrome checked 25%
Edit/copy Merged
4. Take it to Animation shop right click workspace paste as new layer
5. Back in PSP close the bottom layer raster 1. Open the Middle layer copy of raster 1
Edit copy Merged
6. Take it to Animation shop right click first frame/paste/paste after current frame
7. Back in PSP close the middle layer raster 1. Open the Top layer copy 2 of raster 1
Edit copy Merged
8. Take it to Animation shop right click second frame/paste/paste after current frame
9. Save your animation
I hope you enjoy doing my Basic Steps
I want to thank the testers of Babs SassynSimple TagsnTuts for helping to make them mistake free.