
©SassynSimple Tutorials
BAD N BOLD

DATE WRITTEN: April 13, 2010
THINGS NEEDED PAINT SHOP OR COREL PROGRAM
ANIMATION SHOP
Tube
Scrap kit
Mask Font
Credits for things I used.
Tube Used by Keith Garvey was with MPT when I did this he is now at PTE
KIT I used Bel Vidotti FTU tagger kit COLD HERE
MASK I used Gabee gabeemask40-vi HERE
FONT I used Black Chancery FTU AT DAFONT HERE
READ BELOW BEFORE STARTING
Settings may differ slightly depending on your version.
Close original image after you copy unless I state other wise.
Sharpen all re-sized items 1 time
RE-SIZE only one layer unless other wise stated.
Refer to my image for placement of items.
Left click and right click refers to mouse buttons.
Now you can jump right on in..
** Refer to my image for element placements
1. Open Tube, minimize for now.
2. Open a new transparent image 700x600 this is our working image
do not fill
3. Layers palette/right click/add new raster layer
Selections/select all Select paper 19 from the kit edit/copy
Edit/paste into selection on working image
Selections/select none
4. Layers New Mask Layer/from Image
Select the gabeemask40-vi in the window.
source luminance/checked
Invert mask data/checked click ok.
5. Layers palette/Right click black/white mask
Delete/click yes.
next pop up window comes up select Yes
Right click mask layer Merge/merge group.
Re-size mask 95%
6. Select element 38 from the kit. Edit/copy
Edit/paste as new layer into the working image
Re-size 95%
Apply drop shadow (settings below)
Move the left but not to close to edge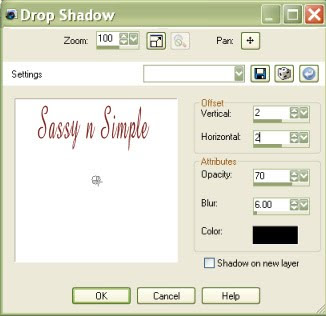
7. Select element 43 from the kit Edit/copy
Edit/paste as new layer into the working image
Re-size it 85% Apply same drop shadow
Move it to the right some
8. Select your magic wand (settings below) click inside the frame window
Selections/modify/expand 15
Keep selected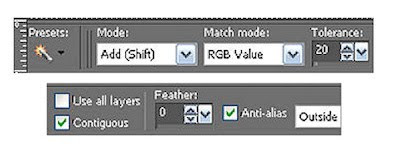
9. Layers palette/right click add a new raster layer below your frame.
Select paper 01 from kit edit/copy
Edit/paste into selection on working image
Selections/select none
10. Select your tube edit/copy
Edit/paste as new layer into the working image below your frame
Re-size as needed I re-sized mine 85%
Apply same drop shadow. If any of tube is outside the frame use eraser to remove it.
11. Select element 15 from the kit edit/copy
Edit/paste as new layer into the working image
Re-size 70%
Apply same drop shadow
Move to the right side of frame.
12. Select element 21 from the kit edit/copy
Edit/paste as new layer into the working image above the frame
Re-size it 60% Apply same drop shadow
Move to bottom of frame
13. Select element 29 from the kit edit/copy
Edit/paste as new layer into the working image
Re-size 60%
Apply same drop shadow
Place on right bottom corner of frame
14. Select element 07 from the kit edit/copy
Edit/paste as new layer into the working image
Re-size it 60%
Image/free rotate 40 right
Apply same drop shadow
Place on top left corner of frame
15. Using dropper tool select a color from your image
Left click/foreground color
Right click/background color
16. Select text tool (settings below) type out BAD N
Use nodes to size your text to fit on Line 1 of element 38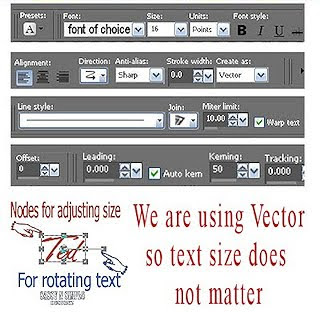 Layers palette/right click/convert to raster layer
17. Repeat step 16 for the other words BOLD, BUT A. BEAUTY
18. Adding your name is optional.
19. Add your copyrights and watermarks.
20. Re-size all layers/smart size so width is 400 height will adjust
21. Close off background layer
Layers palette/right click any open layer/merge/merge visible.
Open back ground layer back up
22. Click on merged layer
under selections tab do all of the following..
A. select all,
B. select float.
C. Select defloat.
D modify expand 4
Keep selected.
23. Use dropper tool select a color in your foreground color
Now flood fill the selection on your background raster 1 layer.
Selections/select none
24. Edit/copy/copy merged
ANIMATION:
Open your animation shop.
1. Right click anywhere in the work space
Paste as new animation.
2. Now save your animation
I hope you enjoy doing my Basic Steps
I want to thank the testers of SassynSimple Tuts for helping to make them mistake free.

DATE WRITTEN: April 13, 2010
THINGS NEEDED PAINT SHOP OR COREL PROGRAM
ANIMATION SHOP
Tube
Scrap kit
Mask Font
Credits for things I used.
Tube Used by Keith Garvey was with MPT when I did this he is now at PTE
KIT I used Bel Vidotti FTU tagger kit COLD HERE
MASK I used Gabee gabeemask40-vi HERE
FONT I used Black Chancery FTU AT DAFONT HERE
READ BELOW BEFORE STARTING
Settings may differ slightly depending on your version.
Close original image after you copy unless I state other wise.
Sharpen all re-sized items 1 time
RE-SIZE only one layer unless other wise stated.
Refer to my image for placement of items.
Left click and right click refers to mouse buttons.
Now you can jump right on in..
** Refer to my image for element placements
1. Open Tube, minimize for now.
2. Open a new transparent image 700x600 this is our working image
do not fill
3. Layers palette/right click/add new raster layer
Selections/select all Select paper 19 from the kit edit/copy
Edit/paste into selection on working image
Selections/select none
4. Layers New Mask Layer/from Image
Select the gabeemask40-vi in the window.
source luminance/checked
Invert mask data/checked click ok.
5. Layers palette/Right click black/white mask
Delete/click yes.
next pop up window comes up select Yes
Right click mask layer Merge/merge group.
Re-size mask 95%
6. Select element 38 from the kit. Edit/copy
Edit/paste as new layer into the working image
Re-size 95%
Apply drop shadow (settings below)
Move the left but not to close to edge

7. Select element 43 from the kit Edit/copy
Edit/paste as new layer into the working image
Re-size it 85% Apply same drop shadow
Move it to the right some
8. Select your magic wand (settings below) click inside the frame window
Selections/modify/expand 15
Keep selected

9. Layers palette/right click add a new raster layer below your frame.
Select paper 01 from kit edit/copy
Edit/paste into selection on working image
Selections/select none
10. Select your tube edit/copy
Edit/paste as new layer into the working image below your frame
Re-size as needed I re-sized mine 85%
Apply same drop shadow. If any of tube is outside the frame use eraser to remove it.
11. Select element 15 from the kit edit/copy
Edit/paste as new layer into the working image
Re-size 70%
Apply same drop shadow
Move to the right side of frame.
12. Select element 21 from the kit edit/copy
Edit/paste as new layer into the working image above the frame
Re-size it 60% Apply same drop shadow
Move to bottom of frame
13. Select element 29 from the kit edit/copy
Edit/paste as new layer into the working image
Re-size 60%
Apply same drop shadow
Place on right bottom corner of frame
14. Select element 07 from the kit edit/copy
Edit/paste as new layer into the working image
Re-size it 60%
Image/free rotate 40 right
Apply same drop shadow
Place on top left corner of frame
15. Using dropper tool select a color from your image
Left click/foreground color
Right click/background color
16. Select text tool (settings below) type out BAD N
Use nodes to size your text to fit on Line 1 of element 38
 Layers palette/right click/convert to raster layer
17. Repeat step 16 for the other words BOLD, BUT A. BEAUTY
18. Adding your name is optional.
19. Add your copyrights and watermarks.
20. Re-size all layers/smart size so width is 400 height will adjust
21. Close off background layer
Layers palette/right click any open layer/merge/merge visible.
Open back ground layer back up
22. Click on merged layer
under selections tab do all of the following..
A. select all,
B. select float.
C. Select defloat.
D modify expand 4
Keep selected.
23. Use dropper tool select a color in your foreground color
Now flood fill the selection on your background raster 1 layer.
Selections/select none
24. Edit/copy/copy merged
ANIMATION:
Open your animation shop.
1. Right click anywhere in the work space
Paste as new animation.
2. Now save your animation
I hope you enjoy doing my Basic Steps
I want to thank the testers of SassynSimple Tuts for helping to make them mistake free.