
©Sassy n Simple
GIVE YOURSELF
Date Written: Oct 18, 2010
Programs you will need arePaintshop or Corel Program
Jasc animation Shop
You will need a good working knowledge of the programs
Other Items Needed are
TUBE: Of your Choice I use artwork by Psyco Jimi FTU from but you need a License from MTA
I have a license to use it.
KIT: Bel Vidotti FTU Tagger Pink Hope HERE
FONT: Of your choice I used FFF Tusj from DAFONT HERE
PLUGINS: Unplugged Colors Hilight Demo HERE
READ BELOW BEFORE STARTING
Settings may differ slightly depending on your version.
Close original after you copy it unless I state otherwise.
Sharpen all re-sized items 1 time.
RE-SIZE only one layer unless other wise stated.
Refer to my image for placement of items.
Left click and right click refers to mouse buttons.
Now Lets Start
1. Open Your Tube and minimize it for now
2. Open a new Transparent image 600x500
Selections/Select AllSelect paper PP03 from the Kit Edit/copy
Edit/paste into selection
Keep Selected
3. Layer palette/right click/add a new raster layer
Select Paper PP10 From the Kit Edit/copy
Edit/paste into Selection on your image
Keep Selected
4. Selections/modify/contract 10
Hit Delete button on keyboard
Or under Edit hit clearSelections/select none
5. Effects/3D/inner Bevel Apply the below settings
Click Ok

6. Effects/3D/drop shadow Apply the below settings Click Ok 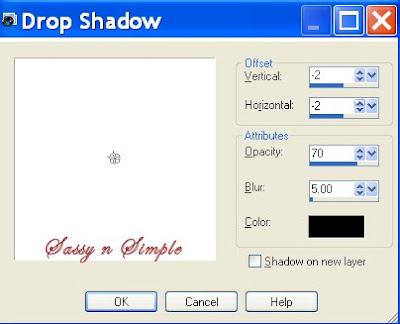
7. Apply the drop shadow again
Change vertical and horizontal to 2
Layers palette/right click/merge/merge down
8. Select the EL31 (beads) from the kit Edit/copy
Edit/paste as new layer into your image
Re-size it 55%
No drop shadow
Move it the right top side of your image
9. Still on El 31
Layers palette/right click/duplicate 1 time
Image/mirror
Layers palette/right click/merge/merge down
Right click merged layer/ duplicate 1 time
Image/flip
Right click/merge/merge down
10. Select EL 19 (leaf branch) from the Kit
Edit/copy
Edit/paste as new layer into your image
Apply drop shadow
No re-size needed
Use eraser remove excess stem
Move it to the left side border of image centered
11. Select EL42 (frame)from the Kit
Edit/copy
Edit/paste as new layer into your image
No re-size needed
Apply Same drop shadow
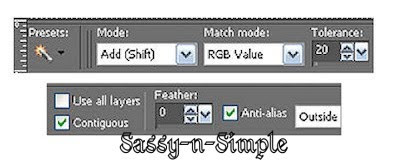
12. Using magic wand tool (settings below)
Click inside frame window
Selections/modify Expand 12
Keep Selected
13. Layers palette right click Leaf branch/add a new raster layer
Select PP07 From the Kit Edit/copy
Edit/paste into selection on this layer
Selections/select none
14. Select your Tube Edit/copy
Edit/paste as new layer above layer you just added
Re-size as needed I re-sized 55%
15. Layers palette/right click duplicate it 1 time
Right click duplicate/arrange bring to top
Apply same drop shadow
Use eraser tool or Selection tool
Remove any parts that are covering the bottom of frame
16. Select EL04 (wrap) from the kit Edit/copy
Edit/paste as new layer into your frame
Re-size it 65%
Move to the bottom of frame
So sides are even with the outside of frame
17. Use warp tool to push in the right side of wrap
In around it (settings below)
Or if you prefer and no how to use freehand tool you can remove access
Apply same drop shadow

7. Apply the drop shadow again
Change vertical and horizontal to 2
Layers palette/right click/merge/merge down
8. Select the EL31 (beads) from the kit Edit/copy
Edit/paste as new layer into your image
Re-size it 55%
No drop shadow
Move it the right top side of your image
9. Still on El 31
Layers palette/right click/duplicate 1 time
Image/mirror
Layers palette/right click/merge/merge down
Right click merged layer/ duplicate 1 time
Image/flip
Right click/merge/merge down
10. Select EL 19 (leaf branch) from the Kit
Edit/copy
Edit/paste as new layer into your image
Apply drop shadow
No re-size needed
Use eraser remove excess stem
Move it to the left side border of image centered
11. Select EL42 (frame)from the Kit
Edit/copy
Edit/paste as new layer into your image
No re-size needed
Apply Same drop shadow
12. Using magic wand tool (settings below)
Click inside frame window
Selections/modify Expand 12
Keep Selected

13. Layers palette right click Leaf branch/add a new raster layer
Select PP07 From the Kit Edit/copy
Edit/paste into selection on this layer
Selections/select none
14. Select your Tube Edit/copy
Edit/paste as new layer above layer you just added
Re-size as needed I re-sized 55%
15. Layers palette/right click duplicate it 1 time
Right click duplicate/arrange bring to top
Apply same drop shadow
Use eraser tool or Selection tool
Remove any parts that are covering the bottom of frame
16. Select EL04 (wrap) from the kit Edit/copy
Edit/paste as new layer into your frame
Re-size it 65%
Move to the bottom of frame
So sides are even with the outside of frame
17. Use warp tool to push in the right side of wrap
In around it (settings below)
Or if you prefer and no how to use freehand tool you can remove access
Apply same drop shadow

18. Select EL46 (beads) from the kit Edit/copy
Edit/pastes as new layer into your image
Re-size it 90%
Apply same drop shadow
Move to left side of frame
19. Select EL 29 (word art) from kit Edit/copy
Edit/paste as new layer into your image
Re-size it 65%
Apply same drop shadow
Move to left bottom corner of image
20. Select EL32 (flower w/bow) from the kit Edit/copy
Edit/paste as new layer into your image
Re-size it 50%
Apply same drop shadow
Move to right side or frame near top of wrap
21. Select EL23 (leaves) from the kit Edit/copy
Edit/paste as new layer into your image
Re-size it 40%
Apply same drop shadow
Move to right side of frame below flower
22. Select EL16 from the kit Edit/copy
Edit/paste as new layer into your image
Re-size it 60%
Apply same drop shadow
Move to right side of frame onto leaves
22. Select your text tool and add the Text if you want to
Add your name also if you want to
If you use the text I did you will want to increase drop shadow to V and H 3
23. Layers palette
Click the eye to close off bottom merged layer and raster 3 beads layer
Right click any open layer/merge/merge visible
24. You will want to re-size your image now smart size all layers
So that width is 500 height will adjust
25. Add copyrights and watermarks at this time as top layer
Right click/merge/merge visible
Now click on merged layer to make it active
Click on your mover tool using keyboard right arrow
Move this image to center it
You should have 3 layers now.
26. You can save image as jpeg or continue to animation
ANIMATION
Open your animations shop and minimize it
1. Open all layers back up
Layers palette right click raster 3 (beads) layer
Duplicate it 3 times for a total of 3 layers
2. Starting with copy (2) of raster 3 (top layer)
Effects/Plugins Unplugged Hilight
Bias 80
Intensity 101
Click Ok
Layers palette click eye close of this layer
3. Select copy of raster 3 (middle layer)
Effects/Plugins Unplugged Hilight
Bias 100
Intensity 101
Click Ok
Layers palette click eye close of this layer
4. Select raster 3 (bottom layer)
Effects/Plugins Unplugged Hilight
Bias 120
Intensity 101
Click Ok
5. Edit/copy/copy merged
Take it to animation shop right click in workspace paste as new animation
6. Back in PSP
Close raster 3 (bottom) Layer by clicking eye
Open copy of raster 3 (middle) layer
Edit/copy/copy merged
Take it to animation shop right click first frame
Paste/paste after current frame
7. Back in PSP
Close raster copy of raster 3 by clicking the eye
Open copy (2) of raster 3 (top) layer
Edit/copy/copy merged
Take it to animation shop right click second frame
Paste/paste after current frame
8. Save your animation
If you need optimization settings click HERE
Thanks for trying my tutorial I hope you enjoyed it.
Please if you use it to make a stat apply below credit in your footer
Tutorial by: ©Sassy n Simple
HERE or HERE
You can copy and paste the above credit into your footer area in Letter Creator
If that does not work use links below
http://www.sassynsimple.com/
And to here http://groups.yahoo.com/group/sassynsimple/
©Sassy n Simple