©Sassy n Simple
DEAD SEXY
Date Written: Oct 30, 2010
Programs needed
Paintshop or Corel Program
ANIMATION SHOP
You will need a good working knowledge of the program.
PLUGINS: Xenoflex 2 constellation Demo
Other Items needed
TUBE: Of your Choice I used Ismael Rac you will find the tube HERE
KIT: Lacrolta’s Black n White FTU HERE
FONT: of your choice
MASK: Essex Girl Framed in stars HERE but include in my supplies
MY SUPPLIES: HERE
READ BELOW BEFORE STARTING
Settings may differ slightly depending on your version.
Close original after you copy it unless I state otherwise.
Sharpen all re-sized items 1 time.
RE-SIZE only one layer unless other wise stated.
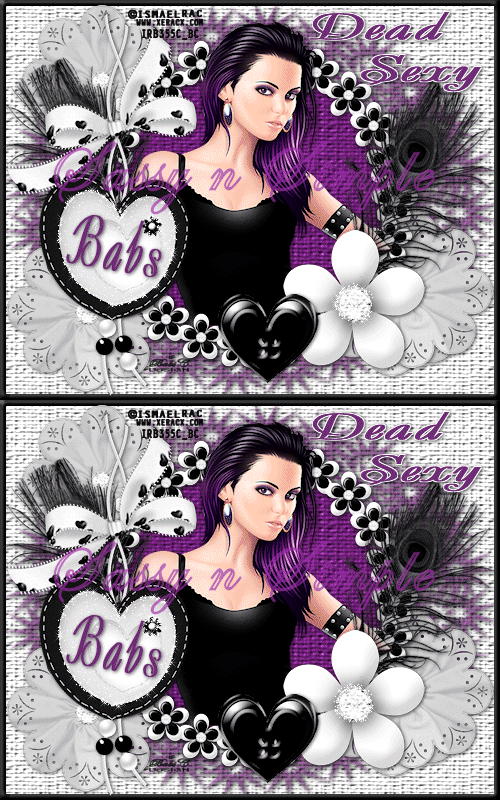
Refer to my image for placement of items.
Left click and right click refers to mouse buttons.
Now Lets Start
1. First Put the texture I included in my supplies in your PSP
Texture file. You should find that in your documents in the PSP folder
Older version may have to place in the Programs files in the version you are running folder
2. Select your tube and the mask in my supplies minimize them for now.
3. Open a new transparent Image 500x400
Flood fill with white
Effects/texture/Textures
Select the Texture I supplied in the supplies
Settings below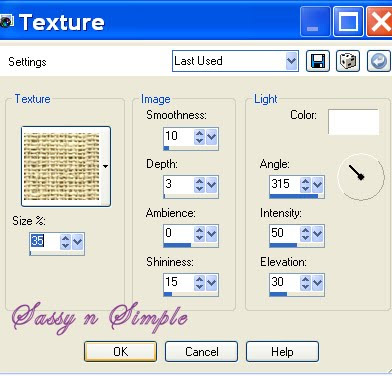
4. Layers palette/right click add new raster layer
Using drop tool left click foreground color
pull up your tube Select a color from your tube I used Purple
Flood fill the layer
Effects/Textures/same texture same setting
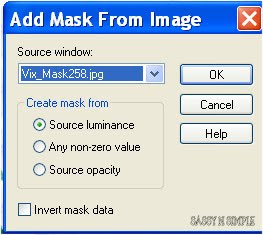
5. Layers New mask Layer/from image settings below
Select sg_framed in stars mask
6. Layers palette/right click black/white mask
Delete
Would you like this mask merged into layer below YES
Layers palette/right click top mask/ merge/merge group
7. Effects/3D/drop shadow settings below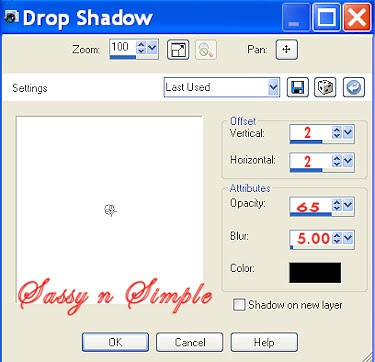
8. Layers palette/right click add a new raster layer
Flood fill with black
Selections/select all
Selections/modify contract 6
Hit your delete button or Edit/clear
Selections/select none
9. Effects/3D/inner bevel setting below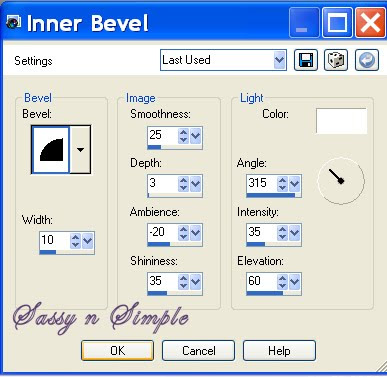
10. Layers palette right click merge/merge visible
11. Select frame 2 from the Kit Edit/copy
Edit/paste as new layer into your image
Re-size it 3%%
Apply same drop shadow
12. Select magic wand settings below click inside the frame
Selections/select all
Selections/modify expand 8
Flood fill with same color you used for mask
Apply the texture to it
Selections/select none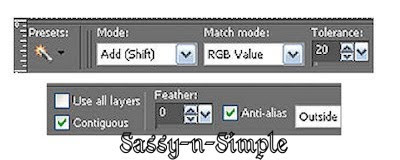
13. Select your Tube Edit/copy
Edit/paste as new layer into your image
Re-size as needed I re-sized 50%
Place it so the head is above the frame
Apply same drop shadow
14. Make your frame layer active
Using selection tool rectangle settings below
select the bottom part of your frame
Edit/copy
Layers palette/right click add new raster layer above your tube
Edit/paste into selection
Selections select none
15. Layers palette close of raster 1 layer
Merge/merge visible
Click eye and close merged frame and tube layer for now
16. Select flower 4 from the Kit Edit/copy
Edit/paste as new layer into image above raster 1
Re-size it 20%
Apply same drop shadow
Move it to the right bottom corner
17. Still on flower layer
Layers palette/right click/duplicate it 2 times
Place one in bottom left corner
Place one in top left corner
Open back up tube layer make it active
Adjust the flowers if you need to
18. Select feather 1 from kit Edit/copy
Edit/paste as new raster layer into your image
Re-size it 30%
Apply same drop shadow
Move to right side of frame
Layers palette/right click/duplicate 1 time
Image/mirror duplicate
19. Select flower 5 from Kit Edit/copy
Edit/paste as new layer into image
Re-size it 20%
Apply same drop shadow
Move over to right bottom side of frame
20. Select heart button 3 from the kit Edit/copy
Edit/paste as new layer into image
Re-size it 20%
Apply same drop shadow move over beside flower
21. Select the embellishment heart from kit
Edit/copy, Edit/paste as new layer into image
Re-size 40%
Apply same drop shadow move to left side of frame
22. Select bow 4 from the kit Edit/copy
Edit/paste as new layer into image
Re-size it 20%
Apply same drop shadow
Move to top left side of frame
23. Apply your text at this time
24. Add a new raster layer.
Apply your copyrights and watermarks
25. Layer palette/right click/merge/merge visible
You can save your image as jpeg now or continue to animation
ANIMATION
1. Using magic wand same settings
Click on the white part of the heart and the center of the flower
You may have to click twice to get it to expand around the diamond
Edit/copy
Keep selected
2. Layers palette right click add a new raster layer
Edit/paste into selection
Selections/select none
Layer palette/right click duplicate 1 time
3. Effects/plugins Xenoflex 2 constellations settings below
Layers palette close of copy of raster 2.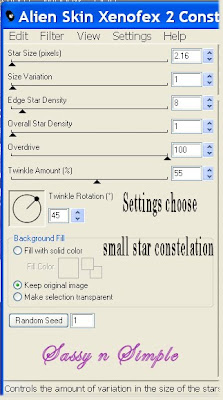 4. Select raster 2 Apply the xenoflex constellations again
But hit the random seed button one time
5. Edit/copy/copy merged
Take it to animation shop right click paste as new animation
6. Back in PsP close off Raster 2, Open copy of raster 2
Edit/copy
Take it to animation shop right click first frame
Paste/paste after current frame
7. Save your animation
Thanks for trying my tutorial I hope you enjoyed it.
Please if you use it to make a stat apply below credit in your footer
Tutorial by: ©Sassy n Simple
HERE or HERE
You can copy and paste the above but if does not work links below
http://www.sassynsimple.com/
And to here http://groups.yahoo.com/group/sassynsimple/
©Sassy n Simple
DEAD SEXY
Date Written: Oct 30, 2010

Programs needed
Paintshop or Corel Program
ANIMATION SHOP
You will need a good working knowledge of the program.
PLUGINS: Xenoflex 2 constellation Demo
Other Items needed
TUBE: Of your Choice I used Ismael Rac you will find the tube HERE
KIT: Lacrolta’s Black n White FTU HERE
FONT: of your choice
MASK: Essex Girl Framed in stars HERE but include in my supplies
MY SUPPLIES: HERE
READ BELOW BEFORE STARTING
Settings may differ slightly depending on your version.
Close original after you copy it unless I state otherwise.
Sharpen all re-sized items 1 time.
RE-SIZE only one layer unless other wise stated.
Refer to my image for placement of items.
Left click and right click refers to mouse buttons.
Now Lets Start
1. First Put the texture I included in my supplies in your PSP
Texture file. You should find that in your documents in the PSP folder
Older version may have to place in the Programs files in the version you are running folder
2. Select your tube and the mask in my supplies minimize them for now.
3. Open a new transparent Image 500x400
Flood fill with white
Effects/texture/Textures
Select the Texture I supplied in the supplies
Settings below

4. Layers palette/right click add new raster layer
Using drop tool left click foreground color
pull up your tube Select a color from your tube I used Purple
Flood fill the layer
Effects/Textures/same texture same setting
5. Layers New mask Layer/from image settings below
Select sg_framed in stars mask

6. Layers palette/right click black/white mask
Delete
Would you like this mask merged into layer below YES
Layers palette/right click top mask/ merge/merge group
7. Effects/3D/drop shadow settings below

8. Layers palette/right click add a new raster layer
Flood fill with black
Selections/select all
Selections/modify contract 6
Hit your delete button or Edit/clear
Selections/select none
9. Effects/3D/inner bevel setting below

10. Layers palette right click merge/merge visible
11. Select frame 2 from the Kit Edit/copy
Edit/paste as new layer into your image
Re-size it 3%%
Apply same drop shadow
12. Select magic wand settings below click inside the frame
Selections/select all
Selections/modify expand 8
Flood fill with same color you used for mask
Apply the texture to it
Selections/select none

13. Select your Tube Edit/copy
Edit/paste as new layer into your image
Re-size as needed I re-sized 50%
Place it so the head is above the frame
Apply same drop shadow
14. Make your frame layer active
Using selection tool rectangle settings below
select the bottom part of your frame
Edit/copy
Layers palette/right click add new raster layer above your tube
Edit/paste into selection
Selections select none
15. Layers palette close of raster 1 layer
Merge/merge visible
Click eye and close merged frame and tube layer for now
16. Select flower 4 from the Kit Edit/copy
Edit/paste as new layer into image above raster 1
Re-size it 20%
Apply same drop shadow
Move it to the right bottom corner
17. Still on flower layer
Layers palette/right click/duplicate it 2 times
Place one in bottom left corner
Place one in top left corner
Open back up tube layer make it active
Adjust the flowers if you need to
18. Select feather 1 from kit Edit/copy
Edit/paste as new raster layer into your image
Re-size it 30%
Apply same drop shadow
Move to right side of frame
Layers palette/right click/duplicate 1 time
Image/mirror duplicate
19. Select flower 5 from Kit Edit/copy
Edit/paste as new layer into image
Re-size it 20%
Apply same drop shadow
Move over to right bottom side of frame
20. Select heart button 3 from the kit Edit/copy
Edit/paste as new layer into image
Re-size it 20%
Apply same drop shadow move over beside flower
21. Select the embellishment heart from kit
Edit/copy, Edit/paste as new layer into image
Re-size 40%
Apply same drop shadow move to left side of frame
22. Select bow 4 from the kit Edit/copy
Edit/paste as new layer into image
Re-size it 20%
Apply same drop shadow
Move to top left side of frame
23. Apply your text at this time
24. Add a new raster layer.
Apply your copyrights and watermarks
25. Layer palette/right click/merge/merge visible
You can save your image as jpeg now or continue to animation
ANIMATION
1. Using magic wand same settings
Click on the white part of the heart and the center of the flower
You may have to click twice to get it to expand around the diamond
Edit/copy
Keep selected
2. Layers palette right click add a new raster layer
Edit/paste into selection
Selections/select none
Layer palette/right click duplicate 1 time
3. Effects/plugins Xenoflex 2 constellations settings below
Layers palette close of copy of raster 2.
 4. Select raster 2 Apply the xenoflex constellations again
But hit the random seed button one time
5. Edit/copy/copy merged
Take it to animation shop right click paste as new animation
6. Back in PsP close off Raster 2, Open copy of raster 2
Edit/copy
Take it to animation shop right click first frame
Paste/paste after current frame
7. Save your animation
Thanks for trying my tutorial I hope you enjoyed it.
Please if you use it to make a stat apply below credit in your footer
Tutorial by: ©Sassy n Simple
HERE or HERE
You can copy and paste the above but if does not work links below
http://www.sassynsimple.com/
And to here http://groups.yahoo.com/group/sassynsimple/
©Sassy n Simple
