©Sassy n Simple
PUNK

Date Written: Nov, 9. 2010
PROGRAMS NEEDED
Paintshop or Corel Program
You will need a good working knowledge of the program.
OTHER ITEMS NEEDED
TUBE: Angie Monasterio is PTU you need to buy it CILM
I have a license to use this tube
KIT: Zaza Scrap and Tubes PTU Tagger kit PUNK you will find it at TKO
FONT: Of Your Choice I use a FTU Chinacat from DaFont HERE
MASK: SDTMASK_202 HERE page 9
READ BELOW BEFORE STARTING
Settings may differ slightly depending on your version.
Close original after you copy it unless I state otherwise.
Sharpen all re-sized items 1 time.
RE-SIZE only one layer unless other wise stated.
Refer to my image for placement of items.
Left click and right click refers to mouse buttons.
Now You can Jump In
First open your tube and mask minimize them for now
1. Open a new transparent Image 600x500
Selections/select all
Select paper 4 from the kit Edit/copy
Edit/paste into selection on your image
Keep Selected
2. Layers palette/right Click Raster 1 /add a new raster layer
Select Paper 3 from the Kit Edit/copy
Edit/paste into selection on you image
Selections/none
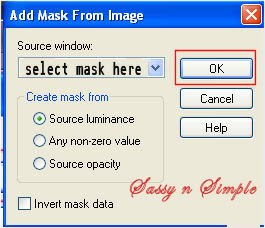
3. Layers/New Mask Layer/from Image (settings below)
Select SDTMASK202 in the window
Select SDTMASK202 in the window

4. Layers palette/right click black/white mask
Delete
Would you like this mask merged into layer below YES
Layers palette/right click top mask/ merge/merge group
Re-size 90%
5. Select Frame 4 from the Kit Edit/copy
Edit/paste as new layer into your image
Re-size it 70%
Image/free rotate 90.00 left all boxes unchecked
Delete
Would you like this mask merged into layer below YES
Layers palette/right click top mask/ merge/merge group
Re-size 90%
5. Select Frame 4 from the Kit Edit/copy
Edit/paste as new layer into your image
Re-size it 70%
Image/free rotate 90.00 left all boxes unchecked
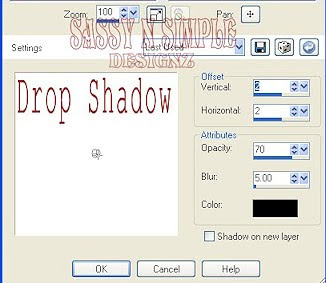
6. Effects/3D/drop shadow (settings below)
7. Select your rectangle tool (settings below)
Starting in top left corner stay on frame right at edge
Draw rectangle out to bottom right corner
Keep selected
8. Layers palette/right click on group raster 2 layer/ add a new layer
Select the color black in foreground color
Flood fill the selection
Selections/select none
7. Layers palette/right click frame Layer/merge/merge visible
8. Select Eyelet 1 from the kit Edit/copy
Edit/paste as new layer into your image
Re-size it 50%
Apply same drops shadow
Move to left side of frame
9. Layers palette/right click eyelet/duplicate 1 time
Image/mirror
10. Select Charm 1 from kit Edit/copy
Edit/paste as new layer into image
No re-size
Apply same drop shadow
Place center at top of frame
11. Select your tube Edit/copy
Edit/paste as new layer into image
Re-size as needed I re-sized 75%
Apply same drop shadow
Move it to the left side of frame
12. Select Tag from the kit Edit/copy
Edit/paste as new layer into your image
Re-size it 70%
Apply same drop shadow
Image/free rotate 10.00 Left same settings
13. Select Brad 3 from Kit Edit/copy
Edit/paste as new layer into image
No re-size
Apply same drop shadow
Place on right bottom corner of frame
14. Select Brad 2 from Kit Edit/copy
Edit/paste as new layer into image
No-re-size
Apply same drop shadow
Place on right bottom corner of frame
15. Select the lips from Kit Edit/copy
Edit/paste as new layer into image
Re-size 85%
Apply same drop shadow
Move to center of frame
16. Layers palette/right click /add a new raster layer
Selections/select all
Select paper 1 from Kit Edit/copy
Edit/paste into selection on your image
Selections/modify/contract 15
Hit delete or Clear under edit
Selections/select none
17. Adjust eyelets if they are behind the frame
18. Re-size your image all layers smart size so width is 500
19. Add your text and name at this time
20. Add your copyrights and watermark.
21. Save your image as a jpeg.
Thanks for trying my tutorial I hope you enjoyed it.
Please if you use it to make a stat apply below credit in your footer
Tutorial by: ©Sassy n Simple
HERE
You can copy and paste it
But if that does not work links are below
http://groups.yahoo.com/group/sassynsimple/
I would Like to Thank the Sassy n Simple
Testers for testing my tutorial for me.

7. Select your rectangle tool (settings below)
Starting in top left corner stay on frame right at edge
Draw rectangle out to bottom right corner
Keep selected

8. Layers palette/right click on group raster 2 layer/ add a new layer
Select the color black in foreground color
Flood fill the selection
Selections/select none
7. Layers palette/right click frame Layer/merge/merge visible
8. Select Eyelet 1 from the kit Edit/copy
Edit/paste as new layer into your image
Re-size it 50%
Apply same drops shadow
Move to left side of frame
9. Layers palette/right click eyelet/duplicate 1 time
Image/mirror
10. Select Charm 1 from kit Edit/copy
Edit/paste as new layer into image
No re-size
Apply same drop shadow
Place center at top of frame
11. Select your tube Edit/copy
Edit/paste as new layer into image
Re-size as needed I re-sized 75%
Apply same drop shadow
Move it to the left side of frame
12. Select Tag from the kit Edit/copy
Edit/paste as new layer into your image
Re-size it 70%
Apply same drop shadow
Image/free rotate 10.00 Left same settings
13. Select Brad 3 from Kit Edit/copy
Edit/paste as new layer into image
No re-size
Apply same drop shadow
Place on right bottom corner of frame
14. Select Brad 2 from Kit Edit/copy
Edit/paste as new layer into image
No-re-size
Apply same drop shadow
Place on right bottom corner of frame
15. Select the lips from Kit Edit/copy
Edit/paste as new layer into image
Re-size 85%
Apply same drop shadow
Move to center of frame
16. Layers palette/right click /add a new raster layer
Selections/select all
Select paper 1 from Kit Edit/copy
Edit/paste into selection on your image
Selections/modify/contract 15
Hit delete or Clear under edit
Selections/select none
17. Adjust eyelets if they are behind the frame
18. Re-size your image all layers smart size so width is 500
19. Add your text and name at this time
20. Add your copyrights and watermark.
21. Save your image as a jpeg.
Thanks for trying my tutorial I hope you enjoyed it.
Please if you use it to make a stat apply below credit in your footer
Tutorial by: ©Sassy n Simple
HERE
You can copy and paste it
But if that does not work links are below
http://groups.yahoo.com/group/sassynsimple/
I would Like to Thank the Sassy n Simple
Testers for testing my tutorial for me.

