©SassynSimple Tutorials
By Babs C
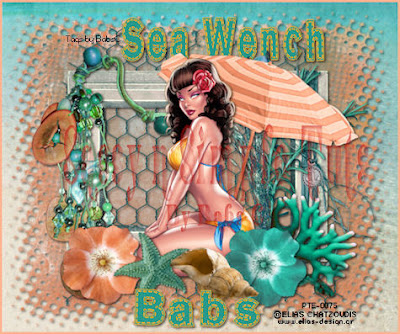
SEA WENCH
Written: June 28, 2011

PROGRAMS YOU NEED
You are responsible for providing the items needed to do my tutorials.
You need a good working knowledge of the programs I use.
Paintshop or Corel Program
PLUGINS: None
ITEMS YOU WILL NEED
TUBE: Of Your choice I used the artwork of Elias Chatzaoudis
I have a license for this tube you must purchase it at PTE
KIT: Skys Scraps Beachy Keen FTU Here
MASK: I used Sharlim Mar Designs Mask 3 HERE you can also visit her BlOG
FONT: Of your choice
THINGS YOU NEED TO KNOW AND DO
Settings may differ slightly depending on Program and Kit used
Close original after you copy it unless I state otherwise.
RE-SIZE only one layer and sharpen once if needed
Left click and right click refers to mouse buttons.
Refer to my image for placement of items.
Now Lets Get Started
Note: Re-size all papers 25% before you copy them
when you close them out do not save new settings.
1. Select your tube and the Sharlimar Mask 3 minimize them for now.
2. Open a new transparent image 600x500
select paper 20 from the kit edit/copy
edit/paste into selection on your image
3. Layers palette right click add new raster layer
select paper 10 from the kit edit/copy
edit paste into selection on your image
selections/select none
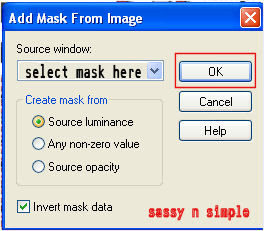
4. Layers/new mask layer /from image
select the Sharlimar Mask 3 in the window
(settings below)
Click OK
layers palette/right click black/white mask/merge/merge group

5.Effects 3D/Drop Shadow
6. Select the wire element from the kit edit/copy
edit/paste as new layer into image
re-size it 15%
apply same drop shadow
7. Select frame 1 from the kit edit/copy
edit/paste as new layer into image
re-size it 20%
apply same drop shadow
center in image
8. Select bead dangle from kit edit/copy
edit/paste as new layer into image
re-size it 20%
apply same drop shadow
move to left side of frame
9. Select the sea grass from the kit edit/copy
edit/paste as new layer into your image
re-size it 20% then again 85%
apply same drop shadow
move it to the right side of frame
so that it does not go off the mask
10. Select the umbrella from the kit edit/copy
edit/paste as new layer into your image
re-size it 25%
apply same drop shadow
image/free rotate 20.00 right boxes unchecked
move to the right side of frame
11. Select your tube edit/copy
edit/paste as new layer into image
re-size as needed, I re-sized 75%
apply same drop shadow
center in frame
12. Select Coral from the kit edit/copy
edit/paste as new layer into your image
re-size it 15%
apply same drop shadow
place on bottom right side of frame
13. Select flower 3 from the kit edit/copy
edit/paste as new layer into image
re-size it 15% then 90%
apply same drop shadow
place it next to the coral
14. Select shell 4 from the kit edit/copy
edit/paste as new layer into image
re-size it 10% then again 55%
apply same drop shadow
place next to flower
15. Select flower 4 from the kit edit/copy
edit/paste as new layer into image
re-size it 15% then 90%
apply same drop shadow
move it to the left bottom side leave room to place
starfish to the right of it
16. Select the starfish from the kit edit/copy
edit/paste as new layer into your image
re-size it 10%
Image/free rotate
(settings below)
apply same drop shadow
place beside other shell

17. Layers palette close off the 3 bottom layers raster
background raster 1, mask layer group raster 2,
and wire raster 2
Right click any open layer merge visible
now re-size merged layer 90%
open all layers back up
18. Apply your text now
19. Add a border if you want to.
20. Re-Size your image all layers.smart size
to the size you like your tags.
I re-sized my width to 475.
21. Add a new raster layer apply copyrights and watermarks
22. Save your image as jpeg
Thanks for Trying my Tutorial I hope you Enjoyed it.
I want to thank Marsha and Ruth for testing my tutorials.
Please copy and paste my credit into your footer
if you can not links are below it
Tutorial by Babs C
http://groups.yahoo.com/group/ourpsphideaway/
http://sassynsimple.blogspot.com/
All My Stationary Tutorials are now in Letter from and found only in my group below
http://groups.yahoo.com/group/ourpsphideaway/
©SassynSimple Tutorials

