©SassynSimple Tutorials
BOO
Date Written: Oct, 11, 2011
BOO
Date Written: Oct, 11, 2011
PROGRAMS YOU NEED
You are responsible for finding things you need to do this tutorial.
You will need a good working knowledge of the programs I use.
Paintshop or Corel Program
ITEMS YOU NEED
Thank all Of you whose items I used to make this tag.
I do appreciate the use of them.
TUBE: Of your Choice I used the lovely artwork of Elias Chatzoudis you can buy it at PTE
I have a license for this tube
KIT: Designs by Ali Halloweenie FTU HERE
MASK: of Your choice or mine BBD 2011 Mask 77 HERE
FONT: Of your choice
READ BELOW BEFORE STARTING
Settings may differ slightly depending on Program and Kit used
Close original after you copy it unless I state otherwise.
RE-SIZE only one layer and sharpen once if needed
Left click and right click refers to mouse buttons.
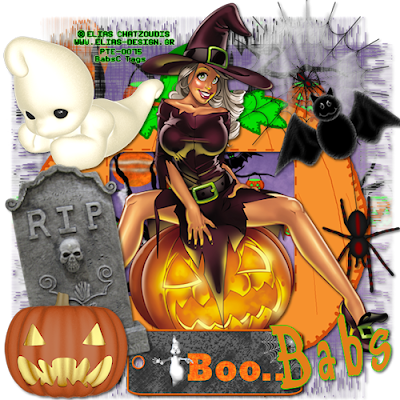
Refer to my image for placement of items.
Now Lets Start
1. Select and open your Tube and mask minimize them for now
2. Open a new transparent image 600x600
Layers palette Right click Raster 1 add a new raster layer
Selections/select all
Keep Selected
3. Select Paper 7 from the Kit Edit/copy
Edit/paste into selection
Selections/select none
Keep paper open we will use it again
4. Layers/New Mask Layer/from Image
Select the BBD_2011_Mask 77 in window
(Settings below)
Click Ok
Layers palette/right click mask/merge/merge group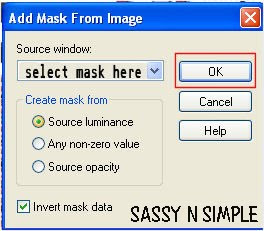
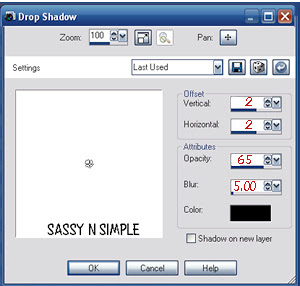
5. Effects/3D/Drop Shadow
(settings below)
6. Select frame 1 from the kit Edit/copy
Edit/paste as new layer into your image
Re-size it 65%
Apply same drop shadow
7. Use magic wand to click inside the window frame
(settings below)
Selections/modify/expand 11
 8. Layers palette right click Mask layer (group raster2) add a new raster layer.
Select Paper 7 Edit/copy Edit/paste into selection on your image
Selections/select none
9. Select Spider & Web 2 from the kit Edit/copy
Edit/paste as new layer into your image above Frame
Re-size it 75%
Apply same drop shadow
Move to top right side of image
10. Select Ghost 3 from the kit edit/copy
Edit/paste as new layer into your image
Re-size it 60%
Apply same drop shadow
Move it to top left side of pumpkin
11. Select Bat 3 from the kit Edit/copy
Edit/paste as new layer into your image
Re-size it 45%
Apply same drop shadow
Move to right side of image above spider
12. Select your tube Edit/copy
Edit/paste as new layer into your image
Re-size if needed I did not re-size
Apply same drop shadow
Place in center of image
13. Select Tag 1 from the kit Edit/copy
Edit/paste as new layer into your image
Re-size it 24%
Apply same drop shadow
Place at bottom of image centered
14. Select Grave stone 1 from the kit edit/copy
Edit/paste as new layer into image
Re-size it 45%
Apply same drop shadow
Image/free rotate 10.00 left
Place on bottom left side of pumpkin
15. Select Pumpkin 5 from the kit edit/copy
Edit/paste as new layer into image
Re-size it 45%
Apply same drop shadow
Place on left side of grave stone
16. At this time re-size your image if you wish. I re-sized to 500x500
17. Add any text you wish to at this time
18. Add a new raster layer and apply copyrights and watermarks
19. Layers palette/right click any layer/merge/merge visible
20. Save your image in png format.
Thanks for trying my tutorial I hope you enjoyed it.
I want to thank Marsha and Ruth for testing my tutorials
If You use my tutorials in Stationary Please apply a credit in your footer
with a link back to where my tutorial is located.
I now put all my stationary tutorials in Incredimail letter form
you have to join my group to access them HERE
we also offer weekly challenges
©SassynSimple Tutorials
You are responsible for finding things you need to do this tutorial.
You will need a good working knowledge of the programs I use.
Paintshop or Corel Program
ITEMS YOU NEED
Thank all Of you whose items I used to make this tag.
I do appreciate the use of them.
TUBE: Of your Choice I used the lovely artwork of Elias Chatzoudis you can buy it at PTE
I have a license for this tube
KIT: Designs by Ali Halloweenie FTU HERE
MASK: of Your choice or mine BBD 2011 Mask 77 HERE
FONT: Of your choice
READ BELOW BEFORE STARTING
Settings may differ slightly depending on Program and Kit used
Close original after you copy it unless I state otherwise.
RE-SIZE only one layer and sharpen once if needed
Left click and right click refers to mouse buttons.
Refer to my image for placement of items.
Now Lets Start
1. Select and open your Tube and mask minimize them for now
2. Open a new transparent image 600x600
Layers palette Right click Raster 1 add a new raster layer
Selections/select all
Keep Selected
3. Select Paper 7 from the Kit Edit/copy
Edit/paste into selection
Selections/select none
Keep paper open we will use it again
4. Layers/New Mask Layer/from Image
Select the BBD_2011_Mask 77 in window
(Settings below)
Click Ok
Layers palette/right click mask/merge/merge group

5. Effects/3D/Drop Shadow
(settings below)

6. Select frame 1 from the kit Edit/copy
Edit/paste as new layer into your image
Re-size it 65%
Apply same drop shadow
7. Use magic wand to click inside the window frame
(settings below)
Selections/modify/expand 11
 8. Layers palette right click Mask layer (group raster2) add a new raster layer.
Select Paper 7 Edit/copy Edit/paste into selection on your image
Selections/select none
9. Select Spider & Web 2 from the kit Edit/copy
Edit/paste as new layer into your image above Frame
Re-size it 75%
Apply same drop shadow
Move to top right side of image
10. Select Ghost 3 from the kit edit/copy
Edit/paste as new layer into your image
Re-size it 60%
Apply same drop shadow
Move it to top left side of pumpkin
11. Select Bat 3 from the kit Edit/copy
Edit/paste as new layer into your image
Re-size it 45%
Apply same drop shadow
Move to right side of image above spider
12. Select your tube Edit/copy
Edit/paste as new layer into your image
Re-size if needed I did not re-size
Apply same drop shadow
Place in center of image
13. Select Tag 1 from the kit Edit/copy
Edit/paste as new layer into your image
Re-size it 24%
Apply same drop shadow
Place at bottom of image centered
14. Select Grave stone 1 from the kit edit/copy
Edit/paste as new layer into image
Re-size it 45%
Apply same drop shadow
Image/free rotate 10.00 left
Place on bottom left side of pumpkin
15. Select Pumpkin 5 from the kit edit/copy
Edit/paste as new layer into image
Re-size it 45%
Apply same drop shadow
Place on left side of grave stone
16. At this time re-size your image if you wish. I re-sized to 500x500
17. Add any text you wish to at this time
18. Add a new raster layer and apply copyrights and watermarks
19. Layers palette/right click any layer/merge/merge visible
20. Save your image in png format.
Thanks for trying my tutorial I hope you enjoyed it.
I want to thank Marsha and Ruth for testing my tutorials
If You use my tutorials in Stationary Please apply a credit in your footer
with a link back to where my tutorial is located.
I now put all my stationary tutorials in Incredimail letter form
you have to join my group to access them HERE
we also offer weekly challenges
©SassynSimple Tutorials
