©SassynSimple Tutorials
CITY DIVA
Date Written: Nov 1. 2011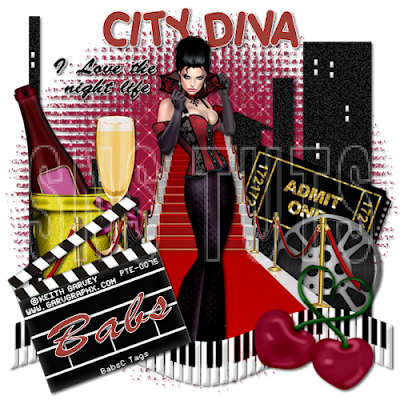
PROGRAMS YOU NEED
You are responsible for finding things you need to do this tutorial.
You will need a good working knowledge of the programs I use.
Paintshop or Corel Program
ITEMS YOU NEED
Thank all Of you whose items I used to make this tag.
I do appreciate the use of them.
TUBE: Of your Choice I used the lovely artwork by Keith Garvey’s
which you must buy at PTE
I have a license for this tube
KIT: I am using a beautiful kit by Wicked Princess Smoking FTU HERE
MASK: Your choice or mine below the tutorial
FONT: Of your choice
READ BELOW BEFORE STARTING
Settings may differ slightly depending on Program and Kit used
Close original after you copy it unless I state otherwise.
RE-SIZE only one layer and sharpen once if needed
Left click and right click refers to mouse buttons.
Refer to my image for placement of items.
Now Lets Start
1. Select and open your Tube and mask minimize them for now
2. Open a new 600x600 transparent image
Selections/Select all
Select paper 17 from the kit Edit/copy
Edit/paste into selection
Selections/select none
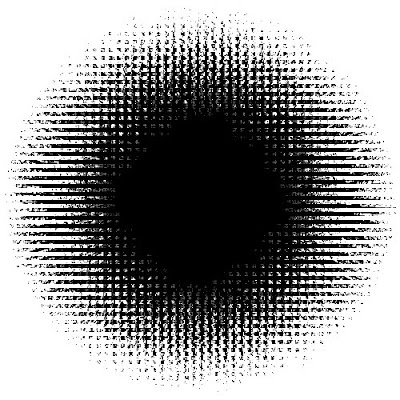
3. Layers/new mask layer/from image
Select mask in window
(Apply settings below)
Click Ok
Layers palette/right click mask/merge/merge group
(note if you mask with black border do not invert)
CITY DIVA
Date Written: Nov 1. 2011

PROGRAMS YOU NEED
You are responsible for finding things you need to do this tutorial.
You will need a good working knowledge of the programs I use.
Paintshop or Corel Program
ITEMS YOU NEED
Thank all Of you whose items I used to make this tag.
I do appreciate the use of them.
TUBE: Of your Choice I used the lovely artwork by Keith Garvey’s
which you must buy at PTE
I have a license for this tube
KIT: I am using a beautiful kit by Wicked Princess Smoking FTU HERE
MASK: Your choice or mine below the tutorial
FONT: Of your choice
READ BELOW BEFORE STARTING
Settings may differ slightly depending on Program and Kit used
Close original after you copy it unless I state otherwise.
RE-SIZE only one layer and sharpen once if needed
Left click and right click refers to mouse buttons.
Refer to my image for placement of items.
Now Lets Start
1. Select and open your Tube and mask minimize them for now
2. Open a new 600x600 transparent image
Selections/Select all
Select paper 17 from the kit Edit/copy
Edit/paste into selection
Selections/select none
3. Layers/new mask layer/from image
Select mask in window
(Apply settings below)
Click Ok
Layers palette/right click mask/merge/merge group
(note if you mask with black border do not invert)
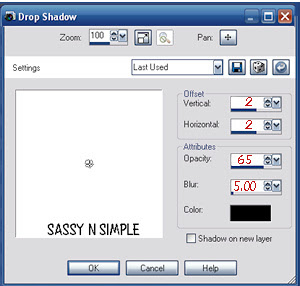
5. Select buildings from the kit edit/copy
Edit/paste as new layer into image
Re-size 80%
Apply same drop shadow
Move them up towards the top some keep centered though
6. Select the movie ticket from the kit edit/copy
Edit/paste as new layer into image
Re-size 65%
Apply same drop shadow
Image/free rotate 20.00 right
Move to right side of image near center
7. Select movie reel from the kit edit/copy
Edit/paste as new layer into image
Re-size 50%
Apply same drop shadow
Move to right side of image below the ticket
8. Select champagnebottlebucket from the kit edit/copy
Edit/paste as new layer into image
Re-size 50%
Apply same drop shadow
Image/mirror
Place on left side of image
9. Select glass (with bow) from the kit edit/copy
Edit/paste as new layer into image
Re-size 35%
Apply same drop shadow
Place on left side of image near bucket
10. Select the red carpet from the kit edit/copy
Edit/paste as new layer into image
Re-size 60%
Apply same drop shadow
Move down towards bottom some
11. Select your tube now Edit/copy
Edit/paste as new layer into image
Re-size as needed I re-sized 90%
Apply same drop shadow
Center in the red carpet
12. Select the piano keys (1st ones) from the kit Edit/copy
Edit/paste as new layer into image
Re-size as needed I re-sized 65%
Apply same drop shadow
Move down to bottom of red carpet
13. Select the cherry from the kit now Edit/copy
Edit/paste as new layer into image
Re-size as needed I re-sized 35%
Image/free rotate 20.00 right
Apply same drop shadow
Move to bottom right side of image
14. Select clacker from the kit now Edit/copy
Edit/paste as new layer into image
Re-size as needed I re-sized 70%
Image/free rotate 20.00 left
Apply same drop shadow
Move to the bottom left side of image
15. Apply any text you would like to apply now
16. Re-size your image all layers to your desired tag size
I re-sized mine 500x500
17. Apply your copyrights and watermark.
18. Layers palette/right click merge/merge visible
Save your image in png if you do not want a background
Thanks for trying my tutorial I hope you enjoyed it.
I want to thank Marsha and Ruth for testing my tutorials
If You use my tutorials in Stationary Please apply a credit in your footer
with a link back to where my tutorial is located.
I now put all my stationary tutorials in Incredimail letter form
you have to join my group to access them HERE
we also offer weekly challenges
©SassynSimple Tutorials
Edit/paste as new layer into image
Re-size 80%
Apply same drop shadow
Move them up towards the top some keep centered though
6. Select the movie ticket from the kit edit/copy
Edit/paste as new layer into image
Re-size 65%
Apply same drop shadow
Image/free rotate 20.00 right
Move to right side of image near center
7. Select movie reel from the kit edit/copy
Edit/paste as new layer into image
Re-size 50%
Apply same drop shadow
Move to right side of image below the ticket
8. Select champagnebottlebucket from the kit edit/copy
Edit/paste as new layer into image
Re-size 50%
Apply same drop shadow
Image/mirror
Place on left side of image
9. Select glass (with bow) from the kit edit/copy
Edit/paste as new layer into image
Re-size 35%
Apply same drop shadow
Place on left side of image near bucket
10. Select the red carpet from the kit edit/copy
Edit/paste as new layer into image
Re-size 60%
Apply same drop shadow
Move down towards bottom some
11. Select your tube now Edit/copy
Edit/paste as new layer into image
Re-size as needed I re-sized 90%
Apply same drop shadow
Center in the red carpet
12. Select the piano keys (1st ones) from the kit Edit/copy
Edit/paste as new layer into image
Re-size as needed I re-sized 65%
Apply same drop shadow
Move down to bottom of red carpet
13. Select the cherry from the kit now Edit/copy
Edit/paste as new layer into image
Re-size as needed I re-sized 35%
Image/free rotate 20.00 right
Apply same drop shadow
Move to bottom right side of image
14. Select clacker from the kit now Edit/copy
Edit/paste as new layer into image
Re-size as needed I re-sized 70%
Image/free rotate 20.00 left
Apply same drop shadow
Move to the bottom left side of image
15. Apply any text you would like to apply now
16. Re-size your image all layers to your desired tag size
I re-sized mine 500x500
17. Apply your copyrights and watermark.
18. Layers palette/right click merge/merge visible
Save your image in png if you do not want a background
Thanks for trying my tutorial I hope you enjoyed it.
I want to thank Marsha and Ruth for testing my tutorials
If You use my tutorials in Stationary Please apply a credit in your footer
with a link back to where my tutorial is located.
I now put all my stationary tutorials in Incredimail letter form
you have to join my group to access them HERE
we also offer weekly challenges

©SassynSimple Tutorials

