©SassynSimple Tutorials
BLOSSOM

Date Written: May 24, 2011
PROGRAMS YOU NEED
You are responsible for finding things need to do this tutorial.
You will need a good working knowledge of the programs I use.
Paintshop or Corel Program
ITEMS YOU NEED
TUBE: Of your Choice I used Anna Liwanag which I got at MPT
but Anna is now selling at PTE
I have a license for this tube
KIT: Delicious Scraps Spring minis FTUGrab all 4 parts Here
MASK: Miz Teeques Mask Mask 36 Here
FONT: Of your choice
READ BELOW BEFORE STARTING
Settings may differ slightly depending on Program and Kit used
Close original after you copy it unless I state otherwise.
RE-SIZE only one layer and sharpen once if needed
Left click and right click refers to mouse buttons.
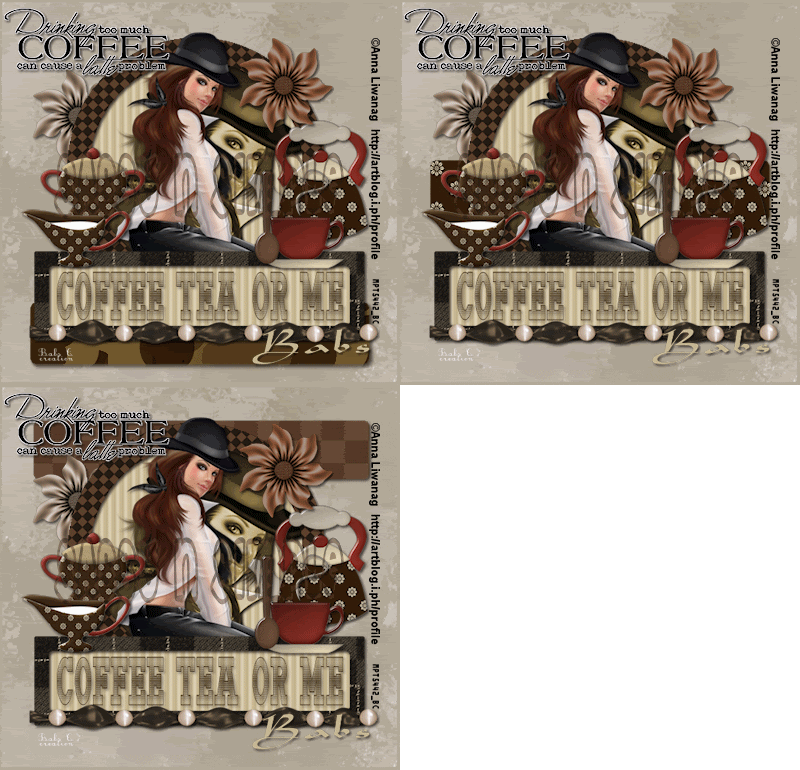
Refer to my image for placement of items.
Now Lets Start
1. Select your Tube and Open the Tee mask 36 minimize them for now
2. Open a new transparent image 650x600
Flood fill with white or color of your choice
3. Layers palette/right click/add new raster layer
Selections/select all
From Spring mini kit 3 Select paper 3
Re-size the paper all layers 20%
Then Edit/copy (close paper do not save changes)
Edit/paste into selection on you image
Selections/select none
4. Layers/new mask layer/from image
select Tee mask 36 in the window
(settings below)
Click Ok
Layers palette/right click black/white mask/merge/merge group

5. Layers palette/right click mask layer/duplicate 1 time
Right click duplicate/merge/merge down
6. Effects/3D/Drop shadow
Apply settings below

7. From Spring Kit (no number) Select Frame 4
Edit/copy/Edit/paste as new layer into your image
Re-size 15%
Apply same drop shadow
8. Using magic wand Click inside frame window
(wand settings below)
Layers palette/right click group raster 2/add a new raster layer
Selections/select all
selections/modify/expand 8
From spring mini kit 2 select paper 2
Re-size it 20%
Edit/copy. Edit/paste into selection on your image
Selections select none

9. Select your tube Edit/copy
Edit/paste as new layer below Frame Layer
Re-size as needed. I re-sized 60%
Apply same drop shadow center in frame
10. From spring mini kit 4 Select Frame round (pink)
Edit/copy Edit/paste as new layer above frame
Re-size it 15%
Then re-size 90%
Apply same drop shadow
Arrange it evenly around the other frame
11. From spring mini kit Select Leaves 4 Edit/copy
Edit/paste as new layer into your image
Re-size 15%
Apply same drop shadow
Move to top right side of frame
12. Layers palette/right click leaves/duplicate 2 times
Move one duplicate to the bottom left side of frame
Image/mirror it
Image/flip (the other duplicate)
13. From Spring Mini kit 2 select Flower 2 Edit/copy
Edit/paste as new layer into your image
Re-size 40%
Apply same drop shadow
Move to top right side of frame over leaves
14. Layers palette/ right click duplicate 1 time
Image/flip
15. From Spring Mini kit 2 select flower 3_2
Edit/copy Edit/paste as new layer into image
Re-size it 35%
Apply same drop shadow
Place in center of other two flowers
16. Layers palette/right click the flower/duplicate 1 time
Move duplicate to left bottom side on top of leaves
17. From Spring kit select String blue Edit/copy
Edit/paste as new layer into your image
Re-size it 20%
Apply same drop shadow
Place 0n top of the frame
18. From Mini kit 3 select string 2 Edit/copy
Edit/paste as new layer into your image
Re-size it 20%
Apply same drop shadow
Place at the bottom of the frame
19. Apply your text now.
20. I used my crop tool and cropped in close to my mask.
21. Re-size your image all layers smart size
To size you would like it
I re-sized my width to 475 height will adjust
22. Add a new layer apply watermarks and copy rights
Then save your image in your desired format.
Thanks for trying my tutorial I hope you enjoyed it.
I now put all my stationary tutorials in Incredimail letter form
you have to join my group to access them HERE
we also offer weekly challenges
If You use my tutorials in Stationary Please apply Credit Below
Tutorial by Babs C
HERE or HERE
You can copy and paste the above if that does not work use Links below
http://groups.yahoo.com/group/sassynsimple/
http://groups.yahoo.com/group/ourpsphideaway/
I want to thank My Testers Marsha and Ruth for testing my tutorials.
©SassynSimple Tutorials

Edit/paste as new layer below Frame Layer
Re-size as needed. I re-sized 60%
Apply same drop shadow center in frame
10. From spring mini kit 4 Select Frame round (pink)
Edit/copy Edit/paste as new layer above frame
Re-size it 15%
Then re-size 90%
Apply same drop shadow
Arrange it evenly around the other frame
11. From spring mini kit Select Leaves 4 Edit/copy
Edit/paste as new layer into your image
Re-size 15%
Apply same drop shadow
Move to top right side of frame
12. Layers palette/right click leaves/duplicate 2 times
Move one duplicate to the bottom left side of frame
Image/mirror it
Image/flip (the other duplicate)
13. From Spring Mini kit 2 select Flower 2 Edit/copy
Edit/paste as new layer into your image
Re-size 40%
Apply same drop shadow
Move to top right side of frame over leaves
14. Layers palette/ right click duplicate 1 time
Image/flip
15. From Spring Mini kit 2 select flower 3_2
Edit/copy Edit/paste as new layer into image
Re-size it 35%
Apply same drop shadow
Place in center of other two flowers
16. Layers palette/right click the flower/duplicate 1 time
Move duplicate to left bottom side on top of leaves
17. From Spring kit select String blue Edit/copy
Edit/paste as new layer into your image
Re-size it 20%
Apply same drop shadow
Place 0n top of the frame
18. From Mini kit 3 select string 2 Edit/copy
Edit/paste as new layer into your image
Re-size it 20%
Apply same drop shadow
Place at the bottom of the frame
19. Apply your text now.
20. I used my crop tool and cropped in close to my mask.
21. Re-size your image all layers smart size
To size you would like it
I re-sized my width to 475 height will adjust
22. Add a new layer apply watermarks and copy rights
Then save your image in your desired format.
Thanks for trying my tutorial I hope you enjoyed it.
I now put all my stationary tutorials in Incredimail letter form
you have to join my group to access them HERE
we also offer weekly challenges
If You use my tutorials in Stationary Please apply Credit Below
Tutorial by Babs C
HERE or HERE
You can copy and paste the above if that does not work use Links below
http://groups.yahoo.com/group/sassynsimple/
http://groups.yahoo.com/group/ourpsphideaway/
I want to thank My Testers Marsha and Ruth for testing my tutorials.
©SassynSimple Tutorials