©SassynSimple Tutorials
Date Written: Dec 31, 2010
PROGRAMS NEEDED
Paintshop or Corel Program
PLUGINS Xenoflex 2 constellations
ANIMATION SHOP
ITEMS YOU NEED
TUBE: of your I used Ray Leaning PTU I bought it at MPT
I have a license for this tube
KIT: Scrap and Tubes PTU Kit HERE
FONT: Of your choice I used Galaxy 1 FTU at 1,000 fonts
READ BELOW BEFORE STARTING
Settings may differ slightly depending on your version.
Close original after you copy it unless I state otherwise.
Sharpen all re-sized items 1 time.
RE-SIZE only one layer unless other wise stated.
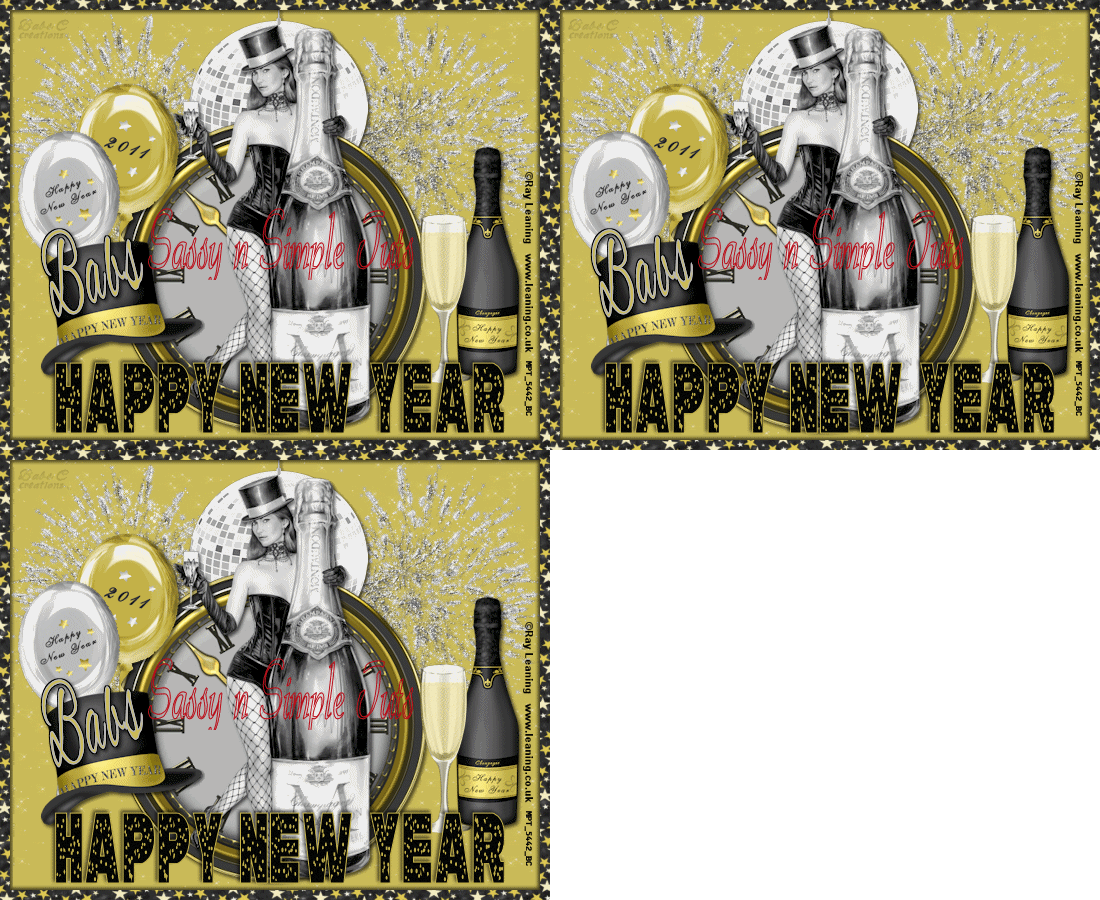
Refer to my image for placement of items.
Left click and right click refers to mouse buttons.
Now Lets Start
1. Select your Tube minimize it for now
2. Open a new transparent image 550x450
Selections/Select all
Keep selected
3. Select Paper 5 from Kit Edit/copy
Edit/paste into selection on your image
Selections/select none
4. Select fireworks 2 from kit Edit/copy
Edit/paste as new layer into image
Re-size 50%
Move to top right side
leave room on side and top for border
5. Still on fire works
Layers palette/right click duplicate 1 time
Image/mirror
Right click duplicate/merge/merge down
Do not add drop shadow
6. Select Disco ball from kit Edit/copy
Edit/paste as new layer into image
Re-size it 50%
Center it in image
7. Still on disco ball
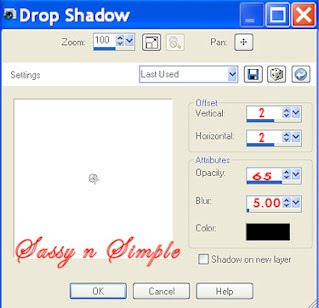
Effects/3D/drop shadow
Settings/below
9. Select clock from the kit Edit/copy
Edit/paste as new layer into your image
Re-size it 85%
Apply same drop shadow
Center it image
10. Select your Tube Edit/copy
Edit/paste as new layer into your image
Re-size as needed I re-sized 80%
Apply same drop shadow
Center in it in the clock
11. Select bottle of champagne from kit
Edit/copy
Edit/paste as new layer into your image
Re-size it 45%
Apply same drop shadow
Move to right bottom side of clock
12. Select the champagne glass
Edit/copy
Edit/paste as new layer into your image
Re-size it 45%
Apply same drop shadow
place it next to champagne bottle
13. Select balloon 1 from Kit
Edit/copy
Edit/paste as new layer into your image
Re-size it 45%
Apply same drop shadow
Move to right side of clock
14. Select balloon 2 from Kit
Edit/copy
Edit/paste as new layer into your image
Re-size it 45%
Apply same drop shadow
Move below other balloon
15. Select hat 1 from Kit
Edit/copy
Edit/paste as new layer into your image
Re-size it 45%
Apply same drop shadow
Move below the balloons
16. Layers palette right click merged layer
Add new raster layer
Selections/select all
17. Select paper 3 from kit Edit/copy
Edit/paste into selection
Selections/modify/contract 10
Hit delete on your keyboard
Or edit/clear
Selections/select none
18. Apply same drop shadow
Go back apply drop shadow again
But change horizontal and vertical to -2
19. Add your text now.
I used Galaxy 1 font ftu at 1,000 fonts
Gold foreground color/black background color
20. Add new raster layers apply copyrights and watermarks
21. Close off raster 1 and raster 2 by clicking eye
Layers palette right click any layer merge/merge visible
You should have 3 layers now
merged Layer
fireworks raster 2 layer
and background raster 1 layer
22. Open back up all your layers
You can save as jpeg or go on to animation
ANIMATION
Open your animation shop minimize for now
1. In psp right click raster 2 (fireworks) Layer
Duplicate 2 times for a total of 3 layers
2. Starting with copy 2 of raster 2 (top) layer
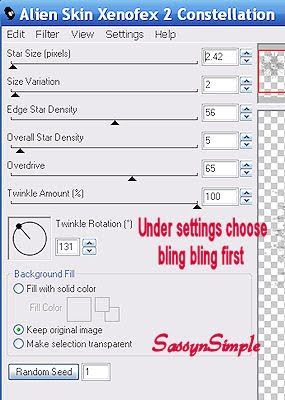
Effects/plugins/Xenoflex 2 constellations
Settings below
After applying click eye close off this layer
3. Select copy of raster 2 (middle layer)
Apply constellations again hit random seed button 1 time
After applying Click the eye and close of this layer
4. Select raster 2 bottom layer
Apply constellations again hit the random seed button 1 time
do not close this layer
5. Edit/copy/copy merged
Take it to Animation Shop
Right click anywhere in workspace paste as new animation
6. Back in PSP click eye close raster 2
Click eye and open copy of raster 2 (middle layer)
Edit/copy/copy merged
Take it to animation shop
Right click first frame paste after current layer
7. Back in PSP click eye close copy of raster 2
Click eye and open copy 2 of raster 2( top layer)
Edit/copy/copy merged
Take it to animation shop
Right click first frame paste after current layer
8. Save your animation I did not change display time
Below is an example of a Background that can be
Made if you would like to make this into a stat.

Thanks for trying my tutorial I hope you enjoyed it.
If You use my tutorials in Stationary Please apply Credit
I really want to thank my Sassy n Simple Group Testers for helping test
This and make it mistake free. They do a wonderful job testing my tutorials.
Marsha
Melody
Linda
Ruth
I now put my Stationary tutorials in Incredimail Letter Form
These can only be accessed by joining My groups below
SassynSimple
Closed to Testers Only
Our PSP Hideaways
Public group hosting weekly challenges
Date Written: Dec 31, 2010
PROGRAMS NEEDED
Paintshop or Corel Program
PLUGINS Xenoflex 2 constellations
ANIMATION SHOP
ITEMS YOU NEED
TUBE: of your I used Ray Leaning PTU I bought it at MPT
I have a license for this tube
KIT: Scrap and Tubes PTU Kit HERE
FONT: Of your choice I used Galaxy 1 FTU at 1,000 fonts
READ BELOW BEFORE STARTING
Settings may differ slightly depending on your version.
Close original after you copy it unless I state otherwise.
Sharpen all re-sized items 1 time.
RE-SIZE only one layer unless other wise stated.
Refer to my image for placement of items.
Left click and right click refers to mouse buttons.
Now Lets Start
1. Select your Tube minimize it for now
2. Open a new transparent image 550x450
Selections/Select all
Keep selected
3. Select Paper 5 from Kit Edit/copy
Edit/paste into selection on your image
Selections/select none
4. Select fireworks 2 from kit Edit/copy
Edit/paste as new layer into image
Re-size 50%
Move to top right side
leave room on side and top for border
5. Still on fire works
Layers palette/right click duplicate 1 time
Image/mirror
Right click duplicate/merge/merge down
Do not add drop shadow
6. Select Disco ball from kit Edit/copy
Edit/paste as new layer into image
Re-size it 50%
Center it in image
7. Still on disco ball
Effects/3D/drop shadow
Settings/below

9. Select clock from the kit Edit/copy
Edit/paste as new layer into your image
Re-size it 85%
Apply same drop shadow
Center it image
10. Select your Tube Edit/copy
Edit/paste as new layer into your image
Re-size as needed I re-sized 80%
Apply same drop shadow
Center in it in the clock
11. Select bottle of champagne from kit
Edit/copy
Edit/paste as new layer into your image
Re-size it 45%
Apply same drop shadow
Move to right bottom side of clock
12. Select the champagne glass
Edit/copy
Edit/paste as new layer into your image
Re-size it 45%
Apply same drop shadow
place it next to champagne bottle
13. Select balloon 1 from Kit
Edit/copy
Edit/paste as new layer into your image
Re-size it 45%
Apply same drop shadow
Move to right side of clock
14. Select balloon 2 from Kit
Edit/copy
Edit/paste as new layer into your image
Re-size it 45%
Apply same drop shadow
Move below other balloon
15. Select hat 1 from Kit
Edit/copy
Edit/paste as new layer into your image
Re-size it 45%
Apply same drop shadow
Move below the balloons
16. Layers palette right click merged layer
Add new raster layer
Selections/select all
17. Select paper 3 from kit Edit/copy
Edit/paste into selection
Selections/modify/contract 10
Hit delete on your keyboard
Or edit/clear
Selections/select none
18. Apply same drop shadow
Go back apply drop shadow again
But change horizontal and vertical to -2
19. Add your text now.
I used Galaxy 1 font ftu at 1,000 fonts
Gold foreground color/black background color
20. Add new raster layers apply copyrights and watermarks
21. Close off raster 1 and raster 2 by clicking eye
Layers palette right click any layer merge/merge visible
You should have 3 layers now
merged Layer
fireworks raster 2 layer
and background raster 1 layer
22. Open back up all your layers
You can save as jpeg or go on to animation
ANIMATION
Open your animation shop minimize for now
1. In psp right click raster 2 (fireworks) Layer
Duplicate 2 times for a total of 3 layers
2. Starting with copy 2 of raster 2 (top) layer
Effects/plugins/Xenoflex 2 constellations
Settings below
After applying click eye close off this layer

3. Select copy of raster 2 (middle layer)
Apply constellations again hit random seed button 1 time
After applying Click the eye and close of this layer
4. Select raster 2 bottom layer
Apply constellations again hit the random seed button 1 time
do not close this layer
5. Edit/copy/copy merged
Take it to Animation Shop
Right click anywhere in workspace paste as new animation
6. Back in PSP click eye close raster 2
Click eye and open copy of raster 2 (middle layer)
Edit/copy/copy merged
Take it to animation shop
Right click first frame paste after current layer
7. Back in PSP click eye close copy of raster 2
Click eye and open copy 2 of raster 2( top layer)
Edit/copy/copy merged
Take it to animation shop
Right click first frame paste after current layer
8. Save your animation I did not change display time
Below is an example of a Background that can be
Made if you would like to make this into a stat.

Thanks for trying my tutorial I hope you enjoyed it.
If You use my tutorials in Stationary Please apply Credit
I really want to thank my Sassy n Simple Group Testers for helping test
This and make it mistake free. They do a wonderful job testing my tutorials.
Marsha
Melody
Linda
Ruth
I now put my Stationary tutorials in Incredimail Letter Form
These can only be accessed by joining My groups below
SassynSimple
Closed to Testers Only
Our PSP Hideaways
Public group hosting weekly challenges