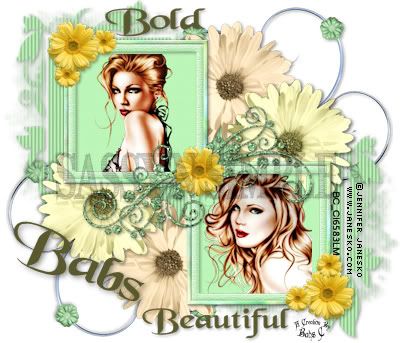
©SassynSimple Tutorials
DIVA
DIVA

To do this Tutorial you need a Paintshop or a Corel program and Animation Shop. You must have a good working knowledge of the programs. Depending on your program settings may vary slightly.
TUBE: Of your choice
I am using Jennifer Janesko she was at CILM when i did this
she is now HERE
KIT: Fantasy Dream FTU tagger Kit Kamilah Fae HERE
MASK: Zuzzanna zuzzanna-mask60 HERE
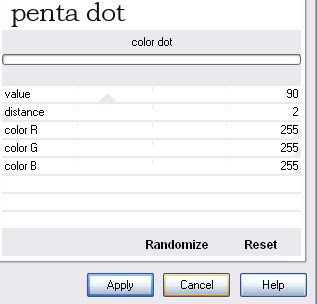
PLUGINS: PENTA DOT
FONT: Of your choice I am using Dafont Holla HERE
Read the following they will not repeated
Always Close original image after you copy unless stated otherwise.
Always sharpen re-sized items one time.
Right click, Left click refers to mouse buttons.
1. Open your Tube and zuzzanna-mask60
minimize them for now.
2. Open a new transparent image 700x700
in foreground color put #efc072 Flood fill the image
(if you use different kit choose a color from it)
This is our working image
3. Layers palette/right click raster 1/add new raster layer
Selections/select all
Select paper 2 from the kit Edit/copy
Edit/paste into selection on working image
Selections/select none
4. Layers New Mask Layer/from Image
Select the zuzzanna-mask60 in the window.
source luminance/checked
Invert mask data/checked click ok.
5. Layers palette/Right click black/white mask
Delete/click yes.
next pop up window comes up select Yes
Right click mask layer Merge/merge group.
6. Select Element 23 frame from the kit Edit/copy
Edit/paste as new layer into your working image
No re-size
Center in mask
7. Effects/3D/drop shadow (settings below)
 8. Select magic wand (settings below) click in mask window
Selections/modify/expand 10
Keep selected

9. Layers palette/right click mask layer/add a new raster layer
Select paper 14 from kit edit copy
Edit/paste into selection on working image
Selections/select none
10. Select your tube Edit/copy
Edit/paste as new layer into your working image
Re-size as needed I re-sized 80%
Apply same drop shadow
Place inside frame window
11. Select element 44 floral from kit Edit/copy
Edit/paste as new layer into your working image above frame
Re-size 70%
Apply same drop shadow
Move to the left side of frame
Layers palette/right click/duplicate 1 time
Adjust if needed
12. Select element 69 wrap from kit edit/copy
Edit/paste as new layer into your working image
Re-size 70%
Move to bottom of frame
13. Select element 38 heart tag from kit edit/copy
Edit/paste as new layer into your working image
No-resize
Apply same drop shadow
Place on left bottom of frame
14. Select element 36 flower from the kit edit/copy
Edit/paste as new layer into your working image
Re-size it 70%
Apply same drop shadow
Move to left side of frame (see image)
15. Select element 75 flower from the kit edit/copy
Edit/paste as new layer into your working image
Re-size it 40%
Apply same drop shadow
Move it below other flower (see image)
16. Select element 35 butterfly from kit edit/copy
Edit/paste as new layer into your working image
Re-size it 50%
Image/mirror
Apply same drop shadow
Place on right side of frame near center
17. Use dropper tool select a color from image
Left click/foreground color
Right click/background color
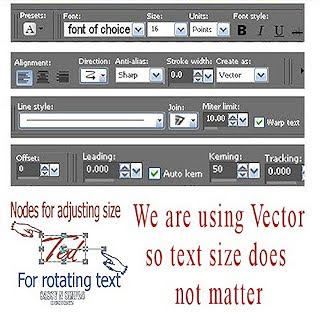
18. Select your text tool (settings below) Type out DIVA
Use nodes to size it to fit at top
Layers palette/right click/convert to raster layer
Select paper 14 from kit edit copy
Edit/paste into selection on working image
Selections/select none
10. Select your tube Edit/copy
Edit/paste as new layer into your working image
Re-size as needed I re-sized 80%
Apply same drop shadow
Place inside frame window
11. Select element 44 floral from kit Edit/copy
Edit/paste as new layer into your working image above frame
Re-size 70%
Apply same drop shadow
Move to the left side of frame
Layers palette/right click/duplicate 1 time
Adjust if needed
12. Select element 69 wrap from kit edit/copy
Edit/paste as new layer into your working image
Re-size 70%
Move to bottom of frame
13. Select element 38 heart tag from kit edit/copy
Edit/paste as new layer into your working image
No-resize
Apply same drop shadow
Place on left bottom of frame
14. Select element 36 flower from the kit edit/copy
Edit/paste as new layer into your working image
Re-size it 70%
Apply same drop shadow
Move to left side of frame (see image)
15. Select element 75 flower from the kit edit/copy
Edit/paste as new layer into your working image
Re-size it 40%
Apply same drop shadow
Move it below other flower (see image)
16. Select element 35 butterfly from kit edit/copy
Edit/paste as new layer into your working image
Re-size it 50%
Image/mirror
Apply same drop shadow
Place on right side of frame near center
17. Use dropper tool select a color from image
Left click/foreground color
Right click/background color
18. Select your text tool (settings below) Type out DIVA
Use nodes to size it to fit at top
Layers palette/right click/convert to raster layer

19. Still on text effects/pluggins/penta dot (settings below)
20. Still on text
under selections tab do all of the following..
A. select all,
B. select float.
C. Select defloat.
D modify expand 2
Keep selected.
21. Layers palette right click/add a new raster layer under text
Use dropper tool select a light color in foreground color
Flood fill selection on working image
Selections/select none
Apply same drop shadow.
22. Repeat step 17 and 18 to add words on tag
If you want to add your name repeat steps 18 through 21
23. Image add border 5 (use dropper select dark color
Image add border 5 use dropper select light color
Image add border 5 use dropper select same dark color
24. Re-size your image so that width is 400 height will adjust
All layers/smart size
25. Apply your watermarks and copyrights
Then save your image
I hope you enjoy doing my Basic Steps
I want to thank the testers of Babs SassynSimple TagsnTuts for helping to make them mistake free.

20. Still on text
under selections tab do all of the following..
A. select all,
B. select float.
C. Select defloat.
D modify expand 2
Keep selected.
21. Layers palette right click/add a new raster layer under text
Use dropper tool select a light color in foreground color
Flood fill selection on working image
Selections/select none
Apply same drop shadow.
22. Repeat step 17 and 18 to add words on tag
If you want to add your name repeat steps 18 through 21
23. Image add border 5 (use dropper select dark color
Image add border 5 use dropper select light color
Image add border 5 use dropper select same dark color
24. Re-size your image so that width is 400 height will adjust
All layers/smart size
25. Apply your watermarks and copyrights
Then save your image
I hope you enjoy doing my Basic Steps
I want to thank the testers of Babs SassynSimple TagsnTuts for helping to make them mistake free.