Showing posts with label ST PATTYS. Show all posts

Wednesday, March 13, 2013

PATTY'S LASS


©SassynSimple Tutorials

 Patty's Lass
Date Written: March 13, 2012

PROGRAMS YOU NEED
You are responsible for finding things you need to do this tutorial.
You will need a good working knowledge of the programs I use.
Paintshop or Corel Program 

ITEMS YOU NEED
 Thank all of you whose items I used to make this tag.
I do appreciate the use of them.

TUBE: Of  your Choice. I used a tube by Misticheskay at Pic for Designs
  You must purchase this tube, I have a license for it.
KIT:  Creative Misfits Kitz St Pattys HERE
MASK: Yez mask070 HERE
FONT: Of your choice I used Tipbrush Slanted from Da Fonts

READ BELOW BEFORE STARTING
Settings may differ slightly depending on program you use I use x2
Close original after you copy it unless I state otherwise.
RE-SIZE only one layer and sharpen once if needed
Left click and right click refers to mouse buttons.
Refer to my image for placement of items.

Now Lets Start

1.  Select your Tube and mask minimize them for now

2. Open a new 700x600 transparent image
in Material palette open foreground  color
paste #b49d45 into the HTML box
Using flood fill tool, fill your layer

3.  Layers/new mask layer/from Image
Select Yez mask070 in the window
(see other settings below)
Click Ok

4 Layers palette/right click mask/merge/merge group
re-size the mask 105%
 make sure all layers is unchecked

5.  Select feather from the kit edit/copy
Edit/paste as new layer into your image
Do not Re-size
image/mirror
Move to top left side of your mask

6. Effect/3D/Drop Shadow
(see settings below)
Click OK

7.  Select tag from the kit edit/copy
Edit/paste as new layer into your image
Re-size 60%

8. Image/free rotate 20.00 left no boxes checked
Apply same drop shadow
Leave centered in image

9.  Select flower 2 from the kit edit/copy
Edit/paste as new layer into your image
Re-size 50%
Apply same drop shadow
Move to top left side of tag

10. Select heart 4 from the kit edit/copy
Edit/paste as new layer into your image
Re-size 60%
Apply same drop shadow
Place it below your flower

11.  Select umbrella from the kit edit/copy
Edit/paste as new layer into your image
Re-size 60%
Image/mirror
Apply same drop shadow
Move to top right side of mask

12. Select key from the kit edit/copy
Edit/paste as new layer into your image
Re-size 60%
Apply same drop shadow
Move to left side of your heart

13. Select basket from the kit edit/copy
Edit/paste as new layer into your image
Re-size 60%
Apply same drop shadow
Move to bottom right side of tag

14.  Select your tube edit/copy
Edit/paste as new layer into your image
Re-size as needed I re-sized mine 60%
Apply same drop shadow
Center in image

15. Select the frog from the kit edit/copy
Edit/paste as new layer into your image
Re-size 30%
Apply same drop shadow
Move to the bottom right side of image

17. Select the hat from the kit edit/copy
Edit/paste as new layer into your image
Re-size 30%
Apply same drop shadow
Move to left bottom side of your tube

18. Select curly string 2 from the kit edit/copy
Edit/paste as new layer into your image
Re-size 70%
Apply same drop shadow
Move to bottom of image bow should be in the center

19. Add your text  

20. Re-size your image if you wish to all layers Smart Size.
I re-sized mine 500 width height will adjust

21. Add a New Layer apply copyrights and watermark
Then save your Image in png format

Thanks Marsha and Ruth for testing my tutorials.
I appreciate it very much.

When using my tutorials for Stationary
Please add a credit in your footer.
With a link back to where my tutorial is located.


©SassynSimple Tutorials

Saturday, April 30, 2011

POT OF GOLD

POT OF GOLD
©SassynSimple Tutorials
Date Written: Feb 28, 2011

PROGRAMS NEEDED
Jasc Paintshop or Corel Program

ITEMS YOU NEED
TUBE: Of your choice I used Pinuptoons which I purchased at CDO
I have a license for this tube
KIT: By Felice Original FTU With a Little Luck HERE
FONT: Of your choice
MY SUPPLIES: HERE

READ BELOW BEFORE STARTING
Settings may differ slightly depending on your version.
Close original after you copy it unless I state otherwise.
Sharpen all re-sized items 1 time.
RE-SIZE only one layer unless other wise stated.
Refer to my image for placement of items.
Left click and right click refers to mouse buttons.

Now Lets Start

1. Select your Tube and Open The BBD_2011_Mask_08 from my supplies
minimize them for now
I included the texture needed in case your program does not have it
Install it into your texture folder in your programs texture folder.

2. Open a new transparent image 600x600
Flood fill with white
We will re-size this later

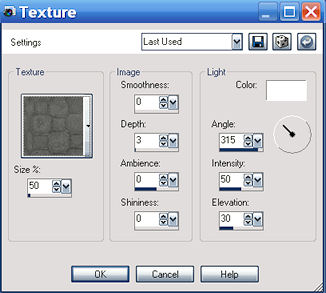
3. Effects/Texture Effects/Texture
Select Cobblestone (settings below)
Click OK

4. Layers palette/right click raster 1 add a new raster Layer
Selections/Select all
Select Paper FOGold from kit Edit/copy
Edit/paste into selection
Selections/select none

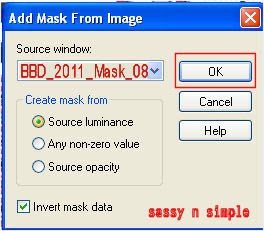
5. Layers/new mask Layer/from image
(settings Below)

Click OK

6. Layers palette/right click black/white mask
Delete
Would you like this mask merged into layer below YES
Layers palette/right click top mask/ merge/merge group
Now Re-size Mask Layer 95% smart size. One layer


7. Effects/3D Effects/Drop Shadow
(settings below)

Click OK

8. Select FOFrameShamrocks from the kit Edit/copy
Edit/paste as new layer into your image
Re-size it 65%
Move down slightly
Apply same drop shadow

7. Select FONetGreen from the kit Edit/copy
Edit/paste as new layer into your image
Re-size it 20%
Apply same drop shadow
Place on right side of frame

9. Select FOHorseshoe from the kit Edit/copy
Edit/paste as new layer into your image
Re-size it 40%
Image/free rotate 15.00 right boxes unchecked
Apply same drop shadow
Place on right bottom side of frame *see my image

10. Select FOPotofGold from the kit Edit/copy
Edit/paste as new layer into your image
Re-size it 40%
Apply same drop shadow
Move to left bottom side of frame

11. Select your Tube Edit/copy
Edit/paste as new layer into your image
Re-size as needed, I re-sized 80%
Apply same drop shadow
Place in center of frame

12. Select FOGoldCoins from the kit Edit/copy
Edit/paste as new layer into your image
Re-size it 50%
Apply same drop shadow
Move to right bottom side of image *see my image
Do not close the original will need it again

13. Still on coins layer
Layer palette/right click duplicate 1 time
Image/mirror

14. Select FOCloverFlowers from the kit Edit/copy
Edit/paste as new layer into your image
Re-size it 45%
Apply same drop shadow
Move to left bottom side of frame *see my image

15. Layers palette/duplicate the clover flowers 1 time
Image/mirror

16. Select FOGoldCoins from the kit Edit/copy
Edit/paste as new layer into your image
Re-size it 40%
Apply same drop shadow
Place in center of the clover flowers

16. Layers palette/add a new raster Layer
Selections/select all
Select FO Shamrock paper from the kit
Edit/copy Edit/paste into selection

17. Selections/modify/contract 8
Hit delete on keyboard or Edit/clear
Selections/select none
Apply same drop shadow.

18. If you wish re-size your image now all layers smart size
I re-sized mine 500x500

19. Apply your text Now

20. Add a new raster layer apply copyrights and watermarks

21. Save your image as jpeg


Thanks for trying my tutorial I hope you enjoyed it.

I really want to thank my Sassy n Simple Group Testers for helping test
This and make it mistake free. They do a wonderful job testing my tutorials.

Marsha
Linda
Ruth

I now put my Stationary tutorials in Incredimail Letter Form
These can only be accessed by joining my public group below
Our PSP Hideaways
we also have weekly challenges in this group

If You use my tutorials in Stationary Please apply Credit


Saturday, February 27, 2010

LADY LUCK TUT 29

©SassynSimple Tutorials
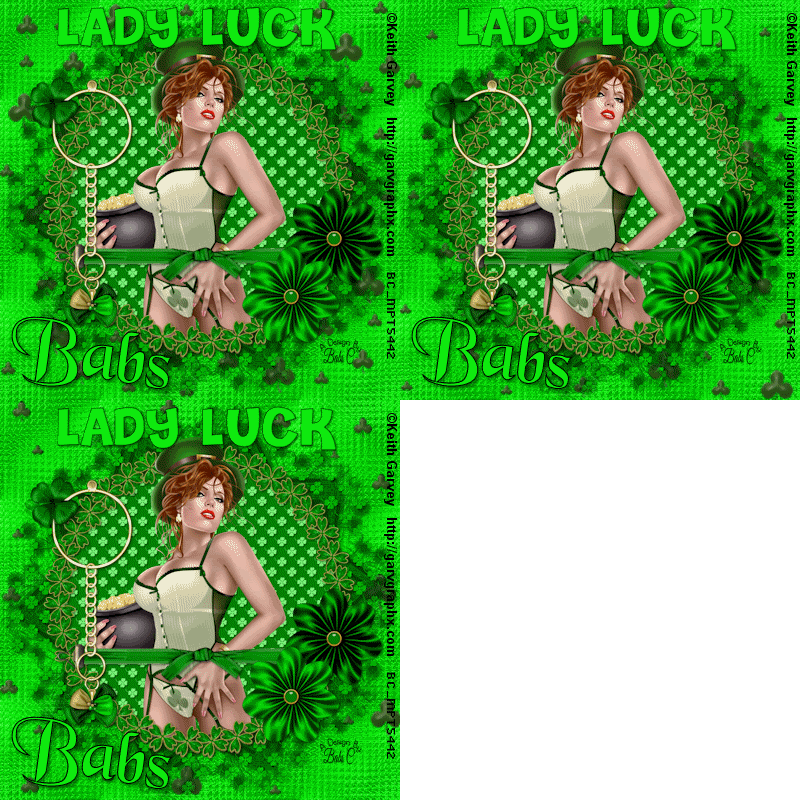
LADY LUCK
DATE WRITTEN: Feb 27, 2010


To do this Tutorial you need a Paintshop or a Corel program and Animation Shop. You must have a good working knowledge of the programs. Depending on your program settings may vary slightly.

TUBE: Keith Garvey was at MPT but you can buy it HERE
KIT: Fantasy Moments FTU Tagger ST Patty HERE
MASK: Essex Girl sg_braid-star page 24 HERE
FONT: Of your choice
MY SUPPLIES: Clover Floaties HERE

Read the following they will not repeated
Always Close original image after you copy unless stated otherwise.
Always sharpen re-sized items one time.
Right click, Left click refers to mouse buttons.
Let's Begin Now

1. Open Tube, and the sg_braided-star minimize for now.

2. Open a new transparent image 700x700
Selections/select all
Select paper 12 from the kit Edit/copy
Edit/paste into selection
Selections select none

3. Add a new raster layer
Selections/select all.
Keep selected

4. Select Paper 1 from the kit. Edit/copy
Edit/paste as new layer into your working image
Selections/select none

5. Layers New Mask Layer/from Image
Select the mask in the window.
source luminance/checked
Invert mask data/checked click ok.

6. Layers palette/Right click black/white mask
Delete/click yes.
next pop up window comes up select Yes
Right click mask layer Merge/merge group.

7. Select Element 77 (frame) from the kit edit/copy
Edit/paste as new layer into your working image
Re-size it 85%

8. Effects/3D/Drop Shadow (settings Below)

9. Select magic wand (settings below) Click inside the frame
Selections/modify/expand 18
Keep selected
10. Add a new raster Layer under your frame layer
Select Paper 2 from the kit, Edit/copy
Edit/paste into selection
Selections/select none

11. Select your tube, edit/copy
Edit/paste as new layer into your working image
Re-size as needed I did not re-size
Apply same drop shadow
Center in your frame

12. Select your selection tool (settings below)
Click on frame layer and draw a rectangle around the bottom of frame
Edit/copy
Keep selected

13. Add a new raster layer above your tube layer
Edit/paste into selection
Selections/select none
Now your frame should be hiding the bottom part of your tube.

14. Select Element 13 (ribbon) from the kit Edit/copy
Edit/paste as new layer into your working image
Re-size it 50%
Place towards the bottom of frame (see image)

15. Select elements 36 and 37 from the kit Edit/copy each one
Edit/paste as new layer into your working image
Re-size them 40%
Apply drop shadow
Place on right bottom corner of frame

16. Select element 71 (charm) from the kit Edit/copy
Edit/paste as new layer into your working image
Re-size it 50%
Apply same drop shadow
Place on left side of frame

17. In your foreground color Select the color black
In your background color use dropper tool and select a color from
The image.

18. Select your text tool (settings below) Type out Lady Luck
Size with your nodes
Layers palette/right click/convert to raster layer
Apply drop shadow.

19. If you want to add your name repeat step 18 I used a different text
For my name.

20. Re-size all layers/smart size 400 width height will adjust.

21. Add your copyrights and water mark

22. Close off the background layer
Layers palette/right click/merge/merge visible
Open up your background layer

ANIMATION
open your Animation Shop


1. Open the Clover floaties in my supplies in your animation shop
Click first clover frame Edit/copy

2. Back in Psp add a new raster layer above your background layer
Selections/select all
Edit/paste into selection your clover floaties should now be in this layer
Selections/select none

3. Back in Animation shop click on clover frame 2
Edit/copy

4. Back in Psp add a new raster layer above the clover floatie layer
Selections/select all
Edit/paste into selection your clover floaties should now be in this layer
Selections/select none

5. Back in Animation shop click on clover frame 3
Edit/copy

6. Back in Psp add a new raster layer above the clover floatie layer
Selections/select all
Edit/paste into selection your clover floaties should now be in this layer
Selections/select none

7. Now close off the middle and top clover floatie layer
Edit/copy/copy merged
Take to animations shop and paste as new animation

8. Back in PsP close off bottom floatie layer open middle floatie layer
Edit/copy/copy merged
Take it to animation shop right click first frame/paste after current frame.

9. Back in PsP close off middle floatie layer open top floatie layer
Edit/copy/copy merged
Take it to animation shop right click second frame/paste after current frame.

10. In Animation shop click first frame
Edit/select all/right click frame/frame properties change display time to 20

11. Save your animation

I hope you enjoy doing my Basic Steps

I want to thank the testers of Babs SassynSimple TagsnTuts for helping to make them mistake free.